Showing posts with label cookies. Show all posts

Sunday, November 30, 2014

Brownie Cookie Sandwich with Salted Caramel


For the past several years I have made it an annual tradition to bake holiday treats and distribute them to my close friends and family. At first I started off small, but by now the box has grown to include more goodies. Of course I always try to improve upon the previous year and use the month or so leading up to the holidays to test recipes for potential new additions to the box.

Last year, I tried a few recipes but ultimately was not satisfied with any of them so I left the box the same as the year before. It contained cranberry bliss bars, berry crumb bars, chocolate crinkle cookies, and almond biscotti. I felt as though I was missing some sort of treat in the "caramel" category but couldn't settle on anything to fulfill it.

So for the past few weeks I have been once again testing nutty/caramel recipes, trying to find something new to include in this year's box. In order to get more opinions, I have gotten in the habit of bringing my baked goods to work and seeing my coworkers' reactions. The first item I tried to make was a pecan pie thumbprint cookie. Although it tasted good, I was not satisfied with the filling-to-dough ratio so for the next batch I reworked it into more of a mini pecan tartlette. This time the filling was much more prominent and I felt the caramel and nut combination stood out.

Then I came across a recipe saved on my browser that I had found months ago but had not yet tested. It was for a cookie that resembled the taste of a brownie, with dulce de leche sandwiched in the middle. You know those two-bite brownies sold in the paper bags at most grocery stores...well believe it or not but these cookies taste exactly like them! The cookie was flaky on the outside and chewy on the inside, simply the perfect bite. Rather than use dulce de leche, I just substituted the salted caramel sauce that I had already made for the previous treats but the result was fantastic.

As soon as I took a bite I knew this cookie was exactly what I was looking for, especially with the slightly salty caramel to offset the rich chocolate, and it fit the bill for the holiday box. Unfortunately, since I already have the chocolate crinkle cookies and two chocolate cookies is too much, I think it will have to replace them. So once again I am faced with a dilemma whether to try and find yet another new recipe, probably something with nuts, or to just swap out the chocolate cookies and leave the box with only four types of treats. I still have a few weeks to decide and test some more recipes.

Brownie Cookie Sandwich with Salted Caramel
Note: This recipe makes about 30 sandwich cookies, 60 cookies overall.
  • 300 grams bittersweet chocolate
  • ½ cup (8 tbsp) unsalted butter, cut into pieces
  • ¾ cups flour
  • ½ tsp salt
  • ½ tsp baking powder
  • 3 large eggs
  • 1 cup sugar
  • 2 tbsp brown sugar
  • 2 tbsp cocoa powder
  • 1 tsp vanilla
  1. Using a double broiler, combine the butter and chocolate and melt over low heat until completely smooth and thickened. Set aside.
  2. Sift together the flour, salt, and baking powder and set aside.
  3. Combine the eggs, sugars, and cocoa powder and mix on medium-high speed until the mixture has doubled in volume and becomes very thick, about 4-5 minutes.
  4. Reduce the speed to medium and the melted chocolate. Continue to mix until well combined. Mix in the vanilla.
  5. Reduce the speed to low and add the flour mixture. Mix just until the flour is incorporated.
  6. Drop spoonfuls of the batter onto a parchment-lined baking tray. The cookies don't spread too much so they can be spaced closely together and flattened if you want them bigger.
  7. Bake for 10 minutes at 350 degrees Fahrenheit. The tops of the cookies should look cracked but inside they will be slightly soft and under-baked.
For the salted caramel:
Note: This makes more than enough caramel for the cookies so there will be plenty of extra. Another option is to use dulce de leche as the original recipe suggests.
  • 1 cup sugar
  • 6 tbsp butter (salted or unsalted), cut into pieces
  • ½ cup heavy cream
  • ½-1 tsp fine sea salt
  1. Heat the sugar in a medium, heavy-bottomed saucepan over medium heat. Stir constantly with a rubber spatula. The sugar will start to form clumps and eventually melt into a thick amber-colored liquid.
  2. Once the sugar is completely melted, immediately add the butter. Be careful because the caramel will start to bubble rapidly.
  3. Stir the butter into the caramel until it is completely melted, about 2-3 minutes.
  4. Very slowly, drizzle the cream into the pan while whisking. Once again, watch out for the bubbling and splatter.
  5. Allow the mixture to boil for one minute then remove from the heat and stir in ½-1 teaspoon of salt, depending on how pronounced you want the taste.   
  6. Cool the caramel before straining into a container. Can be stored for two weeks in the refrigerator tightly sealed.

To assemble the cookies: Place half the cookies flat side up. Warm the caramel if directly from the fridge so it is more spreadable (but let it cool and thicken a little as well). Add a teaspoon or so of caramel to one cookie half and top with another. 

Monday, March 31, 2014

Chocolate Chip Cookie Dough Cupcakes


In addition to making Nutella bomb cupcakes for my birthday Whistler trip with friends, I also made these cookie dough filled cupcakes. Ever since I made chocolate dulce de leche cupcakes back in January, I have been craving making another filled cupcake. I decided that between the two types that I made for my birthday at least one should have a filling.

This recipe was definitely more work than the average cupcake because it involved baking the cupcakes, making the filling, chilling the filling before cutting holes into the cupcakes and stuffing them, and finally frosting the cakes. I wish I could say that these cupcakes were truly amazing and worth all of that effort but the truth is that they were just okay. Personally, I felt that they were a little too sweet and I enjoyed the Nutella bomb cupcakes more. However my friends enjoyed both which just goes to show that everyone has different tastes. Regardless, I had a great time celebrating my birthday with my friends and I hope it was just the beginning of a great year to come.

Chocolate Chip Cookie Dough Cupcakes
Note: The original recipe was for 24 cupcakes, however I cut it in half and made only 12. The recipe below reflects the amounts I used. The original recipe can be found here.

For the cupcakes:
  • 1½ cups (16 tbsp) unsalted butter, room temperature
  • ¾ cups light brown sugar, packed
  • 2 large eggs
  • 1⅓ cups flour
  • ½ tsp baking powder
  • ½ tsp baking soda
  • ¼ tsp salt
  • ½ cup milk
  • 1 tsp vanilla extract
  • ½ cup chocolate chips 
  1. Combine the flour, baking powder, baking soda, and salt in a medium bowl. Stir together to blend and set aside.
  2. Beat the butter and brown sugar together on medium-high speed until light and fluffy, about 3 minutes.
  3. Mix in the eggs one at a time, beating well after each addition and scraping down the sides of the bowl as needed.
  4. Add the dry ingredients to the mixer bowl on low speed, alternating with the milk, beginning and ending with the dry ingredients, mixing each addition just until incorporated. 
  5. Blend in the vanilla and fold in the chocolate chips with a spatula.
  6. Divide the batter evenly in a well-greased or cupcake lined pan . Bake for 18-20 minutes at 350 degrees Fahrenheit, or until a toothpick inserted in the center comes out clean. 
  7. Allow to cool in the pan 5-10 minutes, then transfer to a wire rack to cool completely.
For the filling:
  • 2 tbsp unsalted butter, room temperature
  • 3 tbsp light brown sugar, packed
  • ½ cup + 1 tbsp flour
  • 3½ oz sweetened condensed milk
  • ¼ tsp vanilla extract
  • 2 tbsp mini chocolate chips
  1. Cream the butter and sugar in a mixing bowl on medium-high speed until light and fluffy, about 2 minutes. 
  2. Beat in the flour, sweetened condensed milk and vanilla until incorporated and smooth. 
  3. Stir in the chocolate chips. Cover with plastic wrap and refrigerate until the mixture has firmed up a bit, about an hour.
For the frosting:
  • ½ cup (8 tbsp) unsalted butter, room temperature
  • ¼ cup light brown sugar, packed
  • 1 cup powdered sugar
  • ⅓ cup flour
  • ¼ tsp salt
  • 1 tbsp milk
  • 1 tsp vanilla 
  1. Beat the butter and brown sugar together until creamy. 
  2. Slowly beat in the powdered sugar until smooth. 
  3. Beat in the flour and salt, then mix in the milk and vanilla until smooth and well blended.
To assemble:
  1. Cut a cone-shaped portion out of the center of each cupcake. Fill each hole with a chunk of the chilled cookie dough mixture.
  2. Remove the tip from the cupcake cones and press each top back onto the cupcake.
  3. Frost the cupcakes and sprinkle with some mini chocolate chips for garnish.

Thursday, October 24, 2013

Cookies and Cream Cupcakes


When I first started this blog I had created a goal for myself to write at least three posts a month. In the recent months since graduating from university and starting work as a registered nurse I haven't been able to keep up with my blogging. In addition to the fact that I'm busy, I'm also more picky than I used to be in regards to recipes that I consider "blog worthy". That's not to say that I haven't been cooking and baking, or trying out new recipes, I'm just more aware of the time and effort it takes for me to blog about them therefore I make sure that I strongly feel I should write a post about it before I start taking lots of pictures and investing my time in the recipe.

That being said, a few weeks ago one of my very good friends was celebrating her birthday and I helped her husband organize the food for the party. Together with one of her best friends (whose name also happened to start with the letter "N") we made bite-sized party foods including many appetizers and desserts. We joked around that we could call ourselves "N & N Catering" because, apart from a few items, we pretty much made all of the food.

I made three savory items and one dessert: mini pizza bites, mushroom tartlettes with cranberries and
feta cheese, and veggie wraps. For the dessert I made full-sized cookies and cream cupcakes featuring an Oreo cookie half at the bottom of each one, in addition to Oreo bits mixed throughout the batter.

Throughout the party, and afterward too, both of us "N's" received many compliments and thanks for our food. I told everyone that I had a great time preparing everything and it was even more enjoyable knowing that I was doing it for such a good friend. Even though we met not too long ago in nursing school, I feel so close to her and that she understands me so well. I hope that this is just the beginning of a lifelong friendship and that we will have many more great memories to share together.

Cookies and Cream Cupcakes
Note: This recipe makes 24 standard sized cupcakes. I don't tend to like too much frosting on my cupcakes therefore I had a lot of extra and will probably make only half next time, but I have posted the full recipe below.

For the cupcakes:
For the frosting:
  1. Line the wells of two cupcake pans with 24 paper liners (these cupcakes can't be made without liners because of the Oreo bottoms). 
  2. Place an Oreo halve in the bottom of each liner, cream side up. 
  3. In a medium bowl, combine the flour, baking powder and salt. Stir together and set aside. 
  4. In the bowl of an electric mixer, beat the butter and sugar together on medium-high speed until light and fluffy, about 2 minutes. 
  5. Blend in the egg whites one at a time, beating well after each addition. Add the vanilla extract. 
  6. With the mixer on low speed, beat in half of the dry ingredients just until incorporated. Add the milk and beat just until combined, then mix in the remaining dry ingredients. 
  7. Gently fold in the chopped Oreos with a rubber spatula until evenly incorporated, being careful not to over-mix.
  8. Divide the batter evenly amongst the prepared paper liners and bake for 18-24 minutes at 350 degrees Fahrenheit. Rotate the pans halfway through to ensure even baking. The cupcakes are ready when a toothpick inserted into the center comes out clean (a little hard to judge if you accidentally poke through an Oreo chunk).  
  9. Allow the cupcakes to cool for 10 minutes in the pans before transferring to a wire rack to finish cooling.
  10. To make the frosting: combine the cream cheese and butter in the bowl of an electric mixer and beat on medium-high speed until smooth, about 1 minute. Blend in the vanilla extract. 
  11. Beat in the powdered sugar on low speed until incorporated and smooth, 1-2 minutes, then increase the speed to medium-high and whip for 4 minutes until light and fluffy, scraping down the sides of the bowl as needed.

Monday, June 24, 2013

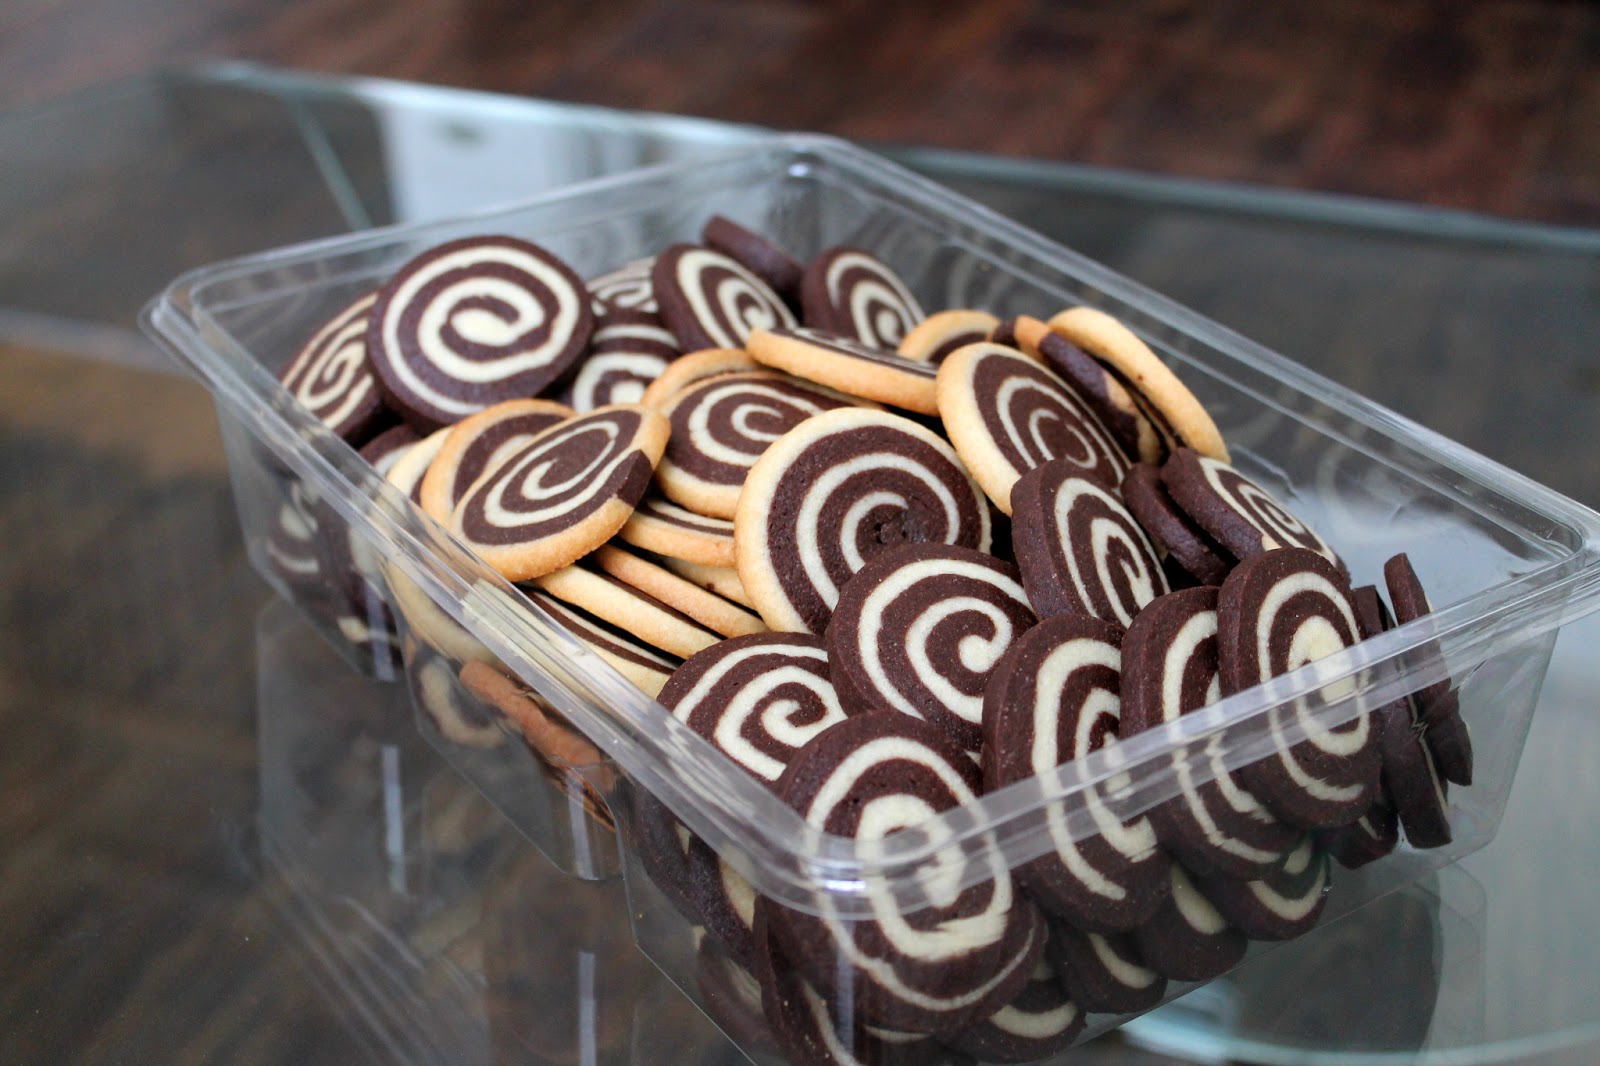
Chocolate Pinwheel Cookies


For the past four years there has been established a much loved tradition in our Russian community of celebrating Father's Day with a giant picnic. Due to scheduling conflicts with the main organizer, this year's picnic was actually postponed and we all celebrated Father's Day one week later. The picnic has a lovely way of bringing together many of the smaller groups into one large gathering and everyone looks forward to it every year.

The picnic is held in a rather potluck style, with each family bringing what they can. There is usually a vast array of salads, meats, fruits, and dessert. Basically it's one big food fest with occasional drinking, singing along to guitar songs, soccer games, card playing, and general merriment.

When I came across this recipe last week I thought it would be fun to bring to the picnic since these cookies look very visually appealing. Granted rolling the dough out was a little time consuming since it had to be done six times (three for each flavor) but once that was out of the way the rest was a breeze.

I split the task into two days, making the dough and shaping it into logs the night before the picnic and then slicing and baking the cookies the next morning. I have never made a "slice-and-bake" cookie dough before but having done it now I can see why it is so appealing; the preparation of the dough can be done well in advance and then frozen into logs. Then, once you're ready, you simply slice the log into cookies and bake. Best of all, you don't have to bake the whole log at once...you can decide to make as many or as few as you want at the given moment.

Although the cookies featured a chocolate and vanilla dough the taste of the chocolate was quite strong, therefore the cookies simply tasted like chocolate cookies. However the pinwheel design was quite intriguing and earned many "oohs" and "aahs" from those at the picnic. They were definitely a hit and enjoyed by young and old alike.

Chocolate Pinwheel Cookies
Makes approximately 100 palm-sized cookies.
  • 1¼ cups butter, slightly softened
  • 1¼ cups sugar
  • 1 egg
  • 1 tsp vanilla extract
  • 3 cups flour
  • ½ tsp salt
  • ¼ tsp baking soda
  • 2 tbsp strong coffee, cooled
  • 4 tbsp unsweetened cocoa powder
  • 4 oz (112 g) bittersweet chocolate, melted and still warm
  1. In a large bowl cream the butter for 2 minutes until smooth.
  2. Mix in the sugar and beat for an additional 2 minutes.
  3. Add the egg and vanilla and beat until well combined.
  4. Sift in the flour, salt, and baking soda and mix until just combined.
  5. Remove 2 cups of the dough and set aside.
  6. Add the cooled coffee and cocoa powder to the remaining dough.
  7. Mix in the melted chocolate until well combined.
  8. Divide each dough into three equal pieces, so as to have 3 chocolate and 3 vanilla.
  9. Shape each piece into a 5×5 square on wax or parchment paper, top with another piece of wax or parchment, and the roll each square into a 7×7 square. (The dimensions don't have to be 100% accurate, just make sure to roll the dough out to be thin and approximately the same size). Refrigerate for 15 minutes.
  10. Take one vanilla square and one chocolate square and remove one piece of waxed paper from each. Align the two layers together evenly, one on top of the other, and gently press to seal both layers together.
  11. Take off top layer of wax paper and slowly start to curl edge of the dough up and over using the bottom waxed paper for help, not rolling it into the cookies.
  12. Roll the dough into a tight spiral roll, pinwheel, avoiding spaces in-between.
  13. Once formed, gently but firmly roll back and forth to compact the roll and make it about 9 inches long, 1½" thick. Cover in plastic wrap, twisting ends to seal it closed. Repeat with remaining layers.
  14. Refrigerate for 3 hours before using or freeze for up to two months.
  15. Once ready to bake slice the cookie log into ¼" thick cookie slices and lay out onto a parchment-lined cookie sheet. The cookies won't spread too much so don't worry about spacing them too far apart.
  16. Bake for 12-14 minutes at 350 degrees Fahrenheit and transfer warm cookies to wire rack to cool.

Thursday, March 7, 2013

Peanut Butter and Chocolate Cookies


I haven't baked cookies in a while and when I saw this recipe it instantly appealed to me because it promised for the softest cookies ever. Also I thought they looked cool with the light and dark combination of peanut butter and chocolate.

Between the two cookie halves I preferred the chocolate side to the peanut butter and I think that in the future I might just make the chocolate part as its own cookie. However it was fun to bite into the cookie directly in the middle and experience both flavors at once. My family was surprised when I made them and said they could eat all of them, meaning I wasn't baking them for any event or meeting but rather just for us to enjoy. Granted with two different cookies squished together they turned out much larger than my usual cookie but indulgence is nice every once in a while.

Peanut Butter and Chocolate Cookies
Note: This recipe makes 3 dozen very large cookies.

For the chocolate dough:
  • ½ cup unsalted butter, softened to room temperature
  • ½ cup sugar
  • ½ cup brown sugar
  • 1 large egg
  • 1 tsp vanilla
  • 1 cup flour
  • ½ cup + 2 tbsp cocoa powder
  • 1 tsp baking soda
  • ½ tsp salt
  • 2 tbsp milk
  • 1 cup chocolate chips
  1. Cream the butter and sugars together with a hand or stand mixer on medium speed until light and fluffy. 
  2. Beat in the egg and vanilla until combined, scraping down the sides of the bowl as needed. 
  3. In a separate bowl, combine the flour, cocoa powder, baking soda, and salt. 
  4. Slowly mix the dry ingredients into the wet ones. With a spoon or rubber spatula, mix in the milk and then fold in the chocolate chips. 
For the peanut butter dough:
  • ½ cup unsalted butter, softened to room temperature
  • ½ cup brown sugar 
  • ¼ cup sugar
  • 1 large egg
  • ¾ cup creamy peanut butter
  • 1 teaspoon vanilla extract
  • ½ teaspoon baking soda
  • 1¼ cups flour
  • ¼ teaspoon salt
  • 1 cup dark chocolate chips
  1. Cream the butter and sugars together with a hand or stand mixer on medium speed until light and fluffy.
  2. Mix in the peanut butter, egg, and vanilla, in that order, and scrape down the sides as needed.
  3. Slowly mix in the baking soda and flour. Then fold in the chocolate chips. 
To Assemble:
Note: I found it easiest to roll out all of the chocolate balls first, then the peanut butter, and then to put them together.
  1. Allow both doughs to chill in the refrigerator for 1-2 hours to make assembly easier.
  2. Measure out about 2 tbsp of each dough and roll into a ball. 
  3. Squish the two balls together and roll into one large ball. Repeat with the remaining dough and place the cookies about 2" apart on a parchment-lined cookie sheet.
  4. Bake the cookies for 11-13 minutes at 350 degrees Fahrenheit or until they start to crack on top. They may still look a little under baked but it is important to take them out of the oven and leave them on the tray as they will continue to bake and "set up".

Sunday, December 9, 2012

Holiday Treats


For the past few years I have made a habit out of putting together little boxes filled with holiday treats for my family. At first I started off small...a box filled with chocolate truffles. Then the following year I added to it with some chocolate crinkle cookies and berry crumb bars. This year I decided to swap out the truffles and add cranberry bliss bars and almond biscotti.

It was definitely a big undertaking to bake so much in a relatively short time period but I broke it up over two days and it all worked out. I will admit that at one point the kitchen looked quite disastrous with many different mixing bowls, ingredients, measuring cups, and baking trays spread out everywhere. Luckily my mom helped me with the packaging and she also tied up the boxes very nicely for me.

Everyone in my family was quite appreciative of the treats and I received many thanks and compliments. I can honestly say that I love the holiday season and the general joyfulness that can be felt everywhere. Therefore I love to do my part to spread the holiday cheer and brighten everyone's holidays just a touch more. Happy Holidays :)

Tuesday, December 4, 2012

Almond Biscotti


The idea of making biscotti has truthfully never been quite appealing to me because it seemed like a time consuming process. This, coupled with the fact that most members of my family aren't huge biscotti fans anyway, led me to ignore most biscotti recipes I have seen in the past.

Last summer, however, one of the things I learned to make during my trip to Italy was this biscotti. The recipe was very easy and actually not as time consuming as I thought; although the biscotti had to bake twice each time was only fifteen to twenty minutes. Also because the loaves were sliced while still hot from the first baking they were actually very easy to cut into pieces, unlike my delicious but difficult to slice fruit and nut crisps.

During my trip to Italy I not only picked up some new recipes but I also brought back some ingredients, one of which was Italian baking soda. When I first showed this to my mom she scoffed and questioned my need to buy specific baking soda from Italy. "Isn't ours good enough?" she asked me. Although there is nothing wrong with our baking soda I was fascinated by the fact that the one we used in Italy already had vanilla mixed into it, therefore no additional vanilla extract had to be added to the biscotti.

Up until last week my Italian baking soda had been sitting, unopened, in the kitchen cupboard. Finally I put it to use when I baked these biscotti. I think the person most surprised by the biscotti was my mom; she did not expect the biscotti to still be soft and chewy rather than hard like a rock as is typical of biscotti sold in stores here. Also she enjoyed the fact that each bite held a new "surprise" as she called it with the chunks of chocolate, almonds, hint of cinnamon, orange, and lemon. I was glad she enjoyed it so much, in addition to the rest of the family, and I think I will be baking it again soon for my holiday treat boxes.

Almond Biscotti
Note: Although I used my special Italian baking soda I was provided with a recipe that uses regular baking soda and vanilla, which is reflected below.
  • 1 cup whole almonds, lightly toasted
  • 4 oz (112 g) chocolate, roughly cut into chunks
  • 1 orange, zested
  • 1 lemon, zested
  • ½ cup unsalted butter, melted
  • 1 cup sugar + extra for sprinkling
  • 3 large eggs, lightly beaten
  • 1 tsp almond extract (can be substituted with almond liquor)
  • ½ tsp cinnamon
  • ¼ tsp salt
  • 1½ tsp baking soda
  • 2¾ cups flour
  • 1 egg white
  1. In a large bowl combine the melted butter, sugar, orange and lemon zests. Add the vanilla and almond extract (or liquor).
  2. Mix in the beaten eggs and almonds.
  3. In a separate bowl sift together the flour with the cinnamon, salt. If working with liquor add the baking soda last to the dough, right before the chocolate, otherwise sift with the other dry ingredients.
  4. Add the dry ingredients to the wet and mix together until a dough forms. Using your hands, work in the chunks of chocolate into the dough.
  5. Split the dough in half and form into two long logs about 3" wide. Lay the logs onto a large baking sheet covered in parchment or wax paper. Make sure to leave space between the logs as they will widen as they bake.
  6. Pat down the logs so they have a flat surface and use a pastry brush to spread the egg white over top. Generously sprinkle sugar over the surface.
  7. Bake the biscotti for 15-20 minutes at 400 degrees Fahrenheit or until the tops of the logs start to crack and become a light golden color. 
  8. Remove from the oven and cut diagonally into long pieces while still warm. The best way to do this is to cut straight down rather than use a sawing motion. 
  9. Lay the cut pieces, cut side facing up, back on the tray and return to the turned off but still warm oven for 15-20 minutes. If you like the biscotti softer take them out sooner, if you like them crunchier leave them in for longer.

Saturday, September 22, 2012

Macarons (Again)


I know that I have already blogged about macarons back when I made them for my friend's birthday at the end of April, but I feel like I should post an update. The truth of the matter is that since that time in April I tried to make macarons again for a baby shower and they turned out to be a total flop. However last week my mom and I attended a macaron making class at a local French cafe and I learned some new techniques.

I have to admit that I attend a lot of these "how-to" cooking classes but rarely do I actually learn new things, usually because I have already experimented so much on my own. I can happily say that this time was different and I definitely learned a lot...starting with how not to be afraid of my Kitchen Aid. Although I love my wonderful Kitchen Aid stand mixer dearly I am still hesitant to use it when it comes to whipping items such as egg whites for meringue or cream for whipped cream. After a few unsuccessful attempts I basically gave up and use my hand mixer instead, relying on the Kitchen Aid for less delicate things like cake batters, cookies, and doughs.

Despite my fear of the Kitchen Aid I saw how easily the teacher used it in our class to whip the egg whites and I wanted that confidence for myself. I intensely grilled her about everything related to the mixer, such as how long to go on each speed, and carefully observed the changes in consistency as she increased speeds. I asked so many questions in such great detail that at some point another person in the class asked if I owned a bakery. My mom laughed when she heard this and was quick to point out that although we did not technically own a bakery she sometimes felt as though we did given my frequency of baking for various occasions.

The macarons we made in class were of course picture perfect...exactly what you would expect from a bakery. As can be seen in the picture, they all had beautiful smooth tops and perfect little feet. We made two varieties, pink and purple, and two different butter cream fillings; raspberry-vanilla for the pink macarons and lemon-lavender for the purple ones. My mom was not thrilled with the lavender filling because she said it reminded her of body wash and made her feel like she was eating soap.

Obviously I wanted to test all of the new things that I learned at home and luckily for me I was invited to a birthday party the following week. I specifically went to a special kitchen store to buy the food coloring that we used in our class, a gel-based color that would not interfere with the moisture content of the macaron shells. Even after coming off my third eight hour clinical shift in a row (PS 5 AM wake-ups are no fun) I was too excited to try making the macarons.

My macarons did not turn out as picture perfect as the ones we made in class but they were definitely an improvement on my previous attempts. Initially I had some problems with getting the oven temperature just right for the first batch of red shells; this resulted in a tray of cracked shells. With the yellow ones I had the right temperature but I had not mixed the batter enough and therefore the shells came out a little bumpy on top instead of smooth. Nonetheless, I was extremely proud of the shells I baked and, more importantly, for getting over my fear of my Kitchen Aid.

Macarons
Note: This recipe makes about 40 shells, 1" in diameter. I highly suggest drawing out a template and placing it underneath the parchment paper in order to be able to pipe all the shells into equal sizes.
  • 120 grams egg whites, room temperature
  • 40 grams granulated sugar
  • 140 grams ground almonds
  • 240 grams icing sugar
  • Optional: Gel-based food coloring
  1. In the bowl of an electric mixer, whisk the egg white on medium speed until frothy. Add the granulated sugar and then whisk on full speed for 6-8 minutes. Note: this may seem like a long time but it really is necessary for the egg whites to be shiny and stiff therefore 6 minutes is a minimum. If desired, add food coloring about 3-4 minutes in, scraping the bowl as necessary.
  2. Meanwhile, sift the icing sugar and ground almonds together in a bowl then add to the stiffened egg white mixture with a rubber spatula. 
  3. Mix the batter by folding from the bottom up and around the sides (called macronnage) but try not to overmix. The mixture should fall back on itself and form ribbons at the bottom of the bowl.
  4. Pipe out 1" sized circles onto a baking tray lined with parchment paper, leaving about ½" between the macarons as the batter will spread. Once the tray is full, tap the tray a couple of times on the counter to release air bubbles and then let the tray sit on the counter for at least 20 minutes before baking.
  5. Once ready, bake at 325 degrees Farenheit for 10-11 minutes. I recommend trying a small test batch to check your oven for the right time and temperature. If your oven has a hot spot you might want to turn the tray 180 degrees halfway through to ensure even baking. 
  6. Allow the macarons to cool completely (I really do mean completely) before removing them from the parchment paper otherwise they will stick. 
  7. The macarons can be filled and stored in an airtight container in the freezer for 2-3 months. To defrost place them on the counter with the lid to the container removed to prevent condensation.
Butter Cream Filling
Note: For my macarons I used a raspberry vanilla butter cream for the red shells and a lemon butter cream for the yellow shells. I used ⅔ cup sugar and ½ cup butter for each filling and still had leftovers.

There are a variety of flavors that macarons can be filled with. To make a simple butter cream filling use the ratio of ¾ cup butter to 1 cup of icing sugar and then add whatever flavor you desire. Just make sure the butter is at room temperature.

Possible suggestions:
  • Vanilla (2 tsp vanilla extract)
  • Raspberry Vanilla (1 tsp vanilla extract, 1 tbsp raspberry jam)
  • Lemon (2 tbsp lemon zest, 1 tbsp lemon juice)
  • Chocolate (35 grams chocolate, melted and cooled)
Beat the butter and icing sugar until light and fluffy and pale in color. Add whichever flavor you are using and continue to beat until incorporated. Leftover butter cream can be stored in an airtight plastic bag (like a Ziploc freezer bag) for 2-3 months.

Tuesday, September 11, 2012

Chocolate Fudge Oatmeal Cookies


Last week was the first week of school and I officially went to my last first day of undergraduate classes. I can't believe that in eight months I will have graduated from university and be on my way to working as a nurse! In the midst of all the first week excitement our nursing undergrad society had our first meeting since going on break. Obviously I did not pass up on the opportunity to bring a yummy treat and decided to bake these chocolate fudge oatmeal cookies.

Needless to say my mother and brother were disappointed when they learned the cookies were not for them, though I did save a few and gave them some. The cookies were extremely chocolatey as one would imagine with almost a cup of cocoa powder. Although highly sticky and hard to handle I think the end result was worth it. I'll probably make them again soon, no doubt for one of the upcoming bake sales I have agreed to participate in.

Chocolate Fudge Oatmeal Cookies
Note: This recipe makes about 40 small 2" cookies.
  • 2 cups rolled oats
  • 1 cup sugar
  • ¾ cup cocoa powder
  • ¼ tsp salt
  • 1 tsp vanilla
  • ½ cup olive oil
  • 4 egg whites
  1. In a large bowl combine the oats, sugar, cocoa powder, and salt.
  2. In a separate bowl combine the vanilla, olive oil, and egg whites.
  3. Add the dry ingredients to the wet and mix well to combine. Refrigerate the mixture for at least 30 minutes, though longer is better, to make it easier to handle.
  4. Plop mounds of dough onto a baking tray covered with parchment paper. The cookies should be about 2" in size and you can use your hands to flatten them out. The cookies will not spread so don't worry about spacing them too far apart.
  5. Bake at 350 degrees Fahrenheit for 12-14 minutes or until the edges are crisp and the centers look set. Remove from the oven and cool for 5 minutes on the tray before moving to a wire rack to finish cooling. The cookies will continue to harden on the tray and as they cool.

Tuesday, July 17, 2012

Gluten Free Almond Cookies


After much talk and anticipation I finally went over to Victoria on Vancouver Island this past weekend to see where one of my good friends grew up. It was a great weekend spent at her parent's condo and touring the city. Even though I had been to Victoria before the last time was for a school field trip ten years ago so I really didn't remember too much. My friend took me out on her boat on Saturday and then showed me downtown Victoria on Sunday. I even tried water skiing...though I was not very successful.

As soon as I found out we were going to be staying with my friend's parents I immediately knew that I wanted to bake something and bring it over as a sign of my appreciation for their hospitality. My friend's father has celiac disease, meaning he cannot eat foods containing gluten. Unfortunately that also means that he cannot eat anything that contains wheat, such as pasta, bread, and cookies. There are of course special flours that can be used, such as rice or amaranth flour, but since I don't own any and didn't want to specially purchase it I decided to stick with ingredients already in my pantry. Nut flours are relatively easy to make and use and therefore I focused on recipes calling for nut flours using almonds or walnuts.

I actually found several recipes for gluten-free almond cookies, some even with chocolate or peanut butter, but I decided to pick this one because I needed cookies that could withstand a hot day in my car prior to the trip over to the island. I'm glad to say these cookies did not disappoint; they held up to the heat and transported well and retained a nice softness and moisture. My friend's family thoroughly enjoyed the cookies and her dad ate several during the weekend. In fact her mother even asked me for the recipe which made me feel quite happy. I promised her that I would write a post about the cookies and past it on. Overall I had a great weekend and I'm so glad to have been welcomed in such a friendly manner. Hopefully I will visit again and maybe next time I'll be able to get up on the water skis!

Gluten Free Almond Cookies
Makes about 25 small cookies.
  • 2 cups ground almonds
  • 3/4 cup powdered sugar
  • 1 egg white
  • 1/4 tsp almond extract
  • Whole almonds (for decorating)
  1. Combine the ground almonds and powdered sugar and set aside.
  2. In a medium-sized bowl whip the egg white and almond extract until frothy and starts to form soft peaks. Do not beat into stiff peaks.
  3. Gradually beat the egg mixture into the nut/sugar mix until a stiff paste forms.
  4. Roll into balls about 2" in size and place about an inch apart on baking sheet lined with parchment paper. Flatten the cookies slightly and press a whole almond into the center of each cookie.
  5. Bake for 11-13 minutes at 350 degrees Fahrenheit or until the bottoms become golden. They will still look pale but do not over bake otherwise they will not stay soft. Remove from the oven and allow the cookies to cool on the baking pan and become firm before transferring to a plate.

Monday, April 30, 2012

Macarons

 
A long time ago, when I first started this blog, I set a personal goal for myself to have at least four posts a month. Most months I do end up having more but I told myself that four is the minimum. Well, this past weekend I was scrambling trying to figure out a recipe I could make, take pictures, and write about within a very short time frame. The challenge was made even more difficult by the fact that my parents went away for the weekend and borrowed my camera. Fortunately, they returned on Sunday in time for me to meet my month's end deadline and photograph the macarons I made.

Now about those macarons...let's just say I gave it my best effort, twice. It was my friend's birthday on Sunday and, as per usual, I wanted to bake something for her. I decided to make macarons because 1) I knew she loved them and would enjoy them 2) I had been wanting to try making them for quite some time and 3) she knows they are difficult to make and would appreciate the effort.

Macarons, not to be confused with macaroons (little fluffy coconut cookies) are the latest food trend along with cake pops. They come in a variety of flavors with and can be paired with virtually and filling. The challenge is to bake the shells with pristine tops and the coveted little "feet" at the bottom. I knew from reading many online blogs that macarons were no easy feat and that they can frustrate even the most accomplished of bakers. However I was determined to at least try it once, if only to be able to say I've done it.

I downloaded an excellent tutorial which is available for free here. The blogger wrote out a wonderful pdf, complete with step-by-step pictures, that explains how to make macarons. She also has a section devoted to troubleshooting, also with pictures of common problems, and then goes into detail on how to alter the basic macaron recipe to produce different types and flavors. I highly recommend downloading the document because it is very detailed and by far the best tutorial I have seen out there.

One of my few perfect macarons, complete with little "feet"
The first attempt I made was with the basic macaron recipe. Although the shells turned out with "feet", some of them were hollow inside. According to the tutorial this was a sign of over-mixing my batter. Normally it's hard to tell whether the macarons will turn out right until you bake them, but I had a feeling they weren't quite right because my batter was quite liquidy. My second attempt was with chocolate shells, but this one wasn't perfect either because only a few of the shells ended up with "feet" and most of them had cracked tops, also a sign of over-mixing.

Although my shells did not turn out perfect, I don't regret the experience or the results. I ended up filling the regular macarons with lemon curd and the chocolate ones with nutella. Both tasted good, though I preferred the regular ones because the almond taste was more noticeable in the shells compared to the strong chocolate taste of the other ones.

When my friend came over I presented her a nicely decorated box filled with both types as well as her other birthday gifts. I could tell she really enjoyed the macarons because she said they were delicious and she ate about three of each type while we sat and chatted. My parents and brother also tried them and agreed that they tasted great. Even though I want to eventually one day make perfect macarons, for now I will settle for less-than-perfect yet still yummy ones instead.

Macarons
Note: This is the recipe on how to make basic shells. I highly recommend downloading the document described above as it gives great instructions and also variations. This recipe makes about 100 shells, or 50 filled macarons.
  • 1 cup almond flour
  • 1 1/2 cups powdered sugar
  • 3  large egg whites
  • 2 tbsp granulated sugar
  1. In a large bowl, sift together the almond flour and powdered sugar and set aside.
  2. Using a whisk or hand-held electric mixer, whip the egg whites on low speed.
  3. Once the egg whites start to become frothy and meringue-like, add the granulated sugar.
  4. Continue to whisk/beat until stiff peaks form.
  5. Carefully take half of the dry ingredients and gently, slowly fold into the egg whites until mostly mixed in. It's important to do this slowly so as not to deflate the egg whites too much.
  6. Pour the mixture into the bowl with the remaining dry ingredients and gently fold in until evenly incorporated and no dry specks are left. Try to do this with minimal mixing as that can result in a too-liquid batter.
  7. Once done, fill a pastry bag, or large ziploc bag with the tip cut off, and pipe nickel-sized rounds onto a baking sheet lined with parchment paper. The batter will continue to spread after piping so make sure to leave about half an inch between each round.
  8. Depending on the moisture in the environment, it will take between 30-90 minutes for the shells to develop a "skin" before they can be baked. The shells are ready if you can touch your finger to them and have no batter stick to it.
  9. Once the "skins" have developed, bake the shells for 15-17 minutes, depending on how large they are, at 280 degrees Fahrenheit. You should see them puff up and form little "feet" on the bottom.
  10. Remove from the oven and allow the shells to cool completely before carefully peeling them off the paper. 
  11. Pipe any filling of your choice onto half of the shells and match with a similar sized shell to create a macaron.

Wednesday, March 14, 2012

White Chocolate and Cranberry Oatmeal Cookies


I am part of a council within my undergraduate class and we have regularly scheduled bimonthly meetings. As a person who always looks for opportunities to bake I take advantage of this by always bringing some sort of treat with me, usually in the form of cookies. Seeing as how I'm currently on an "oats" and "granola" kick I thought to make some sort of cookies using my new favorite ingredient.

Unfortunately for me, my morning lecture was cancelled but by the time I found out I had already driven to class and was about to set foot in the building. Because the announcement was posted so late, this actually happened to everyone else as well. My friend and I decided to be studious and use the time to catch up on some readings. I set out all of my things in front of me, cookie tin included, and invited my friend to help herself while we studied. Little did I know that during our study time she would help herself to six cookies! Luckily I had made a lot and there were plenty to go around during the meeting, where she managed to grab another two. She claimed that the white chocolate and cranberry were an award-winning combination and the cookies were highly addictive. At the rate she was eating them I had no choice but believe her.

White Chocolate and Cranberry Oatmeal Cookies
Note: Makes about 45 two inch sized cookies.
  • 1/2 cup (4 tbsp) unsalted butter, softened
  • 1/2 cup sugar
  • 1/2 cup brown sugar, firmly packed
  • 1 egg
  • 1 tsp vanilla
  • 1 cup flour
  • 1 cup oats
  • 1/2 tsp baking soda
  • 1/2 tsp cinnamon
  • 1/4 tsp salt
  • 3/4 cup white chocolate chips
  • 3/4 cup dried cranberries
  1. In a large bowl, whisk together the flour, baking soda, cinnamon, and salt. Set aside.
  2. In a separate bowl, cream the two sugars and butter on medium speed until light and fluffy.
  3. Beat in the egg and vanilla.
  4. Reduce the speed to low and mix in the flour mixture until a cookie dough forms.
  5. Use a spatula or large wooden spoon to mix in the oats, white chocolate chips, and dried cranberries. It might actually be easier to mix it in by hand so that everything is evenly distributed.
  6. Roll the cookie dough into 2" sized balls and place on a greased or parchment-lined baking tray about 2" apart. Bake at 350 degrees Fahrenheit for 10 minutes, until the tops are lightly golden.
  7. Cool for two minutes on the tray then transfer to a wire rack to finish cooling.

Monday, February 27, 2012

Peanut Butter and Banana Cookies


They say that Elvis used to make himself sandwiches with peanut butter and banana...I think the King had a good thing going. I don't know what it is about the combination that is so appealing but it's definitely an indulgent treat to have once in a while. I have made myself the King's famous sandwich before and I have to admit it tasted really good. In fact I remember I used to eat that sandwich on a daily basis during my economics course that I took two summers ago. I have also employed the combination in ice cream and more recently a batch of granola.

A couple of days ago my friend and I were involved in an activity at a local elementary school and afterward she came over to my house for some good old-fashioned fun: baking. Since she has decided to give up chocolate for Lent these cookies seemed like the perfect thing to make (I know that the picture above is deceiving because there are chocolate chips, but we only added them to half the cookies).

Although these cookies taste great, even better the next day, they posed some challenges when we were making them. The peanut butter dough was extremely sticky and the fact that we were using natural peanut butter only made the problem worse. Also, we couldn't use my oven and had to resort to the toaster oven which made the bottoms slightly burnt. After these initial difficulties I wasn't planning on posting the recipe but once I tasted them the second time (the next day) I changed my mind. Even though they are in the shape of cookies I think the texture was more reminiscent of a dense cake or even banana loaf flavored with peanut butter. In addition, my brothers both loved the cookies a lot so I decided to blog about them after all.

Peanut Butter and Banana Cookies
Note: Makes about 15 cookies.
  • 2 ripe bananas, mashed
  • 1/2 cup peanut butter
  • 1/4 cup brown sugar
  • 1/2 cup sugar
  • 1 tsp baking powder
  • 1/8 tsp salt
  • 1 1/2 cups flour
  • Optional: 1/2 cup chocolate chips
  1. In a large bowl mix together the bananas, peanut butter, and sugars.
  2. Add the baking powder and salt.
  3. Mix in the flour in 3/4 cup increments until evenly incorporated. Fold in the chocolate chips if using.
  4. Drop by large spoonfuls onto a greased cookie sheet and flatten the top of each cookie. Bake at 375 degrees Fahrenheit for 11-13 minutes. (Note: The cookies may need to bake a little longer, depending on the size, just make sure to watch for burnt bottoms)

Tuesday, January 17, 2012

Chocolate Almond Florentines


Almost everyone has New Years resolutions and a very common one is weight loss. I myself have included this as one of my resolutions this year, but I'd like to think that I'm coming at it from a practical standpoint. Let's face it: I like to bake. I know myself and I know that I cannot eliminate baking, and therefore consuming baked goods, completely from my life because it is very intrinsic and important part of who I am. However, in light of this and my acknowledgement of such, I know that I can take certain steps to maintain my goal of weight loss and still enjoy baking.

I'm not going to lie and say that these cookies are good for you...they're cookies therefore they contain sugar therefore they are most definitely not healthy. Still, the amount of sugar contained in these cookies is quite minimal compared to many other cookie recipes and that definitely helps. Also, the key is to remember that everything is good in moderation. For example, rather than bake so often I try to release my creative juices through more cooking and less baking, all the while focusing on healthy recipes. In addition, I look for outlets for my baking such as meetings or gatherings I know I will attend where my baked goods will be welcomed. This allows me to fulfill my desire to bake while not being tempted to consume more than I should.

In all honesty, I came across this recipe for florentines prior to the New Year but I hadn't had a chance to make them, despite buying all of the ingredients. Once the New Year hit, I realized that this recipe fit the bill for my new approach to baking and so I decided to bake them last weekend. I must say they are absolutely delicious! The smoky flavor of the almonds is well complemented by the orange and lemon zests. Different family members preferred the plain vs. chocolate dipped variations. I personally enjoyed the plain florentine because the citrus flavor really stood out however my mother and brother, both chocoholics, liked the chocolate florentines better. I found that by dipping only half of the florentine in chocolate the cookie encompassed the best of both worlds.

If you are like me and wanting to lose some weight but can't entirely give up the baked goods I would highly recommend making these florentines. They were easy to make, required few ingredients, and left me with a slightly less guilty feeling after eating them compared to many other cookies.

Chocolate Almond Florentines
  • 1 large egg white, room temperature
  • 1/3 cup powdered sugar
  • 1 3/4 cup sliced almonds
  • Pinch of flaky sea salt
  • Zest of 1/2 an orange
  • Zest of 1/2 a lemon
  • 1/2 cup semi-sweet chocolate, chopped
  1. Combine all of the ingredients except for the chocolate in a large bowl.
  2. Line a large baking sheet with parchment paper and brush very lightly with neutral oil, or spray with cooking spray.
  3. Place heaping tablespoon-sized mounds of the almond mixture onto the baking sheet about 2-3" apart. It helps to dip your hands or the spoon, if using, into cold water so that the almonds don't stick.
  4. Use a fork, dipped in the cold water, to flatten the mounds as much as possible, avoiding gaps in between the almonds.
  5. Bake at 300 degrees Fahrenheit for 10-15 minutes, depending on the size of the cookies. The cookies should be golden brown across the top and will start to give off a smoky smell. 
  6. Cool the cookies for a minute on the baking tray before transferring them to a metal rack to finish cooling and become crispy.
  7. Meanwhile, melt the chocolate in the microwave at 30 second intervals until smooth, mixing in between. 
  8. Once the cookies are crisp, dip half or the entire cookie into the chocolate and return to the wire rack so that the chocolate can harden.

Tuesday, December 20, 2011

Chocolate Crinkle Cookies


It's that time of the year again which means that my holiday baking is in full swing! Every year I try to make some festive treats for friends and family and give them out to celebrate the holidays. Personally, I love this time of year because I love the cheerfulness; I love all of the decorations and the nice songs and the overall tone of the holidays. I know that not everyone can be together with their loved ones but I am grateful that so far I have been lucky enough to have my family surround me every year.

This year I included chocolate truffles and my grandmother's berry crumb bars, also known as "rombiki" in my family, as well as these new chocolate cookies. I had seen many versions of this cookie on tastespotting.com under names such as "chocolate crinkle" or "chocolate crackle" or "chocolate snowball" cookies and I really liked the way they looked. My cookies didn't turn out as white because I don't think I rolled them in enough powdered sugar, but the taste was great regardless.

I actually didn't have a chance to save any for our own household but luckily went I went to my grandmother's a couple of nights later she still had some left so she gave one each to my brother and me. My cousin had previously told me that they kind of reminded her of Timbits, a little doughnut hole treat that is popular here in Canada at the coffee chain Tim Horton's. Although not fluffy like a doughnut, the flavor is definitely reminiscent of the frosted chocolate Timbit. Despite the fact that these cookies seem to be popular during the holidays, I think that I will make them again sometime soon so that I can have more than just the one and the rest of the household can try them too.

Chocolate Crinkle Cookies
Note: This recipe makes about three dozen cookies.
  • 6 oz (180 grams) semisweet chocolate
  • 3/4 cup flour
  • 1/3 cup cocoa powder
  • 1 1/2 tsp baking powder
  • 1/4 tsp salt
  • 1/2 cup butter
  • 1 cup brown sugar, packed
  • 2 eggs
  • 2/3 cup powdered sugar
  1. Using a double broiler, melt the chocolate and set aside to cool.
  2. Whisk together the flour, cocoa powder, baking powder, and salt.
  3. In a large bowl, beat the butter and brown sugar on medium speed until light and fluffy.
  4. Beat in the eggs, then the chocolate.
  5. Reduce the speed to low and mix in the flour mixture.
  6. Once the dough comes together,transfer to the refrigerator and chill for at least 30 minutes, or until it becomes firm enough to handle.
  7. Pour the powdered sugar into a shallow bowl. Roll dough into 2" sized balls then roll very generously in the powdered sugar. Make sure you have a thick coating. Note: The dough will start to melt in your hands; use gloves for easier handling.
  8. Place the cookies on a greased or parchment-lined baking tray spaced about 2" apart. Bake at 350 degrees Fahrenheit for 10 minutes, until the tops are cracked and the centers are almost set. Cool for three minutes on the baking tray before transferring to a wire rack to cool completely

Sunday, November 13, 2011

Alfajores Cookies with Dulce de Leche


These cookies have been in my "to bake" list for so long that I almost can't believe I've finally made them. Months ago, at the start of the summer, I made a tart for my cousin's birthday using dulce de leche which is an Argentinean version of caramel. I prepared my own dulce de leche using sweetened condensed milk and after discovering how easy it was, I decided to look up more recipes that involved the delicious caramel spread. When I typed "dulce de leche" into the search box on my favorite website tastespotting.com, there were close to fifty different recipes for Alfajores, a classic Argentinean tea time cookie. I scrolled through many different variations before I finally picked one to make. Yet somehow, the cookies ended up on the back burner and I kind of forgot about them; not intentionally of course but they kept getting pushed back in favor of other recipes.

Fast forward to this weekend, four months later, and I finally baked the Alfajores. Since my cousin is no longer living in Vancouver, I try to make caramel-focused desserts for his visits because I know how much he loves caramel. Once again, I made my own dulce de leche a day in advance and planned to bake the cookies the next evening. Little did I know that my baking pans would be thwarted by the weather; as I was mixing the cookie dough in my Kitchen Aid mixer the power suddenly shut off. We had been having crazy winds all day and the weather had gotten the best of us. It came back on within a minute and I continued making the dough, but then as I finished it shut off again. Seeing as how my oven is electric I had no hopes for baking the cookies that night.

Instead of baking, I spent the evening playing board games with my brother by candlelight. Unfortunately, he beat me in each game we played (I still haven't figured out how that happened) but we had a great time together. Eventually the power came back on, though way too late for me to bake, so I made the cookies the next morning. The dulce de leche was extremely rich so I decided to make the cookies quite small, about 2" in diameter. They tasted lovely both as a little sandwich and with the two halves eaten separately. All in all, these cookies were a long time in the making but definitely worth it in the end.

Alfajores Cookies with Dulce de Leche
  • 1 can sweetened condensed milk
  • 1 cup corn starch
  • 1 1/4 cup flour
  • 1 tsp baking powder
  • 1/2 tsp salt
  • 1/2 cup (4 tbsp) butter, softened
  • 1/4 cup sugar
  • 1/2 cup powdered sugar
  • 1 tsp vanilla 
  • 2 egg yolks
To make the Dulce de Leche:
  1. Pour out the sweetened condensed milk into a shallow pie plate (I used a glass pyrex). Stir in a few flecks of sea salt and cover with aluminum foil. 
  2. Set the pie plate within a larger pan, such as a roasting pan, and add hot water until it reaches halfway up the side of the pie plate. 
  3. Bake at 425 degrees Fahrenheit for 1 1/2-2 hours, adding more water into the roasting pan if necessary as it evaporates. 
  4. Once the dulce de leche has turned a golden brown, caramelized color remove from the oven and whisk until smooth. Pour into a sealable container and store in the refrigerator until ready to use.
To make the Alfajores:
  1. Sift the cornstarch, flour, baking powder, and salt together. Set aside.
  2. Cream the butter, sugars, and vanilla together until light and fluffy. 
  3. Beat in the egg yolks, one at a time, and mix until incorporated.
  4. On low speed, slowly beat in the dry ingredients and mix until a crumbly dough comes together. If the dough is already crumbly but not sticking together, add a tablespoon of water, but don't overmix the dough.
  5. Roll out the dough on a lightly floured surface to about 1/4" thickness. Cut out round cookies and place on a baking sheet lined with parchment paper. Don't worry about spacing the cookies too much as they do not spread.
  6. Depending on the size of the cookies, bake for 10-15 minutes at 350 degrees Fahrenheit. They should be white, not brown, when removed from the oven. My cookies were 2" and baked exactly 10 minutes.
  7. Place on a wire rack to cool. Once cooled, spread the dulce de leche on the flat side of one cookie and sandwich with another. Dust with some powdered sugar over top.

Monday, October 31, 2011

Caramel Stuffed Apple Spiced Cookies


Last week my friends came over to my house for dinner and afterward we made these cookies. When I first saw the recipe I thought it would be fun to make because it seemed to reflect fall flavors with the apple, cinnamon, caramel combination. I also had an ulterior motive in picking this particular recipe because I knew that my cousin was going to be coming to town and he absolutely loves caramel, therefore I wanted to make something that I could bring to his house when I saw him.

Funny enough my mom, who is not much of a cookie lover, ended up eating the most cookies out of anyone. She said that the texture and flavor reminded her of a type of cookie she used to eat when she was little and asked me to make them again sometime soon, a request I will be sure to follow given her enthusiasm. Overall I would rate the evening and the recipe a success; the cookies ended up being very easy to make and my friends and I had a great time catching up with one another. In fact we got so caught up in our conversation that we forgot to check on the first batch and accidentally left them in a little too long, leading to slightly crispy and burnt bottoms. However the second batch turned out perfect and some people who tried the cookies said that they actually preferred the slightly burnt ones...go figure.

Caramel Stuffed Apple Spiced Cookies
  • 1 cup (8 tbsp) butter, softened
  • 1 cup sugar
  • 1/2 tsp salt
  • 1 box (7.4 oz or 230 g) Spiced Apple Cider drink mix (can be found near the hot chocolate mixes)
  • 2 eggs
  • 1 tsp vanilla
  • 3 cups flour
  • 1 tsp baking soda
  • 1/2 tsp baking powder
  • 1 tsp cinnamon
  • 1 bag  (12 oz or 336 g) caramel soft chews
  1. In a small bowl whisk together the flour, baking soda, baking powder, and cinnamon. 
  2. In a large bowl cream together the butter, sugar, salt, and all 10 packages of apple cider drink mix until light and fluffy.
  3. Beat in the eggs, one at a time, and then mix in the vanilla.
  4. Gradually add the dry ingredients to the mixture until evenly incorporated and a dough forms.
  5. To make it easier to scoop, refrigerate the dough for an hour, though this step can be skipped if you're in a hurry.
  6. Scoop out cookie dough into 2" balls. Flatten the ball slightly in the palm of your hand then press an unwrapped caramel into the center. Seal the dough around it, covering the caramel completely.
  7. Place the cookies on baking sheets lined with parchment paper about 2" apart. Give them plenty of room because they will spread a lot. 
  8. Bake for 12-14 minutes at 350 degrees Fahrenheit or until the cookies are very lightly browned. If using multiple trays, rotate halfway through to ensure even baking. Allow the cookies to cool for 5 minutes on the baking trays before transferring to a wire rack to finish cooling completely.

Monday, September 26, 2011

Cookies and Cream Cookies


Last Friday it was my friend's birthday so I decided to bake her some cookies and bring them with me to school. I set out on Thursday evening to bake these cookies and cream cookies which my brother had been asking me to make for quite some time. The cookies are kind of like chocolate chip cookies, except instead of using chocolate chips there are Oreo bits mixed in. Since we don't normally have Oreo cookies at my house I made the special effort to go to the store and buy some, pleasantly surprised to find they were on sale.

Of course no good deed goes unpunished, or at least in my case without some hiccups. As I was preparing the cookies I happened to be on hold with our cable TV provider due to some problems we were having with our receiver. I left the phone on speaker and carried on about my business, occasionally pausing to listen closely and see if the "on hold music" had stopped without my noticing. I had already been on hold for an hour and a half by the time I put the cookies in the oven. As with most cookies, these ones do not take a long time to bake and I had to rotate the trays halfway through. And that's when it happened...I opened the oven door only to have the handle fall off on one side. At the same time I could tell that I had finally been taken off hold as the phone started eliciting a person's voice saying "Hello, hello?". Frantically I started to yell at the phone while still holding the oven door, trying to make sure that the customer service agent didn't hang up on me and that the oven handle didn't fall off entirely. Acting fast I yelled at my brother to fetch my mom so that she could take over with the oven and I could attend to the phone.

In the end, my mother fixed the oven door and I managed to schedule and appointment for a service technician to come next week and check out our receiver. Somehow, despite the craziness, I still managed to bake the cookies and didn't have to start the process over with a new batch. I'm not going to lie...the cookies weren't the best I've ever made. The taste of the Oreos was quite prominent but other than that they were just regular cookies. However the conditions under which they were prepared were quite amusing and entertaining. I think that a year ago, maybe even a few months ago, I would have found the situation completely frustrating but now I can recognize how hilarious the situation was and just smile and laugh as I recount the story.

Cookies and Cream Cookies
Makes about 30 cookies.
  • 1/2 cup (8 tbsp) butter, room temperature
  • 6 tbsp sugar
  • 6 tbsp brown sugar
  • 1 large egg
  • 1 tsp vanilla
  • 1 1/4 cup flour
  • 1/2 tsp baking soda
  • 1/4 tsp salt
  • 12 Oreos, broken into small pieces
  1. Cream together the butter and sugars until light and fluffy using a mixer on medium speed.
  2. Beat in the egg and vanilla and mix until incorporated.
  3. In a separate bowl, whisk together the flour, baking soda, and salt.
  4. Reduce the mixer speed to low and gradually add the dry ingredients to the wet until just combined.
  5. Gently fold in the Oreo pieces. Shape the dough into small balls, about 1-2" in diameter and place on a ungreased baking tray spaced 1-2" apart.
  6. Bake at 350 degrees Fahrenheit for 8-10 minutes until the edges just start to brown. If using multiple baking trays, rotate halfway through to ensure even baking. Let cool for a couple of minutes on the tray before transferring to a cooling rack to cool completely.

Thursday, August 11, 2011

Berry Crumb Bars


When I was a little girl my grandmother used to make these little cookie-like bars for dessert which we called "rombiki" or "rhombus" when translated. They were named as such because she always cut them in the shape of diamonds. My mom always called the cookies "tzorti" or "grated" because the crumb topping comes from grating part of the dough over top of the berry preserves. Regardless of their name, I used to absolutely love these cookies and would eat them in great quantities whenever my grandma made them.

Every time my grandma made these cookies, she always used the same platter to serve them, stacking them carefully on top of each other in a beautiful way and then sprinkling them with powdered sugar. A couple of months ago, after my grandfather passed away, we were clearing out his house and found the platter on one of the kitchen shelves. After seeing it I was filled with my childhood memories of my grandmother and decided that I wanted to make her cookies and serve them on the platter, just as she would.

I had actually tried making these cookies once before in the past, a long time ago before I became the culinary lover I am today. My friends and I were working on a school project about Russia and the former Soviet Union and we all thought it would be fun to hand out a treat during our presentation. Seeing as my family is Russian it was agreed that I should provide some sort of recipe and I settled on these cookies. Unfortunately, I had great difficulty with the last step in which part of the dough is grated on top of the preserves to create a crumb topping. I don't recall now what exactly the problem was, just that I could not manage to grate the dough no matter how hard I tried. It refused to create a crumb topping and instead broke into large chunks. As far as I remember, my mom came home later that evening and helped me make a new batch which I brought to school the next day.

This time around the rombiki turned out wonderfully! The crumb topping was exactly like I remembered from my grandmother's cookies and the berry preserve to dough ratio turned out just right. I was so proud of myself for making the cookies as my grandma would have and I served them just like she did, minus the powdered sugar, piled beautifully on the exact same platter. I could tell that it reminded my mom of her mother as well and it made me happy that I could inspire good memories amongst my family with my baking. As I served the rombiki I imagined the pride my grandmother would have had knowing that her granddaughter was trying to keep her memory alive, and hopefully the joy she would have felt as well.

Berry Crumb Bars
  • 2 large eggs
  • 1 1/2 cups sugar
  • 1 cup butter, softened and cut into pieces
  • 1 tsp vanilla
  • 3 cups flour
  • 1/4 tsp baking powder
  • 1 large sized jar of preserves, any flavor
  1. In a large bowl beat together the eggs and sugar. Beat in the butter pieces and then vanilla and mix until even and creamy in consistency.
  2. In a separate bowl combine the flour and baking powder. 
  3. Add the dry mixture to the large bowl in 2-3 batches and work into a uniform dough.
  4. Set aside 1/4 of the dough and press the remaining 3/4 onto a 9" x 13" cookie sheet lined with parchment paper. Make sure you press firmly down and distribute the dough evenly across the entire sheet.
  5. Spoon the preserves over the dough so that the entire sheet is covered but not too thickly. You want the layer to be thin enough that you can still see the dough underneath in a translucent fashion.
  6. Grate the remaining dough over top of the layer of preserves. If having difficulty with the grating, add a little more flour to the dough to make it easier to handle and less sticky.
  7. Bake at 350 degrees Fahrenheit for 35-40 minutes, or until the crumb topping starts to develop a light golden color.
  8. Use the parchment paper to lift the entire thing off of the cookie sheet and onto a cutting board. Allow it to rest for five minutes before proceeding to cut it into 2" wide strips lengthwise and then diagonally across. It is the same technique as used for cutting mazurki, which can be found here. It is best to cut it into individual pieces while it is still hot because, although messy, later when the entire sheet sets it hardens and becomes difficult to cut into.