Showing posts with label holiday. Show all posts

Sunday, November 30, 2014

Brownie Cookie Sandwich with Salted Caramel


For the past several years I have made it an annual tradition to bake holiday treats and distribute them to my close friends and family. At first I started off small, but by now the box has grown to include more goodies. Of course I always try to improve upon the previous year and use the month or so leading up to the holidays to test recipes for potential new additions to the box.

Last year, I tried a few recipes but ultimately was not satisfied with any of them so I left the box the same as the year before. It contained cranberry bliss bars, berry crumb bars, chocolate crinkle cookies, and almond biscotti. I felt as though I was missing some sort of treat in the "caramel" category but couldn't settle on anything to fulfill it.

So for the past few weeks I have been once again testing nutty/caramel recipes, trying to find something new to include in this year's box. In order to get more opinions, I have gotten in the habit of bringing my baked goods to work and seeing my coworkers' reactions. The first item I tried to make was a pecan pie thumbprint cookie. Although it tasted good, I was not satisfied with the filling-to-dough ratio so for the next batch I reworked it into more of a mini pecan tartlette. This time the filling was much more prominent and I felt the caramel and nut combination stood out.

Then I came across a recipe saved on my browser that I had found months ago but had not yet tested. It was for a cookie that resembled the taste of a brownie, with dulce de leche sandwiched in the middle. You know those two-bite brownies sold in the paper bags at most grocery stores...well believe it or not but these cookies taste exactly like them! The cookie was flaky on the outside and chewy on the inside, simply the perfect bite. Rather than use dulce de leche, I just substituted the salted caramel sauce that I had already made for the previous treats but the result was fantastic.

As soon as I took a bite I knew this cookie was exactly what I was looking for, especially with the slightly salty caramel to offset the rich chocolate, and it fit the bill for the holiday box. Unfortunately, since I already have the chocolate crinkle cookies and two chocolate cookies is too much, I think it will have to replace them. So once again I am faced with a dilemma whether to try and find yet another new recipe, probably something with nuts, or to just swap out the chocolate cookies and leave the box with only four types of treats. I still have a few weeks to decide and test some more recipes.

Brownie Cookie Sandwich with Salted Caramel
Note: This recipe makes about 30 sandwich cookies, 60 cookies overall.
  • 300 grams bittersweet chocolate
  • ½ cup (8 tbsp) unsalted butter, cut into pieces
  • ¾ cups flour
  • ½ tsp salt
  • ½ tsp baking powder
  • 3 large eggs
  • 1 cup sugar
  • 2 tbsp brown sugar
  • 2 tbsp cocoa powder
  • 1 tsp vanilla
  1. Using a double broiler, combine the butter and chocolate and melt over low heat until completely smooth and thickened. Set aside.
  2. Sift together the flour, salt, and baking powder and set aside.
  3. Combine the eggs, sugars, and cocoa powder and mix on medium-high speed until the mixture has doubled in volume and becomes very thick, about 4-5 minutes.
  4. Reduce the speed to medium and the melted chocolate. Continue to mix until well combined. Mix in the vanilla.
  5. Reduce the speed to low and add the flour mixture. Mix just until the flour is incorporated.
  6. Drop spoonfuls of the batter onto a parchment-lined baking tray. The cookies don't spread too much so they can be spaced closely together and flattened if you want them bigger.
  7. Bake for 10 minutes at 350 degrees Fahrenheit. The tops of the cookies should look cracked but inside they will be slightly soft and under-baked.
For the salted caramel:
Note: This makes more than enough caramel for the cookies so there will be plenty of extra. Another option is to use dulce de leche as the original recipe suggests.
  • 1 cup sugar
  • 6 tbsp butter (salted or unsalted), cut into pieces
  • ½ cup heavy cream
  • ½-1 tsp fine sea salt
  1. Heat the sugar in a medium, heavy-bottomed saucepan over medium heat. Stir constantly with a rubber spatula. The sugar will start to form clumps and eventually melt into a thick amber-colored liquid.
  2. Once the sugar is completely melted, immediately add the butter. Be careful because the caramel will start to bubble rapidly.
  3. Stir the butter into the caramel until it is completely melted, about 2-3 minutes.
  4. Very slowly, drizzle the cream into the pan while whisking. Once again, watch out for the bubbling and splatter.
  5. Allow the mixture to boil for one minute then remove from the heat and stir in ½-1 teaspoon of salt, depending on how pronounced you want the taste.   
  6. Cool the caramel before straining into a container. Can be stored for two weeks in the refrigerator tightly sealed.
To assemble the cookies: Place half the cookies flat side up. Warm the caramel if directly from the fridge so it is more spreadable (but let it cool and thicken a little as well). Add a teaspoon or so of caramel to one cookie half and top with another. 

Friday, December 28, 2012

Cranberry Lemon Squares


It seems as though my holiday break this year has been characterized by a few things, namely cooking and knitting. I have become slightly obsessed with knitting in the past month and have made several scarves as holiday gifts for friends and family. I have fallen into somewhat of a nightly ritual as I sit on the couch each evening watching Friends and knitting yet another scarf. I don’t know exactly how long this new obsession of mine will last…it could just be a passing thing or it could stick like my love of cooking. In any case I am quite proud of the results so far and everyone who received one of my scarves as a gift thanked me with kind words and lots of hugs.

Besides the knitting, I have also been in the kitchen quite a bit these past few weeks. I almost feel like it’s making up for lost time as I was so busy before. Along with cooking and baking some family favorites I have also had the chance to try out some recipes that I had been saving for a while.
One such recipe was for these cranberry lemon squares. I don’t know why cranberries are associated with the holidays considering they taste good year round. Maybe it has to do with the traditional cranberry sauce that most people eat with their holiday turkey this time of year. Regardless of the reason, the extra emphasis on cranberries during the holiday season makes me crave them in my cooking and baking. 

These little squares I baked up the other day were a perfect cranberry treat because of the wonderful combination of flavors. The sweet, buttery, lemon-zested crust was contrasted beautifully by the tartness of the cranberry filling. I greatly enjoyed these squares because they were quite similar to my grandmother’s berry crumb bars, but the fact that there were whole cranberries in the filling gave it an extra pop and burst of flavor in the mouth. Once again another holiday success!

Cranberry Lemon Squares 

For the dough:
  • 3 cups of flour
  • 1 tsp baking powder
  • ¾ cup sugar
  • 1 lemon, zested and juiced (juice reserved for filling)
  • 1 cup, cold unsalted butter, cubed
  • 1 large egg
  • 2-3 tbsp water
  • 1 tsp vanilla 
For the filling:
  • 1 bag fresh or frozen cranberries (about 500 grams)
  • ½ cup sugar
  • Reserved lemon juice
  • 2 tbsp corn starch
  1. Combine the ingredients for the filling and set aside. 
  2. Mix the flour, baking powder, sugar, and lemon zest.
  3. Using a food processor or mixer, slowly mix in the cubed butter pieces. The butter should become coated in the crumbly mixture and become the size of little peas. Don't overmix.
  4. Mix in the egg, vanilla, and a few tablespoons of water. The dough will remain crumbly but it should be easy to clump together.
  5. Press about ¾ of the dough down into a parchment-lined 9" x 13" pan. Spread the filling over top. The cranberries will not cover all of the dough but try to spread them out evenly all over the pan.
  6. Use your fingers to crumble the remaining dough over top of the filling. Don't press it down.
  7. Bake for 30-35 minutes at 375 degrees Fahrenheit or until the dough on top becomes golden.
  8. Remove from the oven and allow to cool to room temperature before slicing.          

Sunday, December 9, 2012

Holiday Treats


For the past few years I have made a habit out of putting together little boxes filled with holiday treats for my family. At first I started off small...a box filled with chocolate truffles. Then the following year I added to it with some chocolate crinkle cookies and berry crumb bars. This year I decided to swap out the truffles and add cranberry bliss bars and almond biscotti.

It was definitely a big undertaking to bake so much in a relatively short time period but I broke it up over two days and it all worked out. I will admit that at one point the kitchen looked quite disastrous with many different mixing bowls, ingredients, measuring cups, and baking trays spread out everywhere. Luckily my mom helped me with the packaging and she also tied up the boxes very nicely for me.

Everyone in my family was quite appreciative of the treats and I received many thanks and compliments. I can honestly say that I love the holiday season and the general joyfulness that can be felt everywhere. Therefore I love to do my part to spread the holiday cheer and brighten everyone's holidays just a touch more. Happy Holidays :)

Tuesday, December 4, 2012

Almond Biscotti


The idea of making biscotti has truthfully never been quite appealing to me because it seemed like a time consuming process. This, coupled with the fact that most members of my family aren't huge biscotti fans anyway, led me to ignore most biscotti recipes I have seen in the past.

Last summer, however, one of the things I learned to make during my trip to Italy was this biscotti. The recipe was very easy and actually not as time consuming as I thought; although the biscotti had to bake twice each time was only fifteen to twenty minutes. Also because the loaves were sliced while still hot from the first baking they were actually very easy to cut into pieces, unlike my delicious but difficult to slice fruit and nut crisps.

During my trip to Italy I not only picked up some new recipes but I also brought back some ingredients, one of which was Italian baking soda. When I first showed this to my mom she scoffed and questioned my need to buy specific baking soda from Italy. "Isn't ours good enough?" she asked me. Although there is nothing wrong with our baking soda I was fascinated by the fact that the one we used in Italy already had vanilla mixed into it, therefore no additional vanilla extract had to be added to the biscotti.

Up until last week my Italian baking soda had been sitting, unopened, in the kitchen cupboard. Finally I put it to use when I baked these biscotti. I think the person most surprised by the biscotti was my mom; she did not expect the biscotti to still be soft and chewy rather than hard like a rock as is typical of biscotti sold in stores here. Also she enjoyed the fact that each bite held a new "surprise" as she called it with the chunks of chocolate, almonds, hint of cinnamon, orange, and lemon. I was glad she enjoyed it so much, in addition to the rest of the family, and I think I will be baking it again soon for my holiday treat boxes.

Almond Biscotti
Note: Although I used my special Italian baking soda I was provided with a recipe that uses regular baking soda and vanilla, which is reflected below.
  • 1 cup whole almonds, lightly toasted
  • 4 oz (112 g) chocolate, roughly cut into chunks
  • 1 orange, zested
  • 1 lemon, zested
  • ½ cup unsalted butter, melted
  • 1 cup sugar + extra for sprinkling
  • 3 large eggs, lightly beaten
  • 1 tsp almond extract (can be substituted with almond liquor)
  • ½ tsp cinnamon
  • ¼ tsp salt
  • 1½ tsp baking soda
  • 2¾ cups flour
  • 1 egg white
  1. In a large bowl combine the melted butter, sugar, orange and lemon zests. Add the vanilla and almond extract (or liquor).
  2. Mix in the beaten eggs and almonds.
  3. In a separate bowl sift together the flour with the cinnamon, salt. If working with liquor add the baking soda last to the dough, right before the chocolate, otherwise sift with the other dry ingredients.
  4. Add the dry ingredients to the wet and mix together until a dough forms. Using your hands, work in the chunks of chocolate into the dough.
  5. Split the dough in half and form into two long logs about 3" wide. Lay the logs onto a large baking sheet covered in parchment or wax paper. Make sure to leave space between the logs as they will widen as they bake.
  6. Pat down the logs so they have a flat surface and use a pastry brush to spread the egg white over top. Generously sprinkle sugar over the surface.
  7. Bake the biscotti for 15-20 minutes at 400 degrees Fahrenheit or until the tops of the logs start to crack and become a light golden color. 
  8. Remove from the oven and cut diagonally into long pieces while still warm. The best way to do this is to cut straight down rather than use a sawing motion. 
  9. Lay the cut pieces, cut side facing up, back on the tray and return to the turned off but still warm oven for 15-20 minutes. If you like the biscotti softer take them out sooner, if you like them crunchier leave them in for longer.

Wednesday, July 4, 2012

Cranberry Bliss Bar


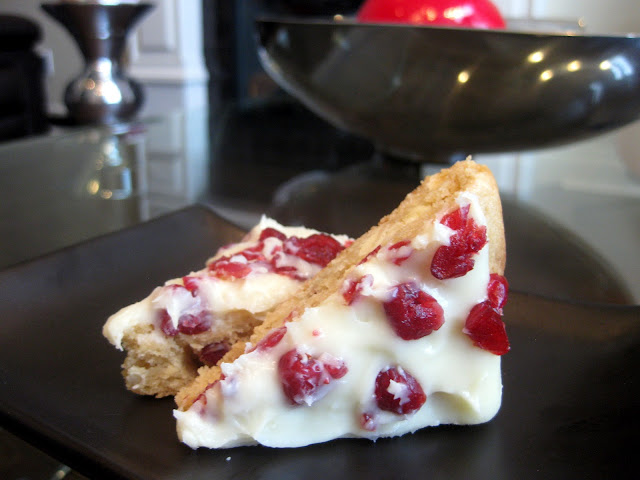
Now I know that it's summertime right now, or at least it should be according to the calendar, but I couldn't resist making this holiday treat. Every year during the holiday season Starbucks brings out some specialty drinks and goodies including the "oh-so-famous" cranberry bliss bar. I have to admit that I have never actually tried the Starbucks version however one of my friends, a fellow baker, has made it a couple of times and every time it's like heaven. The combination of the delicate blondie laced with cranberries and white chocolate then smothered with a cream cheese and white chocolate frosting is absolutely to die for.

After eating my friend's version countless times I asked her for the recipe and she graciously emailed it to me. Granted she actually provided me with the recipe over a month ago but the occasion to bake it had not come up until last night. I had a meeting to go to early this morning and I thought it would be a fun treat to bring along and for everyone to start their day off right. Technically that also meant a huge sugar high in the morning but indulgences are always fun once in a while.

The only annoying part about making the little treats was the last step which involved drizzling melted white chocolate over the bars once they had been frosted. Honestly it was more work than it was worth considering that white chocolate was already in the base of the blondie and mixed into the frosting. Obviously it would have made the bars more aesthetically pleasing but I couldn't make my drizzle turn out right and gave up on it quickly, choosing to spread the remaining white chocolate with a knife instead.

When I brought the treats to the meeting everyone was pleasantly surprised and thanked me for baking them. I distributed the extras amongst my friends afterward and they all loved it too; one friend even said it was like it was made by angels. I also made sure to save a piece for my friend who provided me with the inspiration and the recipe in the first place. Now that I have finally made the bars and have the recipe I'll be sure to whip it out again come holiday time.

Cranberry Bliss Bar
Note: I excluded the part about drizzling the white chocolate over the finished bars but that can be added as a final step if desired using part of the melted chocolate.

For the blondie layer:
  • 3/4 cup (6 tbsp) unsalted butter, melted
  • 1 1/2 cups brown sugar, packed
  • 2 large eggs
  • 3/4 tsp vanilla 
  • 2 1/4 cups flour
  • 1 1/2 tsp baking powder
  • 1/4 tsp salt
  • 1/8 tsp cinnamon
  • 1/2 cup dried cranberries
  • 1 cup white chocolate, chopped (white chocolate chips works too)
For the frosting:
  • 1 8 oz package cream cheese, room temperature
  • 1 cup powdered sugar
  • 100 g white chocolate, melted
  • 1/2 cup dried cranberries, chopped
  1. In a large bowl sift together the flour, baking powder, salt, and cinnamon and set aside.
  2. Cream the butter and sugar until uniform.
  3. Beat in the eggs and vanilla.
  4. Slowly mix in the dry ingredients until evenly incorporated. Stir in the cranberries and white chocolate pieces.
  5. Spread the batter into a well greased 9" x 13" pan and bake at 350 degrees Fahrenheit for 18-21 minutes, or until a toothpick inserted into the center comes out clean.
  6. While waiting to cool, beat the cream cheese and powdered sugar until well blended. 
  7. Gradually add the melted white chocolate and continue to beat until incorporated.
  8. Once the blondie base has cooled completely spread the frosting over top. Sprinkle with the chopped dried cranberries. Cut into squares or triangles and store in the refrigerator until ready to serve.

Thursday, April 12, 2012

Neapolitan Mousse


Last weekend was Easter long weekend here in Canada and my parents decided to host a dinner party on Saturday night. This year, the beginning of Passover happened to coincide with Easter and we celebrated the first night with a Seder at my aunt and uncle's house. I contributed to the meal by making red wine poached pears with cranberry sauce. The Seder, termed Express Seder 2012 by my brother, went by smoothly and he did a great job leading the concise yet trilingual Seder in English, Russian, and Hebrew.

Obviously the dinner party being hosted by my parents the next day gave me an excuse to make something and after my success with the triple chocolate mousse cake from my birthday I decided to make another mousse dessert. I felt it was particularly appropriate for the occasion because mousse is Passover-friendly.

I wanted to use the dark and white chocolate mousse components from the cake because they were so delicious and in order to complete my Neapolitan creation I searched for a strawberry mousse recipe. I thought it would be fun to serve the mousse in little shot glasses and individual sized portions, so I whipped up each mousse and piped it into the glasses, refrigerating for about 30 minutes between layers to allow them to set a little.

Even though I followed the same recipe, somehow the dark chocolate mousse layer did not turn out as smooth and creamy as it had in the cake. Also, the strawberry flavor was more subtle and was overpowered by the dark chocolate; it could only be tasted if a bite excluding the last layer was taken.

Apart from the little Neapolitan Mousses, my mom also made a pavlova style cake that was filled with whipped cream and raspberries and then decorated with meringues. It looked beautiful and tasted great too! My mom was quite proud of her creation and it was definitely a big hit at the party.

In the end, my mom and I concluded that although a fun idea, the Neapolitan Mousses were definitely a lot of work and the same thing could be achieved in one large cake rather than piping individual desserts. The presentation was nice of course but the effort was a lot more than people realized. I was a little disappointed with how the bottom layer turned out, considering that I had made the exact same mousse so well just two weeks prior, but both the white chocolate and strawberry mousses were silky smooth and delicious. Many people came up to me afterward and complemented me on the dessert.

Strawberry Mousse
Note: I made the mousse and split it between 20 shot glasses. If making the mousse to eat on its own it would probably make 4-6 portions, depending on the vessel used.
  • 2 cups strawberries, chopped and pureed
  • 4 tbsp sugar
  • 4 tbsp water
  • 1 tsp gelatin
  • 1 1/2 cups heavy cream
  1. In a small bowl combine the water and gelatin and set aside to bloom.
  2. Meanwhile, combine the pureed strawberries and sugar in a small saucepan and bring to a boil.
  3. Once boiling, add the water-gelatin mixture and continue to heat until all of the gelatin has dissolved, about 3-5 minutes. 
  4. Strain the strawberry mixture through a fine-mesh sieve into a large bowl and set aside to cool.
  5. Meanwhile, beat the cream on medium speed until it starts to thicken, about 30 seconds. Increase the speed to high and continue to beat until soft peaks form, about 30-60 seconds.
  6. Whisk 1/3 of the whipped cream into the cooled strawberry mixture to lighten it. Gently fold in the remaining whipped cream with a rubber spatula until no streaks remain. 
  7. Carefully spoon the mousse into cups or bowls and chill for at least four hours to allow the mousse to set.
Note: If making the layered Neapolitan Mousse, use the two mousse recipes from the triple chocolate mousse cake for the dark chocolate and white chocolate layers. To assemble, use a piping bag or plastic bag with the tip cut off to carefully pipe each layer into the glasses. Allow for at least 30 minutes of chilling in the refrigerator between layers so that the mousse may partially set. 

Thursday, December 22, 2011

Hanukkah Latkes


Last night was the first night of Hanukkah and no Hanukkah is complete without latkes. These traditional potato pancakes are made using grated potatoes and onions, bound together with some egg and matzo meal or flour, and then fried. Of course there are other variations that can include zucchini or carrot, or even sweet potato instead of regular, but I wanted to stick to the traditional latkes that I know and love.

I have never actually made latkes before, though I have consumed plenty every year, and needed to look up a recipe before I started to prepare them on my own. Most of the recipes were pretty standard with slight differences between them, however the one thing that stood out across the board was the need to wring out all of the moisture from the potatoes. All of the recipes suggested different ways of doing this, but each emphasized the importance of this step. Since it was outlined as being so important, I of course made sure to follow instructions but let me just say...it was hard! No matter how many times I thought I was done, another squeeze would produce more liquid. My eyes were watering from the onions and I was wiping at them with the sleeves of my shirt. When I finally finished I had to go to the bathroom to wash off some of the tears that had rolled down my cheeks.

To be honest, these latkes were not a solitary effort; although I made the batter my mom was the one who actually fried them. While she worked on getting the latkes ready, I made a salad to go along with our meal. Once everything was ready, my brother set the table and everyone gathered for dinner. The only thing missing were glasses for our drinks so I went and grabbed some. Just as I was setting them down I accidentally dropped a glass and it fell right on top of another one. Instantly shards of glass flew across the table and landed on all of the plates and food. However the miracle of Hanukkah blessed my family because at that moment, the only thing missing from the table was the plate of latkes which my mom held in her hands, ready to set it down. Luckily for us, our latkes survived my clumsy accident and we were still able to enjoy them just as planned, albeit with a fresh set of dinnerware and a new salad that I quickly put together. I guess the miracle of Hanukkah extends to anything with oil in it...menorahs and fried food.

Hanukkah Latkes
  • 8 medium sized Russet potatoes (or some other variety if you prefer)
  • 2 large onions
  • 4 eggs, lightly beaten
  • 1/4 cup matzo meal (or flour)
  • Salt and pepper to taste
  • Optional: Handful of chives or green onions, chopped finely
  • Oil (for frying)
  1. Peel the potatoes and onions. Line a large strainer with a cheesecloth and place in the sink. Grate the potatoes and onions using the coarse holes of a box grater, alternating between the two, and place the shreds in the lined strainer. Alternatively, use the shredding disc on the food processor and alternate putting through chunks of potato and onion. 
  2. Gather the ends of the cheesecloth so that all of the shreds are enclosed, then twist and squeeze to wring out as much liquid as possible. Do this in batches so that the load is more manageable and it will make it easier to squeeze out the liquid. Once the mixture is as dry as possible, transfer it to a large bowl and repeat with the remaining shreds.
  3. Add the salt, eggs, matzo meal, salt and pepper, and chives/green onions if using, to the potato-onion mixture and stir well to combine.
  4. Pour enough oil into a frying pan so that it covers the entire bottom and comes about 1-2 cm up the sides. Heat over high heat until the oil gets hot then reduce to medium. Take about 3 tablespoons of the mixture and shape into an oval. Place in the pan and flatten it out slightly so that it forms a small pancake. Repeat until the pan is filled, but the latkes are not touching.
  5. Fry each latke for about 3-5 minutes per side, or until each side is well browned. Transfer to a paper towel-lined plate to absorb some of the oil. Repeat until all of the latkes are cooked. 
Note: The latkes taste best when served immediately, alongside some sour cream or applesauce for dipping. However, they can also be cooled and then stored in an airtight container in the refrigerator or freezer with layers of parchment paper between them to keep from sticking. To reheat, place them in a single layer on a baking tray in the oven at 375 degrees Fahrenheit for about 10-15 minutes, or until they start to sizzle.

Tuesday, December 20, 2011

Chocolate Crinkle Cookies


It's that time of the year again which means that my holiday baking is in full swing! Every year I try to make some festive treats for friends and family and give them out to celebrate the holidays. Personally, I love this time of year because I love the cheerfulness; I love all of the decorations and the nice songs and the overall tone of the holidays. I know that not everyone can be together with their loved ones but I am grateful that so far I have been lucky enough to have my family surround me every year.

This year I included chocolate truffles and my grandmother's berry crumb bars, also known as "rombiki" in my family, as well as these new chocolate cookies. I had seen many versions of this cookie on tastespotting.com under names such as "chocolate crinkle" or "chocolate crackle" or "chocolate snowball" cookies and I really liked the way they looked. My cookies didn't turn out as white because I don't think I rolled them in enough powdered sugar, but the taste was great regardless.

I actually didn't have a chance to save any for our own household but luckily went I went to my grandmother's a couple of nights later she still had some left so she gave one each to my brother and me. My cousin had previously told me that they kind of reminded her of Timbits, a little doughnut hole treat that is popular here in Canada at the coffee chain Tim Horton's. Although not fluffy like a doughnut, the flavor is definitely reminiscent of the frosted chocolate Timbit. Despite the fact that these cookies seem to be popular during the holidays, I think that I will make them again sometime soon so that I can have more than just the one and the rest of the household can try them too.

Chocolate Crinkle Cookies
Note: This recipe makes about three dozen cookies.
  • 6 oz (180 grams) semisweet chocolate
  • 3/4 cup flour
  • 1/3 cup cocoa powder
  • 1 1/2 tsp baking powder
  • 1/4 tsp salt
  • 1/2 cup butter
  • 1 cup brown sugar, packed
  • 2 eggs
  • 2/3 cup powdered sugar
  1. Using a double broiler, melt the chocolate and set aside to cool.
  2. Whisk together the flour, cocoa powder, baking powder, and salt.
  3. In a large bowl, beat the butter and brown sugar on medium speed until light and fluffy.
  4. Beat in the eggs, then the chocolate.
  5. Reduce the speed to low and mix in the flour mixture.
  6. Once the dough comes together,transfer to the refrigerator and chill for at least 30 minutes, or until it becomes firm enough to handle.
  7. Pour the powdered sugar into a shallow bowl. Roll dough into 2" sized balls then roll very generously in the powdered sugar. Make sure you have a thick coating. Note: The dough will start to melt in your hands; use gloves for easier handling.
  8. Place the cookies on a greased or parchment-lined baking tray spaced about 2" apart. Bake at 350 degrees Fahrenheit for 10 minutes, until the tops are cracked and the centers are almost set. Cool for three minutes on the baking tray before transferring to a wire rack to cool completely

Friday, September 30, 2011

Rosh Hashanah Apple Cake


It's that time of year again...Shana Tova, or Happy New Year. Last year I made a traditional challah to celebrate the Jewish new year with my family but this year I wanted to do something different. I still wanted to bake something with apples because it is customary to eat apples on Rosh Hashanah and I found a highly rated recipe for an apple cake on allrecipes.com. It was especially appealing to me because it had so many positive reviews and a lot of people commented on how the cake tasted better with age, meaning I could make it a day ahead and serve it the next day knowing it would taste great.

The recipe was quite easy to follow but it was challenging to know how long to bake the cake for because so many of the reviews gave differing opinions. Some commented that the time called for in the recipe was too short, others claimed it was too long and their cake burnt. I think part of the problem was the fact that the cake bakes in a bundt pan and it's very hard to judge when the inside has truly baked through. I used a long wooden kebab skewer as I would a toothpick and that allowed me to poke down all the way through to the bottom of the cake. In the end I actually ended up baking the cake for exactly the time listed in the recipe, though I was watching it like a hawk for the last fifteen minutes making sure I didn't burn it. In fact, for the last ten minutes I covered it in aluminum foil because I could see the top was already done but the skewer was coming out with batter stuck to it every time I tested the cake.

Interestingly enough, I actually wasn't home when my family ate the cake because I had my first clinical shift at the hospital. I had taken some pictures of the cake before I left, but I really wanted to have some pictures of the sliced cake as well and I left that task to my mother. She was quite nervous that she wouldn't be able to capture the cake in a good way that I would like but I assured her that I trusted her photography and food styling skills. Besides, I'm definitely no expert when it comes to food photography and the only reason why I have gotten better at it is because I have a lot more practice now. Although I like to have a good picture, ultimately the food itself and the taste is most important to me; therefore I try my hardest to take a nice shot but in the end I make do with what I have and edit the pictures to look as good as I can given my photographic and editing abilities. I am proud to say that my mother took many wonderful pictures and the one featured above was one that she took.

My family enjoyed the cake and left me some to try when I got home. It had a very strong apple flavor, which is to be expected considering I used four whole apples in the cake, but it was a little too sweet for my taste. I used McIntosh apples because that's what we had on hand but I think that in the future I would prefer to use Grannysmith because I like they way they taste when they're baked better than other types of apples. I noticed that the next day the cake became softer, especially around the bottom where the majority of the apple chunks were concentrated. I'm not sure which texture I liked better but overall I think it was a successful cake. I particularly loved how regal it looked coming out of the bundt pan and I'm going to try and use the bundt pan more often in the future.

Rosh Hashanah Apple Cake
Note: Baking time may vary. Personally, I found 70 minutes to be just right, with the last 10 minutes spent covered, but other reviewers have claimed the time too long or to short. I would start to check on it every 5 minutes around the 45 minute mark in order to make sure it doesn't burn but does get baked through.
  • 3 cups flour
  • 1/2 tsp salt
  • 2 1/2 tsp baking powder
  • 2 cups sugar
  • 1 cup oil (can substitute apple sauce like I did)
  • 4 eggs, lightly beaten
  • 1/4 cup orange juice
  • 1 tsp vanilla
  • 4 apples, peeled, cored, and cut into chunks
  • 2 tsp cinnamon
  • Another picture taken by my mother.
  • 5 tsp sugar
  1. Combine the apple chunks with the cinnamon and sugar and mix well until all of the apples are evenly coated. Set aside.
  2. In a large bowl combine the flour, salt, baking powder, and sugar.
  3. Mix in the oil (or applesauce if using), eggs, orange juice, and vanilla. The batter will be quite thick.
  4. Butter and flour a 10" tube or bundt pan. Alternatively, spray with non-stick cooking spray.
  5. Alternate pouring in the batter and topping with apple chunks. You should have three layers of batter and two layers of apples, starting with the batter. Pour the juice from the apple mixture on top of the last layer of batter and lightly spread around.
  6. Bake at 350 degrees Fahrenheit for 70 minutes. To test the doneness of the cake, poke with a long skewer or use a butter knife to reach the deepest parts. Bake until the skewer or knife comes out clean. 
  7. Allow the cake to cool completely in the pan. To remove, shake the pan back and forth until the cake starts to loosen in the pan then carefully invert it onto a plate. Top with some powdered sugar if desired.

Tuesday, April 19, 2011

Flourless Chocolate Cake


The day that I have long been dreaming of has finally come...I own a Kitchen Aid Stand Mixer! I know that it was a mere five months ago that I happily blogged about a different stand mixer that my mom and I had bought and I had used to make some chocolate chip cookie cakes. In that post I had mentioned that it was my first recipe using the stand mixer and I had yet to try one of my cake batters in it. Needless to say, the mixer did not stand up to the test. I don't quite remember the capacity of the mixer but I do remember that it was nowhere near the large size I needed it to be. Within a week of buying it, I carefully repackaged the stand mixer and my mom returned it to the store.

After witnessing my troubles with the stand mixer, my mom and I agreed that we needed a Kitchen Aid. We decided that we had waited long enough and the time had come to invest in a proper stand mixer. However we both recognized that Kitched Aids are expensive and, after waiting for so long already, agreed that we could wait a little longer until a good sale came along. Also, my mom had one contention...she insisted that the mixer had to be red. Knowing how large the mixer was, and my probable frequent use of it, she admitted that it would most likely sit on the kitchen counter. That being decided, my mom said that the only way she would permit the Kitchen Aid to permanently reside on the counter was if she found it pleasant to look at. As a lover of red accents (our kitchen sports red sugar canisters and a red spoon rest) she wanted the Kitchen Aid to fit right in.

We shared our plan with my aunt and last week she happily called me to announce that she had seen a sale on Kitchen Aids at Costco. I went online and confirmed her observation and, after consulting with my mom, proceeded to order it. When the Kitchen Aid finally arrived on my doorstep I was so excited I think I almost kissed the mailman (I didn't get that far but I definitely squeaked with excitement as I signed for the package)!

I eagerly unpacked it and proudly set it on the counter for the whole family to see when they got home. My brother instantly asked me which recipe I would use to "christen" the new addition to the family. Knowing that Passover was coming up I thought it fitting to "christen" the Kitchen Aid with a Jewish-holiday-friendly recipe...a chocolate flourless cake. On Passover it is customary to eat unleavened bread called matzah and to not prepare any foods requiring flour.

I had first discovered this recipe when I went to go visit my cousin in New York two summers ago. She did not prepare the cake for Passover but after reading the list of ingredients I realized it would be perfectly suited for such an occasion. The cake is extremely chocolatey and rich therefore one small piece is more than enough to cure a chocolate craving.

Originally when my cousin made it she prepared the cake in a small square silicone mold. This made it quite easy to invert onto a plate and serve. I have adapted the recipe for a larger springform pan. Unfortunately, one of the adverse side effects is that the time required to bake such a large cake results in the sides rising significantly while waiting for the middle to bake through. However as soon as the cake is removed from the oven the sides fall and create an edge. I usually solve this problem by cutting off the edge and decorating the cake with some sort of fruit. Alternatively, the cake can be made as it was intended, in a smaller pan, and that problem is avoided. Since I have a large family I tend to make large cakes therefore I choose to accept the edge problem and cover it up in other creative ways.

Due to the fact that it was my first time using the Kitchen Aid, I can't say that I whipped up the cake batter any faster than usual...in fact I was probably even slower because I was nervous with the speeds and kept stopping to scrape the sides of the bowl. I am sure that with more practice I will get the hang of it. Regardless, I love coming downstairs every morning and seeing my lovely Kitchen Aid Stand Mixer sitting peacefully on the counter, waiting for me to use it.

Chocolate Flourless Cake
  • 300 grams chocolate
  • 1 cup unsalted butter, cut into pieces
  • 1/2 cup water
  • 3/4 cup sugar
  • 1/4 tsp salt
  • 6 eggs
  1. In a small saucepan over medium heat, dissolve the sugar and salt in the water and set aside.
  2. Using a double broiler (see how to set up here) melt the chocolate.
  3. Beat the butter pieces into the chocolate, a couple at a time.
  4. Beat in the sugar water.
  5. Slowly beat in the eggs, one at a time.
  6. Spray a 10" springform pan with cooking spray or line with foil or parchment paper. Pour the batter into the pan and bake in a water bath at 300 degrees Fahrenheit for 45-50 minutes. The center will still look a little wet.
  7. Turn off the oven and allow the cake to sit for 5 minutes inside before removing the pan from the oven. Allow the cake to cool to room temperature before sticking it in the refrigerator to chill completely. Don't be surprised if the cake deflates a little, it's supposed to.
Note: I don't normally post any pictures on this blog that are not of the food itself...however I felt that I should make an exception in this case. I had to take a picture with my new baby and proudly feature it. The make-up and costume are a result of a tap dancing competition I had just come home from. I was so eager to take a picture with the Kitchen Aid that I couldn't wait to go upstairs and change.

Wednesday, March 23, 2011

Purim Hamentashen


Happy Purim! Purim is like the Jewish Halloween. There is of course a story behind it and it has nothing to do with Halloween but the costumes and all of the noisemaking always remind me of it. Purim is definitely one of the more fun Jewish holidays because it encourages you to act like a kid. Best of all, Purim is accompanied by yummy cookies called Hamentashen, specially made in the shape of a triangle to resemble Haman's hat.

This year I decided to make Hamentashen and distribute them amongst my family. I made two different types of dough: a shortbread dough and a yeast dough, as well as two different fillings. It was quite a lengthy process to make both but I didn't mind...I hadn't baked in so long I was definitely craving some good quality time in the kitchen!

I wanted to figure out which dough was better for the Hamentashen so I opted to use the same combination of fillings for both and keep that element constant. At first I made the Hamentashen with the shortbread dough then the next day I made the yeast dough. The winner of my little contest: shortbread. Taste wise, I think I actually preferred the shortbread dough over the yeast dough, though my brother felt the opposite. However that wasn't the deciding factor...it was the effort.

The yeast dough took a lot longer to make, considering that I had to wait for it to rise once then again after forming the Hamentashen. Also, the Hamentashen kept falling apart when made from the yeast dough and the triangle shape was hard to achieve. My mom said that when her grandmother made the Hamentashen in the past, she used the yeast dough and made them bigger. Maybe that helps, I don't know, but I definitely know that I'm not repeating the process. I'm sticking to the shortbread dough and that's that.

Purim Hamentashen
Note: This recipe makes about 30 cookies. Each of the fillings is enough to fill one batch of 30 (more or less). I doubled the dough and used both fillings, but had some dough left over, so I filled the rest with apricot jam.

For the dough:
  • 2/3 cup butter, softened
  • 1/2 cup sugar
  • 1 egg
  • 1 tsp vanilla
  • 1 lemon, zested
  • 1 tsp baking powder
  • Pinch of salt
  • 2-3 cups flour
  1. Cream together the butter and sugar. 
  2. Mix in the egg, vanilla, and lemon zest.
  3. In a separate bowl combine the baking powder, salt, and 2 cups of flour.
  4. Add the dry mixture in parts to the wet until a dough starts to form. If necessary add a little more flour.
  5. Gather the dough into a ball and cover with plastic wrap. Refrigerate for 30-45 minutes so that it is easier to work with.
For the poppy seed filling:
  • 1 cup poppy seeds
  • 1 cup milk
  • 2 tbsp honey
  • 1 tsp butter
  • 1 lemon, zested
  • 1 orange, zested
  1. In as small saucepan bring the milk and poppy seeds to boil.
  2. Once boiling, add the honey and butter and continue to heat over medium high heat for about 10 minutes, until the filling thickens.
  3. Remove the saucepan from the heat and mix in the zests. Set aside to cool.
For the berry, chocolate, nut filling:
  • 3/4 cup nuts, toasted (I used almonds. Other options include walnuts, pecans, etc)
  • 1/4 cup chocolate chips
  • 1/2 cup jam (I used plum but you can use anything....strawberry, raspberry, etc. Try to get seedless jam)
  1. Combine the nuts and chocolate chips in a food processor and pulse until a paste forms.
  2. Empty into a separate bowl and stir in the jam.
To make the Hamentashen:
  1. Roll out the dough to about 1/8" thickness and cut into 2" rounds.
  2. Place a teaspoon of filling in the center of each round.
  3. Carefully wet the edge of the dough and bring up the sides to form a triangle. It helps to pinch the ends together to achieve the triangle shape.
  4. Bake for 12-14 minutes at 375 degrees Fahrenheit.
  5. Allow to cool for 2 minutes on the pan before removing to a plate to cool completely.

Wednesday, December 15, 2010

Hanukkah Rugelach


The holiday season has come upon us which means two things: lots of holiday baking and studying for exams. Thankfully, the exams will be over soon but unfortunately the intense studying has taken a toll on my baking. I actually made these rugelach at the beginning of Hanukkah, when my brother and I went to go visit our old neighbors in Seattle. We spent the weekend having a great time playing with their kids and making Hanukkah goodies. Together we made latkes, little potato pancakes, and also these rugelach.

When I told my mom about the rugelach, she insisted that I not call them that. She said that when she grew up, her mom always called them "ragaliki" which translates into "little horns". I suppose since they are rolled up into the crescent shape they could resemble little horns. It was a little time consuming to make the rugelach, especially since the dough had to be chilled for a bit, but I loved the fact that there are a variety of fillings that can go inside.

The weekend was extremely fun and exactly what I needed before gearing up for exams. On a side note...the XBOX 360 kinect gaming system is so cool! We played it at their house and I must say I am extremely impressed. The sensors are so accurate and have facial recognition. The games are quite interactive and involve a lot of movement...definitely a great source of exercise. My only regret while making the rugelach was questioning why I picked a somewhat time consuming (although delicious) dessert, as it took away from my playing time with the kids. Still, everyone loved the rugelach and I had fun making them.

Hanukkah Rugelach
Note: The recipe makes enough dough for 64 little rugelach. I suggest trying a different filling for each batch of 16.
  • 2 cups flour
  • 1/4 tsp salt
  • 1 block (8 oz.) cream cheese, room temperature
  • 1 cup unsalted butter, softened
  1. Sift together the flour and salt and set aside.
  2. Using a mixer, cream the butter and cream cheese together for about 2 minutes.
  3. With the mixer on low, slowly add in the dry ingredients and mix until a dough comes together.
  4. Wrap the dough in plastic wrap and chill in the fridge for 15 minutes.
  5. Remove the dough from the fridge and roll it out until it is about 1" thick all over. Fold the dough into thirds, wrap it back up and chill it for at least another hour, though you can leave it in the fridge for up to 24 hours at this point.
Raspberry Chocolate Pecan Filling
Note: This is both fillings for enough for one batch of 16 rugelach.
  • 1/2 cup raspberry jam (I used seedless)
  • 1/4 cup chocolate chips (I used mini chocolate chips)
  • 3/4 cup pecans, toasted 
Combine the pecans and chocolate chips in a food processor and pulse repeatedly until the pieces stick together. Empty into a separate bowl and stir in the jam.

Cinnamon Sugar Pecan Filling
  • 1/2 cup pecans, toasted
  • 1 tbsp sugar
  • 1/2 tsp cinnamon
Chop the pecans finely using a food processor and then mix together with sugar and cinnamon.

To assemble rugelach:

1.  Divide the dough in quarters. Put three quarters back into the fridge while rolling out the fourth quarter into about a 10" circle.

2.  Spread the filling over the dough and then cover with wax or parchment paper. Use a rolling pin to go over it and get the filling spread in an even layer.

3.  Cut the circle into 16 wedges and roll up each wedge, starting at the wide end.

4.  Place rolled up rugelach onto a baking sheet and brush with the egg wash.

5.  If you want you can sprinkle a little bit of sugar on top, or just leave them plain.

6.  Bake at 375 degrees Fahrenheit for about 22-25 minutes, or until golden brown.

7.  Cool for 5-10 minutes before plating and serving.

Note: There are lots of different fillings that can be made. Some ideas include:
  • Walnuts
  • Hazelnuts
  • Different fruit jams
  • Nutella
  • Cinnamon Sugar (without the nuts)

Friday, September 10, 2010

Rosh Hashanah Challah


Shana Tova! That is the Jewish way of saying Happy New Year. Traditionally, Jewish families eat a special type of sweet bread on the Sabbath called challah. However, on Rosh Hashanah, the challah is even more special because it is baked in a round shape, meant to symbolize the cycle of a year.

When I searched for Rosh Hashanah challah recipes online, I came across one that had great reviews. The only complaint people had was that it seemed to take too long to rise. I decided to overcome that problem by doubling the yeast. I made sure to prepare the dough ahead of time so that I could make changes if need be...and it's a good thing I did. Even though the dough rose, I felt that there wasn't enough to make a challah big enough for the entire family.

I then decided to make a second challah, this time with a recipe I was more sure of. Although I didn't use a challah recipe, I used my sweet dough recipe instead, I filled the dough with apples and rolled it into a round shape.

Even though the first challah had great reviews online, I can't say I was that impressed with the taste. The recipe called for honey instead of sugar but in the end I felt it wasn't sweet enough. The apple challah, on the other hand, was sweet and moist and I was very glad that I had decided to make it at the last minute. Maybe the other challah wasn't great because I didn't stick to the recipe, though my only change was the additional yeast. In hindsight, maybe I should have added more honey as well...I don't know. For those interested in the recipe, I got it from epicurious...perhaps someone else will have better luck with it. I, on the other hand, will stick to the apple challah since it seemed to be a hit with the family.

Apple Challah
Note: I used only half the dough to make the challah, the other half I set aside and used in a different recipe.
  • Sweet dough (recipe same as for apple cream cheese braid)
  • 3-4 medium size apples, cored and peeled
  • Honey
  1. Cut the apples into small chunks and gently heat with some honey until nice and soft. I don't know how much honey I used, I just poured until I felt it was enough and the apples had a nice sweet taste to them.
  2. Roll out the dough into a rectangle about 20" x 15".
  3. Lay out half the apple chunks onto the middle third of the dough and fold the bottom third over. I recommend straining the apples to remove as much juice as possible, so that it doesn't seep out later.
  4. Pat the dough down around the apples and then lay down the rest of the apple chunks on top. Fold over the top third of the dough and pat down around the apples once again. Try to seal the dough around the sides and ends, but be careful not to rip it.
  5. Starting from one of the ends, carefully roll the dough into a loose cylinder. I emphasize the loose because if you press down hard, the dough will rip and apple chunks will fall out.
  6. Transfer the dough, with the smooth side facing up, to a pre-greased round cake pan. I used an 11" springform pan, because it's the biggest one I have, but you can probably get away with a 9". The dough won't fill up the whole pan but you can pat it down a little very gently. 
  7. Cover with plastic wrap and allow the dough to rest in a warm spot for half an hour. Afterward, brush with an egg wash while preheating the oven.
  8. Bake at 350 Fahrenheit for an hour. Once the dough starts to get golden on top, about half way into baking, cover it with aluminum foil so that the top doesn't get burnt while the inside bakes.