Showing posts with label coffee. Show all posts

Monday, December 30, 2013

Cinnamon Dolce Latte Cupcakes


I've been on a bit of a coffee fix with my baking lately: first with my mocha cucakes with espresso buttercream for my work Christmas party and then a caramel latte cheesecake for my aunt and uncle's silver wedding anniversary. I can't explain why I am so suddenly drawn to this flavor but somehow I am very tempted to bake many coffee treats this holiday season.

On Christmas day my brother and I made plans to go with some friends to see the new Disney movie currently in theaters however by the time we arrived it was sold out. Instead we came back to our house and we played board games. I thought it would be fun to bake as well so I suggested we make cupcakes. Of course I had ulterior motives as my friend has just gifted me a cupcake stand and I really wanted to use it.

I decided to remake one of the two cupcake recipes that I had used for my work Christmas party because the first time I made it the frosting didn't quite turn out. Rather than takes my chances again I used the same cake recipe but the frosting from the mocha cupcakes. While the cupcakes baked we played a fun game and then once they cooled down I frosted them.

Excitedly I beautifully placed the cupcakes on my new stand and took them into the living room where I do most of my food photography. Unfortunately I leaned over the table the wrong way and one of the legs gave out, sending the whole thing crashing to the floor. Luckily the glass table did not shatter and nothing happened to the camera or the floor.

Even though we managed to salvage the cupcakes themselves, most of the frosting ended up on the floor and had to be thrown away. There was enough left that we were able to redistribute it, though not as beautifully. I was still able to get a nice picture before they fell and they still tasted great so I guess it was a success, though now I have to figure out how to fix the table.

Cinnamon Dolce Latte Cupcakes:
Note: This recipe makes 12 cupcakes. Also, I used the frosting from my mocha cupcakes. The recipe can be found here.
  • 2 cups flour
  • 1½ tsp baking powder
  • 2 tsp cinnamon
  • ¼ tsp salt
  • ½ cup (8 tbsp) browned butter, cooled
  • ½ cup granulated sugar
  • ½ cup packed brown sugar
  • 3 eggs
  • 1 tsp vanilla
  • ¼ cup milk
  • ¼ cup brewed coffee, cooled
  1. Melt the butter in a medium saucepan over medium heat. Stir constantly as it continues to cook and foam. After a few minutes, it will begin to turn a rich brown and smell nutty. Remove from heat immediately and let cool before using in the cupcakes.
  2. In a medium bowl, whisk flour, baking powder, cinnamon, and salt until well combined. Set aside.
  3. In a small bowl combine the milk and coffee. Set aside.
  4. Beat the browned butter with both sugars until well incorporated. 
  5. Beat in the eggs, one at a time, until fully incorporated, then beat in the vanilla.
  6. Using the lowest speed setting, alternatively beat in the dry ingredients and milk/coffee mixture starting and ending with the dry ingredients.(There should be three dry additions and two wet.) 
  7. Distribute the batter evenly amongst a well-greased or paper-lined 12 cup muffin pan. Bake at 350 degrees Fahrenheit for 20-22 minutes, or until a toothpick inserted into the center comes out clean.
  8. Frost the cupcakes once they have cooled completely.

Sunday, December 29, 2013

Caramel Latte Cheesecake


This year while many families were celebrating Christmas Eve on December 24th, our family was celebrating the silver wedding anniversary of my aunt and uncle. They decided on hosting a big party with many of their closest friends and family and I contributed with my baking. Together with my mom, we baked three cakes for the event over the span of three days. Two of them were well-trusted recipes: my lemon cheesecake and my mom's chocolate cheesecake. The third was a new recipe and also a new shape for me: a caramel latte cheesecake made in a square springform pan.

I was a little hesitant when using the new pan because I had never made a square cheesecake before and I didn't know what proportions to use when scaling the recipe. For example, I doubled the amount of crust and ended up with way too much and was scooping it out of the pan. However doubling the cake batter itself was just perfect and gave me exactly the right amount to fill the pan.

When we brought out the cakes for dessert everyone was thoroughly impressed, especially when they found out we had made all three. They looked beautiful and appealed to people's different tastes with three different flavors. I must say that the chocolate was the biggest hit but this caramel latte cheesecake came in for a close second. I was told by one of my family members that on a scale of 1 to 10 the cheesecake was a 15. My cousin, who loves caramel, was quite pleased when I admitted that I had him in mind when I found the recipe.

Overall the party was a big success and I give kudos to my aunt and uncle for pulling it off. I think that the guests all enjoyed themselves and were genuinely happy to celebrate such a special occasion with their friends. The night had a very festive and happy tone and I was so touched by the warm thanks I received from my aunt and uncle in the end. I hope that one day I too will be celebrating my silver wedding anniversary surrounded by so much happiness and joy.

Caramel Latte Cheesecake
Note: I have adapted the recipe for an 10" or 11" round springform pan as they are more common than square shaped pans.

For the crust:
  • 1½ cups graham cracker crumbs
  • 2 tbsp light brown sugar
  • ⅛ tsp salt
  • ¼ cup (4 tbsp) unsalted butter, melted
  • ½ cup toffee bits
  1. Combine all of the ingredients except for the toffee bits in a bowl and then transfer to an 11" springform pan. Gently press down all along the bottom and bake at 350 degrees Fahrenheit for 8 minutes. 
  2. Remove the pan from the oven and sprinkle the toffee bits in an even layer on top of the crust and press down lightly. Set aside to cool.
For the cheesecake:
  • 2 lbs (4 blocks) cream cheese, softened
  • ⅔ cup brown sugar
  • ½ cup sugar
  • 4 large eggs
  • ½ cup sour cream
  • 4 tsp vanilla
  • 2 tbsp instant espresso
  1. Dissolve the instant espresso in the vanilla and set aside.
  2. Beat the cream cheese on medium-high speed for about a minute, until smooth.
  3. Beat in the eggs, one at a time, at low speed. Beat in the sugar. Scape down the sides of the bowl as necessary.
  4. Beat in the sour cream and then the vanilla and coffee and mix on medium speed until everything is well incorporated. The batter will be fairly liquidy.
  5. Pour the mixture into the cooled springform pan and bake for 55 minutes at 325 degrees Fahrenheit using a hot water bath or by placing a pan of hot water on the lowest rack beneath the cake.
  6. Without opening the oven door, turn off the oven and leave the cake to cool for 1 1/2 hours inside the oven. Afterward, remove from the oven and cool to room temperature before refrigerating for at least 4 hours, though preferably overnight.
For the topping:
Note: There will be extra nuts left over as this recipe makes more than enough to use as a topping for the cake.
  • ⅓ cup sugar 
  • 3 tbsp water
  • 1½ cups salted peanuts
  • Dulce de leche (or caramel)
  1. Put the sugar and water in a 2-quart saucepan and cook over medium-high heat, stirring, until
    the sugar dissolves. 
  2. Keeping the heat fairly high, continue to cook the sugar, without stirring, until it just starts to color. 
  3. Toss in the peanuts and immediately start stirring. Keep stirring, to coat the peanuts with the sugar. Within a few minutes, they will be covered with sugar and turn white but keep stirring until the sugar turns back into caramel. 
  4. Once the peanuts are coated with a nice deep amber caramel, remove the pan from the heat and turn the nuts out onto a baking sheet covered with parchment paper, using a wooden spoon to spread them out as best you can. 
  5. Cool the nuts to room temperature and then chop them into small pieces. Sprinkle over top of the cheesecake and drizzle the dulce de leche or caramel sauce on top.

Friday, December 13, 2013

Mocha Cucakes with Espresso Buttercream Frosting

My oven has been seeing quite the action this past weekend. I decided to make my annual holiday boxes a little early this year because I knew I would be too busy later on. Although I sampled a few new recipes over the past month I wasn't satisfied with them so ultimately the box remained the same and no additions or substitutions were made.

However when it came time for my potluck Christmas party as work I knew that I wanted to make something new and I decided on cupcakes. Originally I found a recipe for cinnamon dolce latte cupcakes but when I read further into it I saw that it only made 12 cupcakes. I quickly did some research and found a second recipe for mocha cupcakes with espresso buttercream frosting. I thought that the two recipes paired well together because they had almost identical ingredients except for the fact that one included cinnamon and the other used cocoa powder.

Ironically enough, the mocha cupcakes turned out perfectly but the cinnamon ones gave me some trouble. The cupcakes turned out well but the kitchen was quite warm by the time I was making the frosting and as a result it broke. Next time I will have to be better with my timing so that I'm not scrambling at the last minute to get everything done. Still, when I brought the cupcakes to the party I received many compliments. I also managed to bring some leftovers home for my family and my mother and brother, both coffee lovers, expressed their enjoyment over the cupcakes.

Mocha Cupcakes with Espresso Buttercream Frosting
Note: This recipe makes 12 cupcakes.
  • 1⅓ cups flour
  • ⅓ cups unsweetened cocoa powder
  • 1 tsp baking powder
  • ½ tsp baking soda
  • ¼ tsp salt
  • ½ cup milk
  • ½ cup espresso
  • 1 tsp vanilla extract
  • ½ cup (8 tbsp) unsalted butter, softened
  • ½ cup granulated sugar
  • ½ cup light brown sugar, packed
  • 1 egg 
  1. Sift together the flour, cocoa powder, baking powder, baking soda, and salt. Set aside.
  2. Combine the milk with the espresso and vanilla and set aside.
  3. Cream the butter with the two sugars until light and fluffy.
  4. Beat in the egg.
  5. Reduce the mixer to low speed and add one-third of the dry ingredients. Once the flour is almost mixed in, add half of the espresso/milk mixture. 
  6. Mix in half of the remaining flour, then the remaining milk mixture, and finally the rest of the flour.
  7. Distribute the batter evenly amongst a well-greased or paper-lined 12 cup muffin pan. Bake at 350 degrees Fahrenheit for 20-22 minutes, or until a toothpick inserted into the center comes out clean.
For the frosting:
  • ¾ cup unsalted butter, softened
  • 3 cups icing sugar
  • 2 tsp vanilla extract
  • 2 tsp espresso powder
  • a bit of milk (maybe a tablespoon)
  1. In a small bowl, combine the vanilla with the espresso powder and stir to dissolve. If the espresso doesn't completely dissolve add a bit of hot water.
  2. Whip the butter for a few minutes on medium-high speed until whitened and fluffy.
  3. Reduce the speed to low-medium and gradually add the icing sugar.
  4. Pour in the vanilla/espresso mixture and beat on medium for a few minutes to incorporate. Scrape the sides of the bowl as necessary.
  5. If the buttercream is still stiff add about a tablespoon of milk so that it becomes more spreadable. Continue to whip for a couple of minutes on medium-high speed until it becomes fluffy.
  6. Frost the cupcakes once they are completely cooled. 

Monday, June 24, 2013

Chocolate Pinwheel Cookies


For the past four years there has been established a much loved tradition in our Russian community of celebrating Father's Day with a giant picnic. Due to scheduling conflicts with the main organizer, this year's picnic was actually postponed and we all celebrated Father's Day one week later. The picnic has a lovely way of bringing together many of the smaller groups into one large gathering and everyone looks forward to it every year.

The picnic is held in a rather potluck style, with each family bringing what they can. There is usually a vast array of salads, meats, fruits, and dessert. Basically it's one big food fest with occasional drinking, singing along to guitar songs, soccer games, card playing, and general merriment.

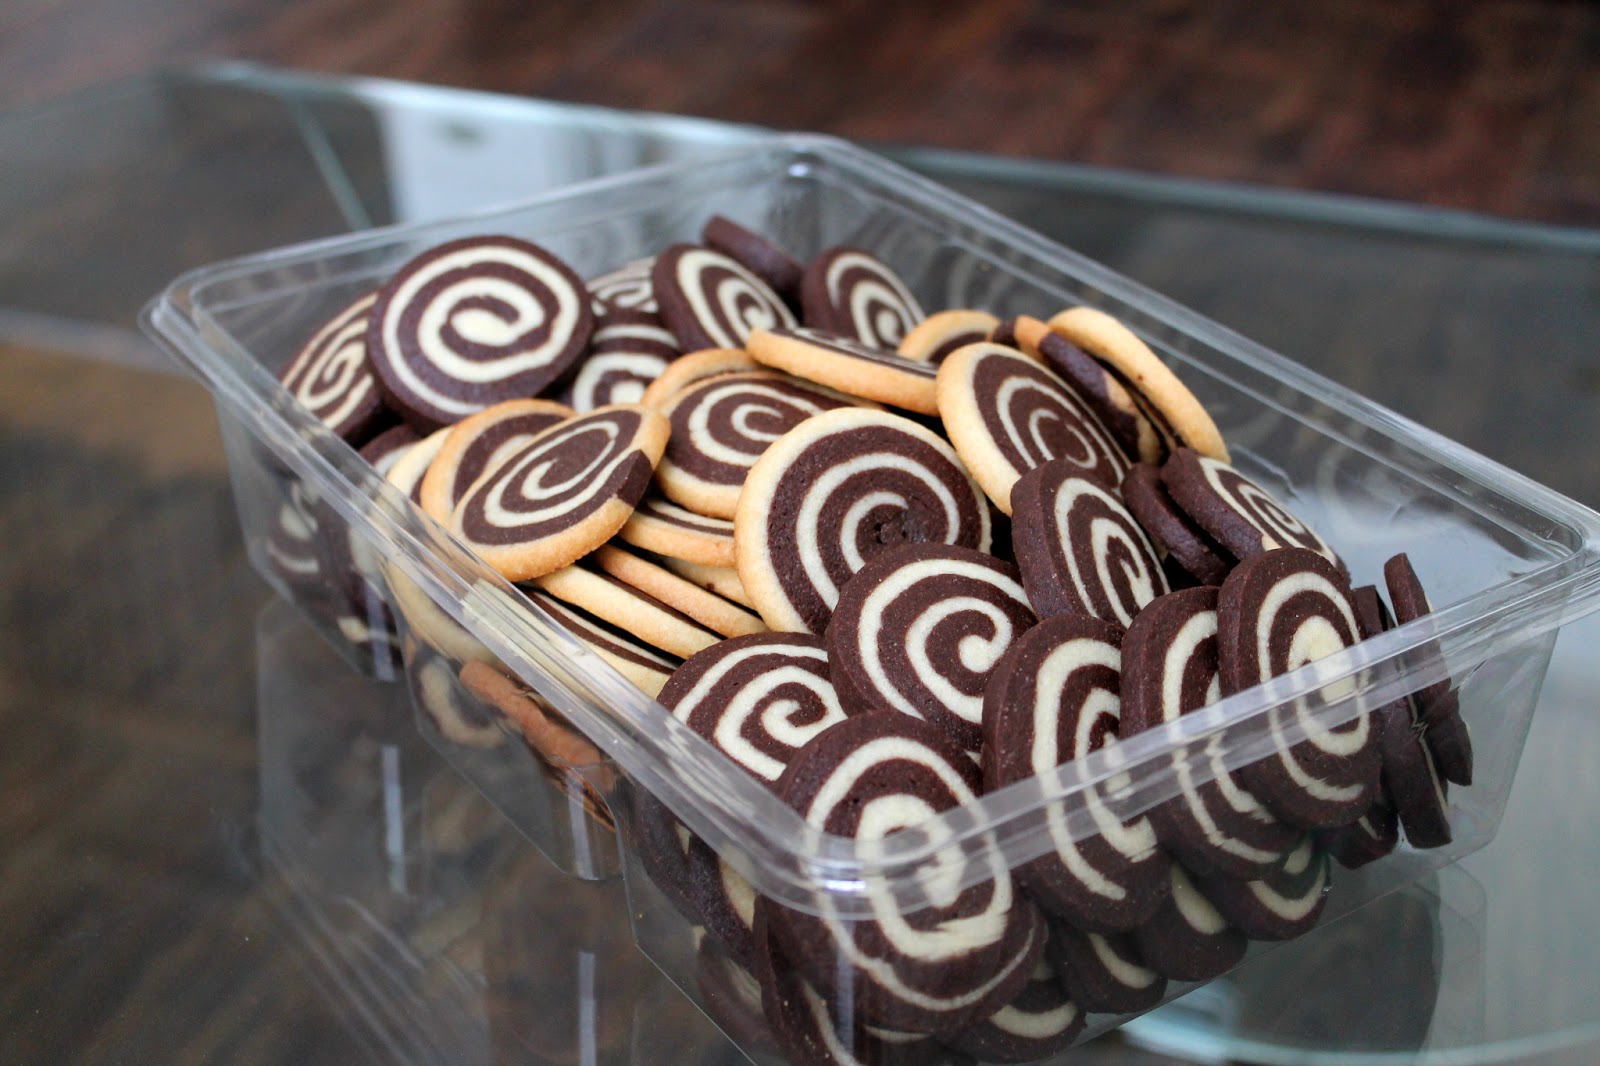
When I came across this recipe last week I thought it would be fun to bring to the picnic since these cookies look very visually appealing. Granted rolling the dough out was a little time consuming since it had to be done six times (three for each flavor) but once that was out of the way the rest was a breeze.

I split the task into two days, making the dough and shaping it into logs the night before the picnic and then slicing and baking the cookies the next morning. I have never made a "slice-and-bake" cookie dough before but having done it now I can see why it is so appealing; the preparation of the dough can be done well in advance and then frozen into logs. Then, once you're ready, you simply slice the log into cookies and bake. Best of all, you don't have to bake the whole log at once...you can decide to make as many or as few as you want at the given moment.

Although the cookies featured a chocolate and vanilla dough the taste of the chocolate was quite strong, therefore the cookies simply tasted like chocolate cookies. However the pinwheel design was quite intriguing and earned many "oohs" and "aahs" from those at the picnic. They were definitely a hit and enjoyed by young and old alike.

Chocolate Pinwheel Cookies
Makes approximately 100 palm-sized cookies.
  • 1¼ cups butter, slightly softened
  • 1¼ cups sugar
  • 1 egg
  • 1 tsp vanilla extract
  • 3 cups flour
  • ½ tsp salt
  • ¼ tsp baking soda
  • 2 tbsp strong coffee, cooled
  • 4 tbsp unsweetened cocoa powder
  • 4 oz (112 g) bittersweet chocolate, melted and still warm
  1. In a large bowl cream the butter for 2 minutes until smooth.
  2. Mix in the sugar and beat for an additional 2 minutes.
  3. Add the egg and vanilla and beat until well combined.
  4. Sift in the flour, salt, and baking soda and mix until just combined.
  5. Remove 2 cups of the dough and set aside.
  6. Add the cooled coffee and cocoa powder to the remaining dough.
  7. Mix in the melted chocolate until well combined.
  8. Divide each dough into three equal pieces, so as to have 3 chocolate and 3 vanilla.
  9. Shape each piece into a 5×5 square on wax or parchment paper, top with another piece of wax or parchment, and the roll each square into a 7×7 square. (The dimensions don't have to be 100% accurate, just make sure to roll the dough out to be thin and approximately the same size). Refrigerate for 15 minutes.
  10. Take one vanilla square and one chocolate square and remove one piece of waxed paper from each. Align the two layers together evenly, one on top of the other, and gently press to seal both layers together.
  11. Take off top layer of wax paper and slowly start to curl edge of the dough up and over using the bottom waxed paper for help, not rolling it into the cookies.
  12. Roll the dough into a tight spiral roll, pinwheel, avoiding spaces in-between.
  13. Once formed, gently but firmly roll back and forth to compact the roll and make it about 9 inches long, 1½" thick. Cover in plastic wrap, twisting ends to seal it closed. Repeat with remaining layers.
  14. Refrigerate for 3 hours before using or freeze for up to two months.
  15. Once ready to bake slice the cookie log into ¼" thick cookie slices and lay out onto a parchment-lined cookie sheet. The cookies won't spread too much so don't worry about spacing them too far apart.
  16. Bake for 12-14 minutes at 350 degrees Fahrenheit and transfer warm cookies to wire rack to cool.

Sunday, May 5, 2013

Mocha Granola


Yes that's right...it's another granola recipe. You would think that by now I would have stopped posting such recipes because really they're all quite the same. The concept is simple: mix some oats with desired nuts, add some sort of binding sweetner, bake in the oven (mixing often), and then mix in any dried fruit at the end. Easy, right?

Well the truth of the matter is that there are actually many flavor combinations out there, some on the healthier side and others more like a dessert. This particular granola is more of a dessert granola due to the mini chocolate chips that get mixed in the end. It also uses quite a bit of coffee so I wouldn't recommend it as a late night snack, though it's a great pick-me-up in the morning. Of course the chocolate chips can be omitted all together...but then again, who would want to do that?

Mocha Granola
  • 3 cups old-fashioned oats
  • ¼ cup ground flax seed
  • ½ cup sliced almonds
  • ½ cup sunflower seeds
  • ¼ tsp salt
  • 3 tbsp dry instant coffee granules
  • 3 tbsp hot water
  • 1 tsp vanilla extract
  • ½ cup canola oil
  • ½ cup honey
  • ½ cup mini chocolate chips 
  1. Dissolve the instant coffee granules in the hot water. Add in the vanilla and set aside.
  2. In a large bowl, combine the oats, ground flax seed, almonds, sunflower seeds, and salt. 
  3. Add the oil to the dissolved coffee mixture and combine with the oats. Mix well.
  4. Add the honey to the oats and stir until everything is evenly coated.
  5. Spread the oats in an even layer onto a large baking sheet lined with parchment paper. Bake for 30-45 minutes at 300 degrees Fahrenheit, stirring every 10-15 minutes, until the oats are golden.
  6. Allow the granola to cool completely before mixing in the mini chocolate chips and breaking into clumps. Store in an airtight container. 

Tuesday, February 19, 2013

Nutella Espresso Mousse Brownies


I can't believe it's been a month since I posted any new dessert recipes. I guess after all of my holiday baking I took somewhat of a break from desserts and focused more on cooking, as well as bringing back some favorites from the past. Last night, however, I had the perfect excuse to bake something new as my family came over to see pictures from my parents' recent trip to Australia.

These brownies turned out to be a huge hit amongst my family members and were received with much more enthusiasm than I had anticipated. That's not to say that I didn't think they would taste bad; I was just surprised at how much everyone loved them and how many questions I received about them.

The original recipe called for making the brownies in an 8" x 8" pan but my pan was occupied at the time. However I used my super math skills and calculated that using a round cake pan with a 9" diameter would yield the same result without me having to adjust the quantities. True, the baking time was slightly less but that just made the whole thing faster and by using a springform pan I was able to just pop the entire thing out and slice it like a cake instead of into squares, as is typical of a brownie.

The truth of the matter was that the recipe was super easy and kind of reminded me of a cheater's version of a double layered chocolate mousse cake. The espresso flavor was quite pronounced in the mousse but I think it complimented the nutella well. My only complaint would be that I felt the brownie layer was too dense compared to the airy mousse and it felt like two separate desserts in my mouth. My mom, a lover of dense, fudgy brownies did not feel the same. I would have paired the mousse with a lighter, more cakey brownie and I might try that in the future.

Nutella Espresso Mousse Brownies
Note: I used a 9" springform pan and therefore my "brownies" turned out to be more of a cake. The directions posted below reflect the original brownies, meant for an 8" x 8" pan. If using a 9" round cake pan, keep the quantities the same and decrease the baking time by 5 minutes. 

For the brownie layer:
  • ½ cup unsalted butter, melted
  • 1 tbsp instant espresso powder
  • 1 cup sugar
  • 2 large eggs
  • 1 tsp vanilla
  • ⅓ cup cocoa powder
  • ½ cup flour
  • ¼ tsp salt
  • ¼ tsp baking powder
For the mousse layer:
  • 2 tsp instant espresso powder
  • 1 tbsp hot water
  • ¼ cup nutella
  • 1 cup heavy cream
  1. Sift together the cocoa powder, flour, salt, and baking powder. Set aside.
  2. In a separate bowl, whisk the instant espresso powder in the melted butter until dissolved. 
  3. Add the sugar and beat until fully incorporated. 
  4. Beat in the eggs, one at a time, then the vanilla. 
  5. Stir the dry ingredients into the mixture just until incorporated then pour into a well-greased or parchment lined 8" x 8" pan. Bake at 350 degrees Fahrenheit for 28-30 minutes or until a toothpick inserted into the center comes out clean. Set aside to cool.
  6. To make the mousse: dissolve the instant espresso in the hot water and then whisk with the nutella. 
  7. Beat the heavy cream on medium speed until stiff peaks form. Take a spoonful of the whipped cream and whisk into the nutella espresso mixture to loosen it. Add the mixture to the rest of the whipped cream and gently fold in with a spatula until no streaks remain.
  8. Pour the mousse over the cooled brownie layer and smooth the top. Refrigerate for at least 2-3 hours to allow the mousse to set then remove from the pan and cut into squares.

Thursday, August 30, 2012

Coffee Cheesecake with Chocolate Glaze


If there's anything my brother loves it's coffee and chocolate...so when it came time to bake him a cake for his birthday there was no doubt in my mind that a coffee cheesecake with a chocolate crust and glaze would be perfect. Considering how long I have been baking cheesecakes it's actually surprising I have yet to make a coffee flavored one. But I guess that's not the case anymore since we all celebrated my brother's 16th birthday with the family last night and capped the evening with my cheesecake.

I really wanted to make sure that the cake had a strong coffee flavor which I achieved by adding ¼ cup of strongly brewed espresso. However I think everyone would agree that what really made the cake shine was the chocolate glaze, courtesy of my mom. Not as much anymore, do to my excessive baking, but in the past my mom used to make her famous "Chocolate Festival Cheesecake". The cake was incredibly rich and chocolatey with a chocolate graham cracker crust, chocolate cheesecake, and a chocolate glaze. I basically recreated her cake but I substituted the chocolate middle for a coffee cheesecake instead.

Everyone enjoyed the case, especially my mom and my brother as they are such coffee and chocolate lovers. In fact my mom even came home during her lunch break from work the next day to have some cake. She claimed she also came to see us but I wonder if the cake in the fridge held the bigger appeal ; )

Coffee Cheesecake with Chocolate Glaze

For the crust:

  • 2 cups graham cracker crumbs
  • ⅓ cup powdered sugar
  • ⅓ cup cocoa powder
  • ½ cup unsalted butter, melted
Combine all of the ingredients in a bowl and then transfer to an 11" springform pan. Gently press down all along the bottom and sides and then bake at 350 degrees Fahrenheit for 8 minutes. Set aside to cool.

For the cheesecake:

  • 2 lbs (4 blocks) cream cheese, room temperature
  • 1 cup sugar
  • 4 large eggs
  • 2 cups sour cream
  • ¼ cup brewed espresso, cooled
  • 1 tsp vanilla
  1. Beat the cream cheese on medium-high speed for about a minute, until smooth.
  2. Beat in the eggs, one at a time, at low speed. Beat in the sugar. Scape down the sides of the bowl as necessary.
  3. Beat in the sour cream and then the vanilla and coffee and mix on medium speed until everything is well incorporated. The batter will be fairly liquidy.
  4. Pour the mixture into the cooled springform pan and bake for 55 minutes at 325 degrees Fahrenheit using a hot water bath or by placing a pan of hot water on the lowest rack beneath the cake.
  5. Without opening the oven door, turn off the oven and leave the cake to cool for 1 1/2 hours inside the oven. Afterward, remove from the oven and cool to room temperature before refrigerating for at least 4 hours, though preferably overnight.
For the chocolate glaze:
  • 1 cup sugar
  • ⅔ cup milk
  • ¾ cup cocoa powder
  • ½ cup unsalted butter
  1. Combine all of the ingredients in a small saucepan over medium heat. Stir constantly until the butter melts entirely and the glaze starts to boil.
  2. Once boiling, reduce the heat to low and continue to simmer and stir the glaze as it thickens. Try to break up any clumps formed by the cocoa powder. 
  3. Take the glaze off the heat once it has thickened and coats the back of a spoon with slow trails. If desired, add more cocoa powder to create more thickness.
  4. Strain the glaze to remove any clumps and cool it before spreading it over top of the cake. 

Thursday, December 23, 2010

Frozen Chocolate Souffle


Recently my dad brought home a magazine from the liquor store featuring many delicious recipes. Each recipe was meant to be paired with a wine but I didn't look too heavily at that part. Instead, I flipped my way through the magazine until I found this easy to make frozen chocolate souffle. Souffles, in general, are pretty finicky and difficult to make. You have to time the baking just right so that your souffle doesn't fall as soon as you take it out of the oven. Since, I have no time and patience for such tedious monitoring of my baking, this no-bake souffle appealed to me. For those who are curious, this souffle is meant to be paired with either Tia Maria, a sweet Jamaican rum-based coffee liqueur, or with Fonseca Bin 27 Premium Reserve Port, a rich chocolatey wine.

I must be truthful and admit I have no idea how this souffle was actually supposed to turn out. I didn't know what texture to look for or even what consistency it should have after mixing. In the end, the finished product reminded me of ice cream though not as fluffy. My mother and brother especially loved it because it had quite a strong coffee taste mixed with the chocolate. They are both coffee and chocolate fanatics so obviously a dessert that combines both flavors is ideal for them. I deviated slightly from the recipe, using freshly made espresso instead of dissolving instant espresso granules in the hot cream, which could have accounted for the extra coffee flavor. Since there were no complaints I guess the coffee flavor was a hit, though I personally wouldn't have minded less of it.

Frozen Chocolate Souffle
Note: This recipe calls for making the souffles in 6 espresso cups. I used fairly large cups and in the end I inverted the souffle onto a plate. The souffles can also be served in the cup, though I liked my presentation on the plate.
  • 1/2 cup milk
  • 3/4 cup heavy cream
  • 1/2 cup espresso (recipe called for 2 tbsp of instant coffee)
  • 8 oz (250 g) semi-sweet chocolate (70%), coarsely chopped
  • 3 large eggs
  • 4 1/2 tbsp sugar
  • 1/4 tsp salt
  • 1/2 cup hazelnuts, chopped
  1. If using instant coffee, place milk, cream, and coffee in a heavy saucepan over medium heat and whisk until coffee crystals dissolve. Remove from heat and allow to cool for 15 minutes. If using ready espresso, simply mix with milk and cream and set aside.
  2. Using a double broiler, beat the eggs yolks into the coffee mixture until it slightly thickens.
  3. Gradually add half of the chopped chocolate, stirring as it melts into the hot cream. Afterward, put the saucepan into an ice water bath to cool down the mixture completely.
  4. While the mixture cools, add the salt to the egg whites and beat until stiff. Gradually add the sugar while beating until stiff peaks form.
  5. Fold the egg whites carefully into the cooled chocolate mixture.
  6. Pour the mixture into each cup until it reaches the top. Place on a baking sheet and freeze for at least 4 hours.
  7. Once ready to serve, run a knife around the edges of the souffle and then invert onto a plate. Melt the remaining chocolate and drizzle onto the frozen souffles. Sprinkle with the chopped hazelnuts while the chocolate sauce is still warm.

Saturday, November 20, 2010

Tiramisu


Today is my mom's birthday! I decided that as a gift to her, I would make her favorite dessert...tiramisu. Personally, I'm not a huge fan of tiramisu because it has such as strong coffee flavor and I'm not keen on the bitter taste of coffee. However, I thought she would appreciate my taking the time to learn how to make her a yummy tiramisu especially for her birthday.

Traditionally, tiramisu is made with eggs, marscapone cheese, lady fingers, and espresso. Of course other variations exist that substitute heavy cream for the eggs or some sort of fruit for the espresso. After making this cake, I realized that the technique itself is not too difficult and I think I will attempt to try a non-traditional variation next time. Also, due to my brother's concern over the raw eggs, I think I will switch to using heavy cream in the filling. For one, it eliminates the possible health hazard; he was quite worried after being extensively taught in his food class about the dangers of raw eggs and salmonella. Also, I think that using cream will give it a fluffier texture and make it more smooth.

I'm glad my mom enjoyed her birthday cake but I think I will try and make a different flavor next time to see how it tastes. Online there were many interesting variations involving fruits such as strawberry or raspberry. Also, many people like to add a little bit of liquor to the espresso. I personally chose to forgo the liquor because it creates an even more bitter taste, but I'm sure that when paired with the right liquor it can heighten the espresso flavor and coffee fanatics would enjoy that.

Tiramisu
Note: I made this for a 9" cake pan but you can use pretty much any dish you desire. Just make sure to trim the ladyfingers so that they fit into your pan. For example, I had to trim my ladyfingers to make them short enough to not stand over the top of the pan.
  • 500 g marscapone cheese
  • 400 g ladyfingers (I actually used 1 1/2 packages but it depends how the lady fingers fit into your pan)
  • 5 eggs, separated
  • 125 g (1/2 cup) sugar
  • 2 cups espresso, cooled
  • Chocolate bar (dark or milk depending on your preference)
  • Cocoa powder


  1. Beat the egg whites until they form stiff peaks and set aside.
  2. Beat the egg yolks together with the sugar until creamy and pale yellow in color, almost white. 
  3. Mix the marscapone cheese into the egg yolk and sugar mixture.
  4. Fold the egg whites gently into the creamy mixture and mix lightly until evenly combined.
  5. Lightly dip each side of the ladyfingers into the espresso and arrange around the bottom and sides of the pan. Make sure you don't soak them through, just a little dip to get them moist.
  6. Spread half of the filling over the ladyfingers and then grate the chocolate over top.
  7. Arrange the next layer of dipped ladyfingers and then spread the rest of the filling over top.
  8. Grate the chocolate and then use a fine mesh sieve to dust cocoa powder over the top. Refrigerate the cake for at least 4 hours to allow all of the flavors to come together.