Showing posts with label cinnamon. Show all posts

Monday, December 30, 2013

Cinnamon Dolce Latte Cupcakes


I've been on a bit of a coffee fix with my baking lately: first with my mocha cucakes with espresso buttercream for my work Christmas party and then a caramel latte cheesecake for my aunt and uncle's silver wedding anniversary. I can't explain why I am so suddenly drawn to this flavor but somehow I am very tempted to bake many coffee treats this holiday season.

On Christmas day my brother and I made plans to go with some friends to see the new Disney movie currently in theaters however by the time we arrived it was sold out. Instead we came back to our house and we played board games. I thought it would be fun to bake as well so I suggested we make cupcakes. Of course I had ulterior motives as my friend has just gifted me a cupcake stand and I really wanted to use it.

I decided to remake one of the two cupcake recipes that I had used for my work Christmas party because the first time I made it the frosting didn't quite turn out. Rather than takes my chances again I used the same cake recipe but the frosting from the mocha cupcakes. While the cupcakes baked we played a fun game and then once they cooled down I frosted them.

Excitedly I beautifully placed the cupcakes on my new stand and took them into the living room where I do most of my food photography. Unfortunately I leaned over the table the wrong way and one of the legs gave out, sending the whole thing crashing to the floor. Luckily the glass table did not shatter and nothing happened to the camera or the floor.

Even though we managed to salvage the cupcakes themselves, most of the frosting ended up on the floor and had to be thrown away. There was enough left that we were able to redistribute it, though not as beautifully. I was still able to get a nice picture before they fell and they still tasted great so I guess it was a success, though now I have to figure out how to fix the table.

Cinnamon Dolce Latte Cupcakes:
Note: This recipe makes 12 cupcakes. Also, I used the frosting from my mocha cupcakes. The recipe can be found here.
  • 2 cups flour
  • 1½ tsp baking powder
  • 2 tsp cinnamon
  • ¼ tsp salt
  • ½ cup (8 tbsp) browned butter, cooled
  • ½ cup granulated sugar
  • ½ cup packed brown sugar
  • 3 eggs
  • 1 tsp vanilla
  • ¼ cup milk
  • ¼ cup brewed coffee, cooled
  1. Melt the butter in a medium saucepan over medium heat. Stir constantly as it continues to cook and foam. After a few minutes, it will begin to turn a rich brown and smell nutty. Remove from heat immediately and let cool before using in the cupcakes.
  2. In a medium bowl, whisk flour, baking powder, cinnamon, and salt until well combined. Set aside.
  3. In a small bowl combine the milk and coffee. Set aside.
  4. Beat the browned butter with both sugars until well incorporated. 
  5. Beat in the eggs, one at a time, until fully incorporated, then beat in the vanilla.
  6. Using the lowest speed setting, alternatively beat in the dry ingredients and milk/coffee mixture starting and ending with the dry ingredients.(There should be three dry additions and two wet.) 
  7. Distribute the batter evenly amongst a well-greased or paper-lined 12 cup muffin pan. Bake at 350 degrees Fahrenheit for 20-22 minutes, or until a toothpick inserted into the center comes out clean.
  8. Frost the cupcakes once they have cooled completely.

Friday, November 29, 2013

Hummingbird Cake


While my parents were away last week, my aunt and uncle invited my brother and me over for dinner one night. As usual, I volunteered to make something for dessert. We happened to have some overly-ripe bananas lying around and I wanted to use them. However I didn't want to just make a banana loaf, not that it isn't yummy, but I wanted to try something different. When I went to my favorite tastespotting.com and typed in "banana" into the search box I scrolled through quite a few recipes for different variations of banana loaf before I came across one for "hummingbird cake".

The recipe appealed to me because it was simple, easy, and had a twist using crushed pineapple and chopped pecans. Also, the idea of baking it in a bundt pan made for a nice presentation. Of course the cream cheese icing on top also scored points in my book.

The cake turned out moist and delicious and everyone enjoyed it after dinner. According to my aunt, who later phoned my mom, my uncle really loved it and has been taking it to work with him as well. Although I liked how it looked coming out of the bundt pan, I think I may use a regular 9" x 13" pan next time because it took a long time to bake all the way through and that resulted in the outside being a little too crusty for my liking. Despite that fact, I was still satisfied and based on their comments it seemed everyone else was too.

Hummingbird Cake

For the cake:
  • 1½ cups pecans, chopped
  • 3 cups flour
  • 2 cups sugar
  • 1 tsp baking soda
  • 1 tsp cinnamon
  • ½ tsp salt
  • 3 eggs, beaten
  • 1¾ cups mashed banana (approximately 3-4 large bananas)
  • 1 cup crushed pineapple with juice
  • ¾ cups canola oil
  • 1½ tsp vanilla extract
For the cream cheese icing:
  • 4 oz (½ cup) cream cheese, softened
  • 2 cups powdered sugar
  • 1 tsp vanilla
  • 1-2 tbsp milk
  1. In the oven or on the stove, gently heat the pecans for 5-8 minutes or until lightly toasted. Cool and set aside.
  2. In a large bowl, sift together the flour, sugar, baking soda, cinnamon, and salt. 
  3. Add the eggs, mashed banana, pineapple, oil, and vanilla. Stir just until all of the ingredients are combined. (The batter will be lumpy)
  4. Gently stir in one cup of the chopped pecans.
  5. Grease a large bundt pan with butter or non-stick spray and pour the batter into the pan.
  6. Bake at 350 degrees Fahrenheit for 60-80 minutes, or until a knife poked all the way to the bottom comes out clean. (Mine took the full 80 minutes) If the top starts to brown too quickly cover the pan with aluminum foil.
  7. Remove the pan from the oven and set aside for 10 minutes before carefully loosening the cake and flipping it over. Allow the cake to finish cooling for about an hour on a wire rack.
  8. Meanwhile, blend the ingredients for the icing. Add more milk if desiring a more liquidy consistency. 
  9. Once the cake has cooled, pour the icing over top and sprinkle the remaining chopped pecans. 

Sunday, July 28, 2013

Cinnamon Rolls


Recently one of my best friends moved into a new place just two blocks away from the beach! After dealing with an ant-infested apartment for the past year I would say she truly deserves an upgrade. Last night I had the pleasure of seeing her new place and catching up with her over dinner. Afterward we walked over to the beach and watched the annual Celebration of Lights fireworks that take place every summer in Vancouver.

As a mini housewarming I decided to bake cinnamon rolls for my friend as they are one of her favorite desserts. I was actually surprised that I had yet to post any recipes of cinnamon rolls in the three years since I first started this blog. That's not to say I haven't baked any in that time, but somehow I was never completely satisfied with the recipe or the pictures.

Luckily this time was different. The rolls turned out flaky and soft with the perfect proportion of cinnamon filling. The original recipe called for an icing glaze but I personally love cream cheese frosting so I made that instead.

My friend's eyes lit up when she opened the door and saw the treat I had brought along. The expression on her face was worth the time I spent making the rolls, although truthfully it wasn't difficult at all. I had some extras left over and brought them to my cousin's house the next day, which she was equally grateful for.

Cinnamon Rolls
Note: This recipe makes 8-12 large or 12-16 small rolls, depending on how you cut them.

For the dough:
  • 6 ½ tbsp sugar
  • 1 tsp salt
  • 5 ½ tbsp unsalted butter
  • 1 large egg, slightly beaten
  • 1 tsp lemon extract or 1 tsp grated lemon zest
  • 3 ½ cups flour
  • 2 tsp instant (rapid rise) yeast
  • 1 1/8 to 1 ¼ cups whole milk or buttermilk, at room temperature
For the filling:
  • 6 ½ tbsp sugar
  • 1 ½ tsp ground cinnamon
  1. Beat the sugar, salt, and butter together on medium-high speed.
  2. Beat in the egg and lemon zest/extract until smooth.
  3. Add the flour, yeast and milk. Mix on low speed until the dough forms a ball. Switch to a dough hook and increase the speed to medium, mixing for approximately 10 minutes, or until the dough is silky and supple, tacky but not sticky. (You may have to add a little flour or water while kneading to achieve this texture.) Alternatively, hand-knead the dough until it is smooth.
  4. Lightly oil a large bowl and transfer the dough to the bowl, rolling it around to coat it with oil. Cover the bowl with plastic wrap and set aside in a warm place for approximately two hours, or until it has doubled in size.
  5. Once the dough is ready, roll it out into a rectangle about 2/3" thick and 14" x 12 for large rolls, 18" x 9" for smaller rolls. Make sure not to roll it out too thin otherwise the rolls will be chewy and tough.
  6. Combine the sugar and cinnamon for the filling and spread generously across the surface of the dough. Starting from one long edge, carefully roll the dough into a log.
  7. With the seam side down, cut the dough into 8 to 12 pieces about 1 ¾ inches thick for larger rolls or 12 to 16 pieces about 1 ¼ inches thick for smaller rolls.
  8. Set aside onto a baking sheet lined with parchment paper, placing the pieces about ½" apart so they aren’t touching but are close to one another.
  9. Cover loosely and allow them to proof at room temperature for 75-90 minutes, or until the pieces have grown into one another and have nearly doubled in size. (You may also retard the shaped buns in refrigerator for up to 2 days, pulling the pan out of the refrigerator 3-4 hours before baking to allow the dough to proof.)
  10. Bake at 350 degrees Fahrenheit for 20-30 minutes or until the rolls are golden brown. Cool for 10 minutes in the pan before glazing or frosting.
Note: The original recipe can be found on my favorite food blog Annie's Eats which also has the recipe for the icing glaze. I used half the amount from my standard cream cheese frosting recipe which can be found here.

Tuesday, April 16, 2013

Apple Cinnamon Pancakes


I woke up on Saturday morning with a big craving to make pancakes, something I haven't done for a while. I had bookmarked a recipe for apple cinnamon pancakes a few months ago and decided that this weekend would be a good time to finally try it out. The recipe was pretty straightforward and I substituted using sour cream instead of Greek yogurt because that's what I had on hand.

My brother was delighted to discover that I had made pancakes for breakfast and eagerly helped me out with his taste-testing skills. Although nice and fluffy, as all good pancakes should be, I have to admit the apple flavor was not as pronounced as I had hoped it would be. The chunks of grated apple were pleasant but I think I might add more in the future, in addition to some applesauce in order to really make the apple flavor come through.

Apple Cinnamon Pancakes
Note: Makes about 10 slightly larger than palm-sized pancakes. Also, this recipe features changes that should create more of an apple flavor, but have not actually been tested. For the original recipe click here.
  • 1 large egg
  • ½ cup Greek yogurt or sour cream
  • ½ cup milk
  • ½ cup applesauce
  • 1 cup flour
  • ½ tsp baking powder
  • ¼ tsp salt
  • ½ tsp cinnamon
  • ¼ tsp vanilla extract
  • 2 large apples, peeled and roughly grated
  1. Sift together the flour, baking powder, salt, and cinnamon and set aside.
  2. In a separate bowl combine the egg, Greek yogurt or sour cream, milk, applesauce, and vanilla extract.
  3. Add the dry ingredients to the wet ones and mix until just barely incorporated.
  4. Add the grated apples and mix to incorporate into the batter. Don't worry if the batter is lumpy but if it is too thick add a little bit of milk to thin it out.
  5. Heat a griddle or large skillet over medium heat. Once heated, reduce the temperature to medium low and pour cup of batter onto the cooking surface. Allow the pancake to cook until bubbles start to form on the top surface, about 20-25 seconds, then use a large spatula to gently flip the pancake over. Cook the other side until it is light and golden and fully cooked through. Repeat with remaining batter.
Note: You may have to go through a couple of "test" pancakes before you achieve the right temperature on the griddle or skillet. Finished pancakes can be kept warm in the oven at 200 degrees Fahrenheit while the rest are cooking. 

Sunday, March 31, 2013

Carrot Cupcakes


After never having made cupcakes before I actually made two different types this weekend. The unit on the hospital where I am currently finishing my last practicum has a few pregnant nurses who are about to go on maternity leave. I knew that one of them would be having her last shift this weekend and I thought to make some cupcakes and bring them for the staff to share. I couldn't settle on one type so I made Red Velvet, secretly chocolate in flavor, and carrot cupcakes.

Despite my preconceptions about both, and the fact that I'm not crazy about cupcakes, I actually enjoyed the carrot cupcakes more than the red velvet. They were incredibly moist and the carrot flavor was present but not overwhelming. Combined with the cream cheese frosting, featuring subtle hints of lemon zest, I could see why lots of people love carrot cake.

Ironically, the nurse that I intended to bake the cupcakes for was sick and did not come in for her shift. Since I had already gone through the effort of baking the cupcakes and bringing them in I didn't want them to go to waste so the rest of the staff happily obliged in eating them.

Carrot Cucakes
Makes 12-14 standard sized cupcakes.
  • 1 cup flour
  • 1 cup sugar
  • 1 tsp baking powder
  • ¼ tsp baking soda
  • ½ tsp ground cinnamon
  • 1½ cups finely grated carrots (about 3 medium-large sized)
  • 2 large eggs
  • ½ cup vegetable oil
  1. In a large bowl, combine the flour, sugar, baking powder, baking soda, and cinnamon. Whisk to blend and set aside.
  2. In a separate bowl, lightly beat together the eggs and oil. Add the grated carrots and mix together. Note: I used a food processor to make sure the carrots were very finely grated because I didn't want large chunks in the cupcakes.
  3. Pour the wet ingredients into the dry and gently stir with a wooden spoon or spatula until the batter comes together and everything is evenly incorporated.
  4. Use a pre-greased or paper-lined muffin tin and fill each cup about ¾ full with the batter. Bake at 350 degrees Fahrenheit for 18-20 minutes, or until a toothpick inserted into the center comes out clean.
  5. Cool for 5-10 minutes in the pan before removing to cool completely.
Note: I frosted the carrot cupcakes with the same frosting as the red velvet ones except I omitted the vanilla and added the zest of one lemon. The recipe can be found here

Sunday, December 9, 2012

Holiday Treats


For the past few years I have made a habit out of putting together little boxes filled with holiday treats for my family. At first I started off small...a box filled with chocolate truffles. Then the following year I added to it with some chocolate crinkle cookies and berry crumb bars. This year I decided to swap out the truffles and add cranberry bliss bars and almond biscotti.

It was definitely a big undertaking to bake so much in a relatively short time period but I broke it up over two days and it all worked out. I will admit that at one point the kitchen looked quite disastrous with many different mixing bowls, ingredients, measuring cups, and baking trays spread out everywhere. Luckily my mom helped me with the packaging and she also tied up the boxes very nicely for me.

Everyone in my family was quite appreciative of the treats and I received many thanks and compliments. I can honestly say that I love the holiday season and the general joyfulness that can be felt everywhere. Therefore I love to do my part to spread the holiday cheer and brighten everyone's holidays just a touch more. Happy Holidays :)

Tuesday, December 4, 2012

Almond Biscotti


The idea of making biscotti has truthfully never been quite appealing to me because it seemed like a time consuming process. This, coupled with the fact that most members of my family aren't huge biscotti fans anyway, led me to ignore most biscotti recipes I have seen in the past.

Last summer, however, one of the things I learned to make during my trip to Italy was this biscotti. The recipe was very easy and actually not as time consuming as I thought; although the biscotti had to bake twice each time was only fifteen to twenty minutes. Also because the loaves were sliced while still hot from the first baking they were actually very easy to cut into pieces, unlike my delicious but difficult to slice fruit and nut crisps.

During my trip to Italy I not only picked up some new recipes but I also brought back some ingredients, one of which was Italian baking soda. When I first showed this to my mom she scoffed and questioned my need to buy specific baking soda from Italy. "Isn't ours good enough?" she asked me. Although there is nothing wrong with our baking soda I was fascinated by the fact that the one we used in Italy already had vanilla mixed into it, therefore no additional vanilla extract had to be added to the biscotti.

Up until last week my Italian baking soda had been sitting, unopened, in the kitchen cupboard. Finally I put it to use when I baked these biscotti. I think the person most surprised by the biscotti was my mom; she did not expect the biscotti to still be soft and chewy rather than hard like a rock as is typical of biscotti sold in stores here. Also she enjoyed the fact that each bite held a new "surprise" as she called it with the chunks of chocolate, almonds, hint of cinnamon, orange, and lemon. I was glad she enjoyed it so much, in addition to the rest of the family, and I think I will be baking it again soon for my holiday treat boxes.

Almond Biscotti
Note: Although I used my special Italian baking soda I was provided with a recipe that uses regular baking soda and vanilla, which is reflected below.
  • 1 cup whole almonds, lightly toasted
  • 4 oz (112 g) chocolate, roughly cut into chunks
  • 1 orange, zested
  • 1 lemon, zested
  • ½ cup unsalted butter, melted
  • 1 cup sugar + extra for sprinkling
  • 3 large eggs, lightly beaten
  • 1 tsp almond extract (can be substituted with almond liquor)
  • ½ tsp cinnamon
  • ¼ tsp salt
  • 1½ tsp baking soda
  • 2¾ cups flour
  • 1 egg white
  1. In a large bowl combine the melted butter, sugar, orange and lemon zests. Add the vanilla and almond extract (or liquor).
  2. Mix in the beaten eggs and almonds.
  3. In a separate bowl sift together the flour with the cinnamon, salt. If working with liquor add the baking soda last to the dough, right before the chocolate, otherwise sift with the other dry ingredients.
  4. Add the dry ingredients to the wet and mix together until a dough forms. Using your hands, work in the chunks of chocolate into the dough.
  5. Split the dough in half and form into two long logs about 3" wide. Lay the logs onto a large baking sheet covered in parchment or wax paper. Make sure to leave space between the logs as they will widen as they bake.
  6. Pat down the logs so they have a flat surface and use a pastry brush to spread the egg white over top. Generously sprinkle sugar over the surface.
  7. Bake the biscotti for 15-20 minutes at 400 degrees Fahrenheit or until the tops of the logs start to crack and become a light golden color. 
  8. Remove from the oven and cut diagonally into long pieces while still warm. The best way to do this is to cut straight down rather than use a sawing motion. 
  9. Lay the cut pieces, cut side facing up, back on the tray and return to the turned off but still warm oven for 15-20 minutes. If you like the biscotti softer take them out sooner, if you like them crunchier leave them in for longer.

Tuesday, October 30, 2012

Peanut Butter and Quinoa Granola


Yes I know...another granola recipe. You're probably thinking to yourself: "How can she have yet another granola recipe...didn't she already figure it out?" The truth is yes...for the most part I figured out two different base recipes that I alter with different mix-ins to create various flavors. However this granola is not like the others because it also uses quinoa, a new favorite ingredient of mine. The quinoa isn't cooked before being added to the oats, rather it gets baked right into the granola itself.

Personally I think that this is my new favorite granola. Granted I may say that about the next one I make but for now this is it. Being the texture snob that I am, I love how the quinoa provided an extra crunch to the granola. Also, the base recipe had a good ratio of wet to dry ingredients making for a crunchy granola to start with that was full of peanut flavor. Of course that could easily be changed to some other type of nut with the appropriate substitution. That being said I would still recommend using a nut butter of some sort, such as almond or cashew, because without it there will not be enough wet binder for the granola to stick together in clumps.

As for the mix-ins, I'm not a coconut lover myself but I know that coconut flakes are a common and popular granola addition. Other things include various dried fruits, banana chips, or chocolate chips. Ultimately, I highly recommend trying this granola because it's probably unlike any you have tasted before with the great addition of quinoa.

Peanut Butter and Quinoa Granola
  • 2 cups large-flake (old-fashioned) rolled oats
  • ¾ cup quinoa, rinsed
  • ¾ cup lightly salted roasted peanuts, coarsely chopped
  • ½ tsp fine sea salt
  • ½ tsp ground cinnamon
  • ¼ cup natural cane sugar or packed light brown sugar
  • ¼ cup honey
  • ½ cup unsweetened natural peanut butter
  • cup vegetable oil
  • 1 tsp vanilla extract
  • cup dried cranberries
  1. In a large bowl, combine the oats, quinoa, peanuts, salt and cinnamon.  
  2. In a small saucepan, combine the sugar and honey. Bring to a simmer over medium heat, stirring constantly. Turn off heat and stir in peanut butter, oil, and vanilla until blended.
  3. Pour the peanut butter mixture over the oats and stir until evenly coated. Spread the mixture in a single layer on a large rimmed baking sheet lined with parchment paper.
  4. Bake for 30-45 minutes (time will vary based on size of baking sheet) at 325 degrees Fahrenheit or until the granola becomes golden brown. Stir every 10-15 minutes to ensure even baking.
  5. Remove from the oven and allow the granola to cool completely on the tray before mixing in the dried cranberries and transferring to an airtight container.

Thursday, October 18, 2012

Caramel Apple Pie Bars


I find it interesting how having time off of school actually leads to me being busier rather than actually taking time off. Somehow my mind plays tricks on me and convinces me that it's a good idea to try to get every little thing crossed off of my to do list that I have been putting off for one reason or another. The result is that I have set way too many goals of things I would like to accomplish by the end of the week, which is not a good thing considering that the weekend is about to start and then I'm back to school on Monday.

Regardless, today my friend came over and we spent time doing research for a big project we are working on. I know how much my friend loves my baked goodies, as does my family, and I thought I would use the occasion to bake these caramel apple pie bars which I first saw on my favorite food blog Annie's Eats about a month ago. The dessert seemed appropriate for fall with the lovely undertones of cinnamon, sweetness of the caramel, and the crunch provided by the nuts on top.

Although making the bars originally detracted from my research, once they were in the oven I got to work. Later on they provided the perfect little pick me up and boost of sugar we needed to keep ourselves going. I have to admit that we were a little impatient to wait for them to cool and slice, so we spooned them out of the pan and ate them as more of a crumble rather than a composed bar. My family enjoyed it too and my brother even said it was "glorious". By the end of the evening only a quarter of the pan was left. My conclusion: this recipe is definitely a keeper.

Caramel Apple Pie Bars

For the filling:
  • 4 large apples, peeled and sliced
  • 2 tbsp unsalted butter
  • 3 tbsp sugar
  • ¾ tsp ground cinnamon
  • 9 oz (252 g) caramel soft chews
  • 2 tbsp milk
For the dough:
  • 1½ cups all-purpose flour
  • 1 cup old-fashioned oats
  • cup sugar
  • cup brown sugar, lightly packed
  • ¾ tsp baking powder
  • ½ tsp salt
  • ¼ tsp ground cinnamon
  • 12 tbsp cold unsalted butter, cut into small pieces
  • 1 large egg yolk
  • 1 tsp vanilla extract
  • Optional: ½ cup chopped nuts, such as pecans or walnuts
  1. To prepare the filling, melt the putter in a large pan over medium heat. Stir in the apples, sugar, and cinnamon and mix to coat evenly. Continue to cook for about 15 minutes, stirring occasionally, and remove from the heat once the apples start to brown and the sugar caramelizes.
  2. To prepare the dough, combine the flour, oats, sugars, baking powder, salt, and cinnamon in a large bowl. Stir everything to blend then add the butter pieces. Use a pastry cutter or two knives (I actually used my hands) to cut the butter into the oat mixture until it resembles a course meal.
  3. Add the egg yolk and vanilla and knead just until a crumbly dough starts to come together. Press ⅔ of the dough into a 9" x 9" baking pan lined with aluminum foil or parchment paper. Bake for 12-14 minutes at 375 degrees Fahrenheit or until the dough is lightly golden.
  4. Meanwhile, while the dough is baking, finish preparing the filling by combining the caramel soft chews and the milk in a small saucepan over medium heat until completely melted and smooth.
  5. Once the dough is ready, pour the melted caramel and spread evenly over the surface. Strain the apple filling and spread over top the caramel layer. Crumble the remaining dough mixture evenly over the surface and sprinkle with chopped nuts if using. Return to the oven to bake for another 22-25 minutes or until the top is golden brown. Cool completely before slicing and serving (or spoon and serve if impatient like me ;)

Wednesday, September 26, 2012

Chocolate Swirl Buns


Wow, September has gone by in a flash! I can't believe that it's already the end of the month and yet it feels like it's still summer. Part of the reason is because we have been blessed with great weather that has lasted all month long. In fact I heard on the radio that apparently we broke the record for the longest streak of dry days. According to reports the streak went on for 51 days...not bad for a city known around the world for its rainy weather. This great weather coupled with my extensive summer wardrobe made me a very happy camper all month long, despite having to return to school.

I have to admit that another reason the month seemed to fly by is because my schedule was packed with activities. As a result I didn't actually spend too much time in the kitchen because I was simply too busy, though I'm sure others would still consider it a lot by their standards. Still, when some classmates called upon me to help them with their bake sale I immediately agreed to contribute.

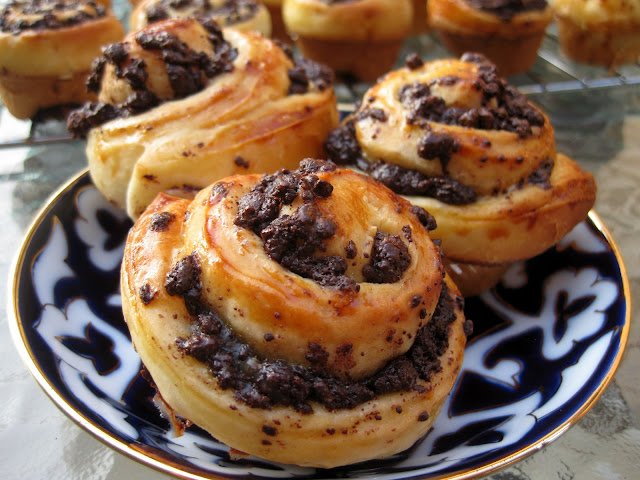
I decided to make these chocolate swirl buns that I saw not to long ago on my favorite food blog Annie's Eats. They are basically like a cinnamon bun, though with a chocolate filling, and by baking them in a muffin tin they are extremely easy to pop out and serve. Once again my family was disappointed that I was baking for someone else, though I did leave two for my mom and brother to try. They both enjoyed the little buns and I decided that I should make them again sometime soon, this time for the family, because they looked delicious but I didn't have a chance to try one.

Chocolate Swirl Buns
Note: The original recipe calls for making 12 rolls in a regular muffin tin. I made 24 in a mini muffin tin and the rolls were a great size. I also prepared the rolls a day ahead and kept them in the fridge then let them sit on the counter for a few hours the next day before baking them.

For the dough:
  • ½ cup warm milk
  • ¼ cup sugar
  • 2 tsp rapid rise (instant) yeast
  • 1 large egg, room temperature
  • 2 cups flour
  • ½ tsp salt
  • 3 tbsp unsalted butter cut into pieces, room temperature 
For the filling:
  • 8 oz (225 grams) dark chocolate, roughly chopped 
  • ¼ cup sugar
  • ½ tsp ground cinnamon
  • Pinch of salt
  • 3 tbsp unsalted butter, room temperature
  • 1 egg yolk + 1 tbsp water
  1. Using an electric mixer, combine the milk, sugar, and yeast. Add the egg, flour, and salt and mix until a sticky dough starts to form.
  2. Mix in the butter until incorporated. If using a stand mixer switch to the dough hook and knead on low speed for 10 minutes, otherwise just use your hands. The dough will still be extremely sticky.
  3. Transfer the dough to a well-greased bowl and cover with plastic wrap or a towel. Keep in a warm place until doubled in bulk, approximately 1-2 hours.
  4. While waiting, prepare the filling by combining the chocolate, sugar, cinnamon, and salt in the bowl of a food processor. Pulse several times until the chocolate is finely chopped and even somewhat powdery. Add the butter and continue pulsing until incorporated.
  5. Once the dough has risen place it on a well floured surface and punch it a little to deflate it. Let it rest for five minutes then split in half. Working with one half at a time, roll the dough out into a large rectangle about 12" long. 
  6. Sprinkle half of the chocolate filling over the rolled out dough then, working from the long end, roll it into a log. Cut the log into 12 individual pieces and place each into a well-greased mini muffin tin. Repeat with remaining dough and filling.
  7. Cover the muffin tins loosely with plastic wrap and allow the rolls to rise for at least 30 minutes. If not planning on baking right away simply cover and put them in the fridge, then allow them to proof twice as long before baking them later.
  8. Once ready to bake, brush the tops of the rolls with the egg wash and bake for 15-20 minutes at 350 degrees Fahrenheit, or until puffed and golden brown. If baking those that were refrigerated the bake time may be slightly longer.

Wednesday, July 4, 2012

Cranberry Bliss Bar


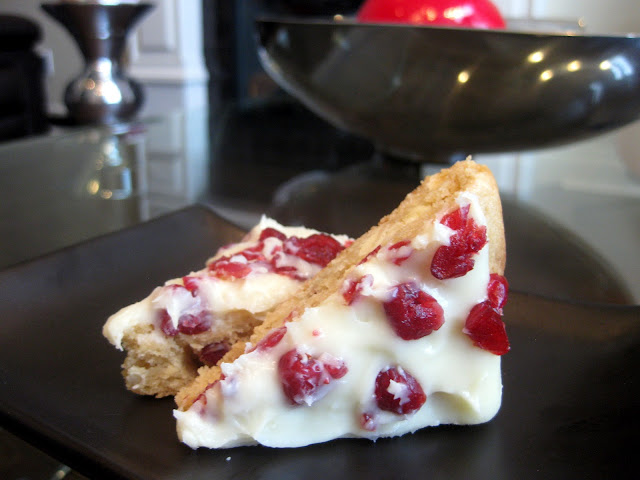
Now I know that it's summertime right now, or at least it should be according to the calendar, but I couldn't resist making this holiday treat. Every year during the holiday season Starbucks brings out some specialty drinks and goodies including the "oh-so-famous" cranberry bliss bar. I have to admit that I have never actually tried the Starbucks version however one of my friends, a fellow baker, has made it a couple of times and every time it's like heaven. The combination of the delicate blondie laced with cranberries and white chocolate then smothered with a cream cheese and white chocolate frosting is absolutely to die for.

After eating my friend's version countless times I asked her for the recipe and she graciously emailed it to me. Granted she actually provided me with the recipe over a month ago but the occasion to bake it had not come up until last night. I had a meeting to go to early this morning and I thought it would be a fun treat to bring along and for everyone to start their day off right. Technically that also meant a huge sugar high in the morning but indulgences are always fun once in a while.

The only annoying part about making the little treats was the last step which involved drizzling melted white chocolate over the bars once they had been frosted. Honestly it was more work than it was worth considering that white chocolate was already in the base of the blondie and mixed into the frosting. Obviously it would have made the bars more aesthetically pleasing but I couldn't make my drizzle turn out right and gave up on it quickly, choosing to spread the remaining white chocolate with a knife instead.

When I brought the treats to the meeting everyone was pleasantly surprised and thanked me for baking them. I distributed the extras amongst my friends afterward and they all loved it too; one friend even said it was like it was made by angels. I also made sure to save a piece for my friend who provided me with the inspiration and the recipe in the first place. Now that I have finally made the bars and have the recipe I'll be sure to whip it out again come holiday time.

Cranberry Bliss Bar
Note: I excluded the part about drizzling the white chocolate over the finished bars but that can be added as a final step if desired using part of the melted chocolate.

For the blondie layer:
  • 3/4 cup (6 tbsp) unsalted butter, melted
  • 1 1/2 cups brown sugar, packed
  • 2 large eggs
  • 3/4 tsp vanilla 
  • 2 1/4 cups flour
  • 1 1/2 tsp baking powder
  • 1/4 tsp salt
  • 1/8 tsp cinnamon
  • 1/2 cup dried cranberries
  • 1 cup white chocolate, chopped (white chocolate chips works too)
For the frosting:
  • 1 8 oz package cream cheese, room temperature
  • 1 cup powdered sugar
  • 100 g white chocolate, melted
  • 1/2 cup dried cranberries, chopped
  1. In a large bowl sift together the flour, baking powder, salt, and cinnamon and set aside.
  2. Cream the butter and sugar until uniform.
  3. Beat in the eggs and vanilla.
  4. Slowly mix in the dry ingredients until evenly incorporated. Stir in the cranberries and white chocolate pieces.
  5. Spread the batter into a well greased 9" x 13" pan and bake at 350 degrees Fahrenheit for 18-21 minutes, or until a toothpick inserted into the center comes out clean.
  6. While waiting to cool, beat the cream cheese and powdered sugar until well blended. 
  7. Gradually add the melted white chocolate and continue to beat until incorporated.
  8. Once the blondie base has cooled completely spread the frosting over top. Sprinkle with the chopped dried cranberries. Cut into squares or triangles and store in the refrigerator until ready to serve.

Wednesday, May 23, 2012

Nutty Granola


It's no secret that I'm crazy about granola. Every single weekday morning I have the exact same thing for breakfast...two hard boiled eggs and Greek yogurt mixed with granola. The variation comes from the flavor of the yogurt or the granola, but it's generally the same and I rotate through different combinations. On the weekends, when I have more time, I like to make some sort of an omelet but I still eat the yogurt with granola at some point during the day.

Ever since the new year I have really gotten into making my own granola. Back in February I posted about fruit, yogurt, and granola parfaits and in it I included a great granola recipe. Since then I have tried to come up with a few different variations but that recipe is still the one I make most frequently. Usually my new flavor combinations come from pre-existing granolas that I see on grocery store aisles. Often times I will buy one box to sample and see if I like the flavor; if I do I then try to recreate it at home. One of the combinations that I have come to love most is the maple/almond combo and honey/peanut. I find that both have a nice flavor that goes well with any variety of yogurt I choose, be it fruit flavored, coffee, plain, etc.

Even though I came up with a few good flavor combos, I was still having problems with the texture. Part of the reason I love granola so much is because of the great crunch it has. I've said it before and I'll say it again...I'm a texture snob, so obviously eating something that stays crunchy even when mixed with liquidy yogurt really appeals to me. That being said you can only imagine my frustration when my homemade granola was failing to achieve the same great crunch of the store-bought variety.

Well I am happy to report that I have finally solved the puzzle and made super crunchy, flavorful granola. The key to my success was to use the biggest sheet pan possible (I think it was 17" x 13" but that's just my rough measurements with a ruler) so that I could spread out the granola in a thin layer. That way it was able to properly dry out in the oven and become nice and crispy.

The recipe posted below can be used as a base and have different substitutions added to it in order to make it how you want it. I recently bought a box of hazelnut and chocolate granola and I liked how it tasted, so I may try making that next. Another popular combo is mocha/almond or mocha/chocolate, but I have yet to try it. One time I made a sort of dessert-type granola with honey roasted peanuts, dried bananas, and mini chocolate chips. Really the possibilities are endless so I suggest getting creative and seeing what you come up with.

Nutty Granola
  • 4 cups rolled oats (not instant)
  • 1/2 tsp salt
  • 1/4 cup ground flax seed
  • 1/4 tsp cinnamon (optional)
  • 1 cup applesauce
  • 1/2 cup nut butter (peanut, almond, hazelnut...)
  • 1/2 cup chopped or sliced nuts (any variety)
  • 1/4 cup honey (increase to 1/2 cup if making honey flavored)
  • 1/4 cup flavored syrup (maple, fruit syrup, agave nectar....)
  1. In a large bowl combine the oats, salt, ground flax seed, cinnamon (if using), and the chopped nuts. Note: if adding any "dry" flavors, such as espresso powder, nutmeg, etc do so at this step.
  2. In a separate bowl combine the applesauce, nut butter, honey, and syrup. Mix well so that it becomes a homogenous liquid.
  3. Pour the liquid into the dry ingredients and mix thoroughly until the oats are evenly coated.
  4. Spread the oats onto a large (very large) baking sheet lined with parchment paper. Bake at 325 degrees Fahrenheit for 35-40 minutes, or until the oats become golden and crispy. Stir the oats every 10-15 minutes so that they do not become burned.
  5. Remove from the oven and leave to cool on the baking sheet. Once cool store in an airtight container for up to a week.

Wednesday, April 4, 2012

Banana Split Cake


In addition to making a triple chocolate mousse cake for my birthday, I also made this cake which I decided to entitle "Banana Split Cake". Although I loved the mousse cake I am even more proud of this cake because I made it up all by myself, without any recipe to follow. Even though I am used to creating my own cheesecake recipes by now, this cake was a whole new ballgame. First of all, I don't normally make layered cakes, at least not ones where layers have to be stacked and filled, not just all compiled one after the other in the same pan. Secondly, I don't have very much experience frosting cakes; the only other time I have done it (outside of a cake making class I attended once) was when I made a black and white chocolate cake a few months back. Still, I decided that I wanted to challenge myself and really try something new.

Considering my lack of experience with layered cakes and the fact that I was making everything on a whim without any recipe to guide me, I would say this cake was quite a success. The banana cake itself was very moist and delicious and definitely had a lot of banana flavor. I alternated the fillings between chocolate ganache and vanilla pastry cream, both studded with sliced strawberries. My personal favorite was the vanilla cream layer because it was silky smooth and melted in your mouth. I think I should have used a slightly different chocolate:cream ratio for the ganache because it ended up getting to hard in the fridge and turned out more like chocolate chunks in between the cake layers rather than a smooth filling. For the top and sides I used a simple whipped cream frosting and tried to make it as smooth as possible by using an offset spatula I had purchased specially for the occasion.

When my friends came over to celebrate my birthday they were all quite impressed with the cake. I have to admit, the height itself was striking and the white frosting with sliced strawberries on top gave it a simple elegance. Obviously I had to take a picture of it from all angles and then more once it was sliced, making my friends a little impatient to dig in. But once they did I received praises all around. Looking back, I am extremely pleased with both cakes I made for my birthday and I think I will start to make mousse cakes and layered cakes more often now that I have some experience under my belt.

Banana Split Cake
Note: Because I had no recipe to follow and was making things up as I went, I made one full batch each of chocolate ganache and vanilla pastry cream from previous desserts I have created. As a result, I ended up with extra ganache and cream. I don't know how to adjust the portions for this cake, but the extras can be used up some other way or just eaten on their own if you have a big sweet tooth.

Banana Cake
Note: This recipe makes two 9" cakes.
  • 2 1/2 cups flour
  • 1 tbsp baking soda
  • 1/4 tsp salt
  • 1 tsp cinnamon
  • 1/2 cup unsalted butter, room temperature and cut into pieces
  • 3/4 cup sugar
  • 3/4 cup brown sugar, packed
  • 2 large eggs
  • 1 tsp vanilla
  • 4 ripe bananas (about 2 cups) mashed
  • 2/3 cup yogurt or sour cream
  1. In a small bowl whisk together the flour, baking soda, salt, and cinnamon. Set aside.
  2. In a large bowl, cream the butter and sugars until light and fluffy. 
  3. Beat in the eggs, one at a time, then the vanilla. Mix in the bananas until fully incorporated.
  4. Add half the flour mixture, then the sour cream/yogurt, and then repeat with the remainder.
  5. Divide the batter evenly between two greased 9" cake pans. Bake at 350 degrees Fahrenheit for 25-30 minutes, or until a toothpick inserted comes out clean.
Whipped Cream Frosting
  • 1 1/2 cups heavy whipping cream, chilled
  • 1/2 cup powdered (confectioner's) sugar
Whip the cream on medium speed until foamy, about 30-60 seconds. Increase the speed to high and slowly add the sugar. Continue to whip until soft peaks form, about 1 more minute.
To assemble:
  1. Take each banana cake and slice across in half to create four separate layers. Tip: it's easier to slice the cakes if they are cold therefore chill them in the refrigerator for a couple of hours prior to assembling the cake.
  2. Place the bottom of one of the cakes onto the serving platform, preferably at least 10" wide. Spread some chocolate ganache all over the surface of the cake and cover with sliced strawberries.
  3. Place the top of the corresponding cake on top and gently press down a little to secure it into place. Spread some vanilla pastry cream onto the surface and also sliced strawberries.
  4. Place the top of the second banana cake on top and repeat the chocolate filling with the strawberries. Cover with the bottom of the corresponding cake, bottom side up.
  5. To frost place a large spoonful of whipped cream on top of the cake and use an offset spatula or the back of a large spoon to spread across. Let the excess go onto the sides and then spread additional frosting along the side of the cake until covered. 

Monday, January 9, 2012

Moroccan Chickpea Stew


Back in December, my friend and I took a trip to Whistler to commemorate the end of our first term of nursing school. Thanks to an amazing deal I found using a coupon website, livingsocial.com, we were able stay in a wonderful resort with an outdoor pool and hot tub and complimentary DVD rentals. I had a great time skiing with my friend during the day and then walking around the village in the evening.

On our last day we had already checked out of the resort and walked around while waiting for our bus back to Vancouver. For lunch, we stopped by a small cafe at the base of the mountains and each ordered a soup and sandwich. I particularly enjoyed the Moroccan lentil soup that I ordered and decided to recreate it once I got home. Due to other things going on, I wasn't able to make the soup until this past weekend, but I definitely think the results were worth the wait.

Originally I had researched recipes for Moroccan soups and came across one from Emril Lagasse for Harira, a traditional Moroccan chickpea stew with chicken and lentils. I read through both the recipe and the reviews and decided to give it a try, but in my own way. I decided to omit the chicken and rice called for in the original recipe because I felt it would make the stew to heavy and I wanted something vegetarian. I also added a few more vegetables of my own choosing to the stew and used canned chickpeas instead of dried in order to speed up the cooking time. Basically, the recipe provided a good base and showed me which spices to use, but the rest I took creative liberties with.

In the end, I was quite pleased with how the stew turned out. It definitely had a Moroccan/Lebanese taste to it which I figured out comes from the turmeric. I had always found this taste so appealing in Mediterranean cuisine but I never knew its source; now, though, I think I will try to use it in more of my dishes. My mother also recognized the scent and taste when she tried the stew and she said that she enjoyed it as well. Overall the stew was a success; I made something yummy and I discovered a new spice to play around with.

Moroccan Chickpea Stew
  • 1 large onion, chopped
  • 2-3 stalks celery, chopped
  • 2-3 carrots, chopped
  • 1 28 oz can crushed tomatoes
  • 1 19 oz can chickpeas, rinsed and drained
  • 2 cups green lentils, rinsed and drained
  • 6 cups (2 L) chicken or vegetable stock
  • 2 tsp ground ginger
  • 2 tsp ground turmeric
  • 1 tsp ground cinnamon
  • 1 lemon, juiced
  • 1/2 cup (about 1/2 bunch) cilantro, chopped
  • Salt and pepper
  • Olive oil
  • Optional: 1/4-1/2 tsp red chili flakes
  1. In a large pot, saute the onion 3-4 minutes over medium heat until the onion starts to become translucent. 
  2. Add the chopped celery and carrots and saute for another 5-7 minutes, or until they become soft.
  3. Stir in the ginger, turmeric, and cinnamon to the vegetables and continue to cook for another minute.
  4. Add the tomatoes and their juices, as well as the chili flakes if using, and mix well to incorporate everything.
  5. Add the lentils and chicken stock and mix to incorporate. Bring the stew to a boil then cover and reduce the heat to a simmer.
  6. Continue to cook, stirring occasionally, for 45 minutes. At this point, mix in the chickpeas and test the lentils for softness. If still crunchy, replace the lid and continue to cook for another 15 minutes, or until they soften.
  7. Once the lentils are cooked, add the lemon juice and chopped cilantro. Season with salt and pepper to taste.

Monday, October 31, 2011

Caramel Stuffed Apple Spiced Cookies


Last week my friends came over to my house for dinner and afterward we made these cookies. When I first saw the recipe I thought it would be fun to make because it seemed to reflect fall flavors with the apple, cinnamon, caramel combination. I also had an ulterior motive in picking this particular recipe because I knew that my cousin was going to be coming to town and he absolutely loves caramel, therefore I wanted to make something that I could bring to his house when I saw him.

Funny enough my mom, who is not much of a cookie lover, ended up eating the most cookies out of anyone. She said that the texture and flavor reminded her of a type of cookie she used to eat when she was little and asked me to make them again sometime soon, a request I will be sure to follow given her enthusiasm. Overall I would rate the evening and the recipe a success; the cookies ended up being very easy to make and my friends and I had a great time catching up with one another. In fact we got so caught up in our conversation that we forgot to check on the first batch and accidentally left them in a little too long, leading to slightly crispy and burnt bottoms. However the second batch turned out perfect and some people who tried the cookies said that they actually preferred the slightly burnt ones...go figure.

Caramel Stuffed Apple Spiced Cookies
  • 1 cup (8 tbsp) butter, softened
  • 1 cup sugar
  • 1/2 tsp salt
  • 1 box (7.4 oz or 230 g) Spiced Apple Cider drink mix (can be found near the hot chocolate mixes)
  • 2 eggs
  • 1 tsp vanilla
  • 3 cups flour
  • 1 tsp baking soda
  • 1/2 tsp baking powder
  • 1 tsp cinnamon
  • 1 bag  (12 oz or 336 g) caramel soft chews
  1. In a small bowl whisk together the flour, baking soda, baking powder, and cinnamon. 
  2. In a large bowl cream together the butter, sugar, salt, and all 10 packages of apple cider drink mix until light and fluffy.
  3. Beat in the eggs, one at a time, and then mix in the vanilla.
  4. Gradually add the dry ingredients to the mixture until evenly incorporated and a dough forms.
  5. To make it easier to scoop, refrigerate the dough for an hour, though this step can be skipped if you're in a hurry.
  6. Scoop out cookie dough into 2" balls. Flatten the ball slightly in the palm of your hand then press an unwrapped caramel into the center. Seal the dough around it, covering the caramel completely.
  7. Place the cookies on baking sheets lined with parchment paper about 2" apart. Give them plenty of room because they will spread a lot. 
  8. Bake for 12-14 minutes at 350 degrees Fahrenheit or until the cookies are very lightly browned. If using multiple trays, rotate halfway through to ensure even baking. Allow the cookies to cool for 5 minutes on the baking trays before transferring to a wire rack to finish cooling completely.

Wednesday, October 12, 2011

Apple Pie


Last week I went out for dinner with my oldest childhood friend. Even though we only live two blocks from each other, our busy schedules keep us from seeing each other on a regular basis and we had a great time catching up over some lovely tapas and sangria. For the past month my friend has been living by herself as her parents went to go visit family in Israel. In honor of their return she told me that she wanted to bake something and I volunteered to help. I asked her to pick something to bake and I would research the recipe and send her a list of ingredients to buy. She agreed to the plan and a couple of days later informed me that she wanted to bake apple pie.

I was actually quite excited at her choice because I have never made apple pie before and always wanted to try my hand at this classic baked good. Although I have made galettes in the past, which are basically just a free form rustic pie, I have always wanted to make a traditional pie with a lattice top. Now that I have done it I can honestly say that it's really not that hard to accomplish and it definitely gives the pie a beautiful appearance which everyone admires.

As it happens, this past weekend was a holiday weekend in Canada with everyone receiving Monday off for Thanksgiving. Because my friend was alone my mother invited her to come celebrate Thanksgiving with our family on Sunday. We didn't exactly have a traditional meal with turkey and all of the fix-ins, but we still spent a wonderful afternoon together and that's what really counts. After the meal my friend and I partook in some fall shopping before coming back to the house to bake the pie. It was so much fun to have such an eager student in the kitchen; she carefully watched me each step of the way and listened to my explanations of why I did things a certain way. Generally I would start on something, like making the dough or preparing the filling, and then she would take over.

At the end of the night she took the pie home and the next day she served it to her parents when they arrived. She told me that they loved the pie and I know she was proud of making it for them. It was great for me to see how much she enjoyed herself in the kitchen and that I could teach her about something I love so much.

Apple Pie

For the dough:
Note: This is enough to make one 9" crust. To make the top layer double-up the ingredients.
  • 1 1/4 cups flour
  • 1 tbsp sugar
  • 1/4 tsp salt
  • 1/2 cup (8 tbsp) cold unsalted butter, cut into pieces
  • 3-4 tbsp ice cold water
  1. Combine the flour, sugar, and salt and pulse a couple of times in a food processor. Add the chunks of butter into the processor and pulse until the butter pieces are roughly the size of walnuts. If you don't have a food processor use a pastry cutter or fork and knife to cut the butter into the flour.
  2. Transfer the dough mixture into a bowl and moisten with the water, starting with just a couple of tablespoons at first. Work the mixture until it forms a dough, adding water by the tablespoon only as needed if it feels dry.
  3. Form the dough into a small disk and wrap in plastic wrap. Refrigerate for at least 30 minutes or up to 24 hours before rolling it out.
For the filling:
  • 5-6 large Granny Smith apples (or any other variety), peeled, cored and sliced
  • 1/3 cup sugar
  • 3 tbsp brown sugar
  • 1 tbsp flour
  • 1/2 tsp cinnamon
  • 1 tbsp lemon juice
  • 2 tbsp cold unsalted butter, cut into small chunks
  • 1 egg yolk
To assemble:


  1. Roll out half of the dough (equivalent to one crust) into approximately a 12" round. Transfer to a 9" pie plate and cover with plastic wrap and refrigerate for 30 minutes.
  2. Meanwhile, in a large bowl, combine the apple slices, sugars, flour, cinnamon, and lemon juice. Mix well and set aside.
  3. Once the dough has chilled, pour the apple mixture with its accumulated juices into the bottom pie crust and spread the filling evenly. 
  4. Dot the surface of the apples with the small chunks of cold butter.
  5. Roll out the remaining dough and use a pizza cutter to cut into long strips of equal width. If you want more of a lattice look make the strips thinner. If you want less work, make them thicker.
  6. Lay several strips of dough parallel to each other over the filling. Fold back every other strip to the middle of the pie then lay another strip next to the folded ones, perpendicular to the rest.
  7. Unfold the strips so that they lay over the newly placed perpendicular one. Next, fold back the previously unfolded strips (now underneath the new strip) and lay another perpendicular strip on either side. 
  8. Repeat the process until the lattice is finished. Trim off the excess and crimp the edges. If you have extra dough, you can cut out little shapes and stick them on the sides of the pie.
  9. Add a little water to the egg yolk and brush the egg wash all along the surface and edges of the pie. Bake at 400 degrees Fahrenheit for 50-60 minutes or until the crust is golden brown and the juices are bubbling. If the crust starts to brown too quickly, cover with aluminum foil and continue baking.
  10. Allow the pie to cool for at least 30 minutes before slicing and serving. It pairs well served warm with a scoop of vanilla ice cream on the side.

Sunday, January 23, 2011

Baklava


After making my southwest style spring rolls last week, I had some phyllo sheets left over and decided to make baklava. Unfortunately I had only six sheets left but I cut each sheet in half so that I could create more layers. After tasting the finished product, I wished that I had more sheets because the baklava did not have enough crunch...but that will have to wait until next time.

Despite missing the crunch, I felt that the actual filling was quite delicious and I was pleased with it. I know that a common problem with many baklava recipes is that they are too sweet. In fact, that is often the reason why I avoid eating baklava and why my mom was skeptical when I told her of my intentions to bake it. However I resolved the problem by cutting the sugar from the filling all together and instead putting it only in the syrup. By limiting the sugar to the syrup alone, I was able to reduce the sweetness of the baklava while still holding true to its flavor.

Unfortunately my desire to blog this recipe and take pictures of the intermediate steps had an effect on the overall appearance of the baklava. In between working with the dough and the camera I kept having to clean my hands and stand on chairs for a bird's eye view. By the time I was able to cut the baklava and put it in the oven the phyllo sheets on top had dried out, making them hard. Each time I made a cut the phyllo cracked and created many little pieces. I don't regret taking the pictures, but I wish I had a second set of hands there to do it so that I could focus on the recipe itself. Still, it all worked out in the end because the finished product tasted good.

Baklava
Note: This recipe is slightly different than my own because it incorporates the amount of phyllo sheets I wish I had, rather than what I actually used.
  • 1 package phyllo dough, thawed
  • 3 cups walnuts
  • 1 cup raisins
  • 1 cup dried apricots, roughly chopped
  • 1 orange, zested
  • 2 tsp cinnamon
  • 1 cup water
  • 1 cup sugar
  • 1/2 cup honey
  1. Prepare the filling by combining the walnuts, raisins, dried apricots, orange zest, and cinnamon in a food processor. Mix it on high speed until all of the pieces are small and uniform in size.
  2. Working quickly, and with unused sheets covered under parchment/wax paper and a damp paper towel,  layer 6-7 phyllo sheets into a greased 9" x 13" pan with the edges hanging over. To help the sheets stick together use cooking spray between each layer.
  3. Spray the top layer with cooking spray and sprinkle about 1/4-1/3 of the filling over the dough. 
  4. Sprinkle some water over the filling and then layer a couple of phyllo sheets on top. Continue to sprinkle filling and layer sheets until the filling runs out.
  5. Fold the overhanging sides over the last layer of filling and then cover the top with another 3-4 layers of phyllo. Trim the edges and then cut the baklava into diamond pieces by making diagonal and lengthwise cuts. Make sure to cut through the entire stack of filling and dough in each cut. Spray the top with cooking spray.
  6. Bake at 350 degrees Fahrenheit for 30-35 minutes, or until the top is golden brown. 
  7. While the baklava is baking, bring the water, sugar, and honey to a boil and then simmer for 5-7 minutes. Cool the syrup and then pour directly over the hot baklava as soon as it comes out of the oven.

Wednesday, December 15, 2010

Hanukkah Rugelach


The holiday season has come upon us which means two things: lots of holiday baking and studying for exams. Thankfully, the exams will be over soon but unfortunately the intense studying has taken a toll on my baking. I actually made these rugelach at the beginning of Hanukkah, when my brother and I went to go visit our old neighbors in Seattle. We spent the weekend having a great time playing with their kids and making Hanukkah goodies. Together we made latkes, little potato pancakes, and also these rugelach.

When I told my mom about the rugelach, she insisted that I not call them that. She said that when she grew up, her mom always called them "ragaliki" which translates into "little horns". I suppose since they are rolled up into the crescent shape they could resemble little horns. It was a little time consuming to make the rugelach, especially since the dough had to be chilled for a bit, but I loved the fact that there are a variety of fillings that can go inside.

The weekend was extremely fun and exactly what I needed before gearing up for exams. On a side note...the XBOX 360 kinect gaming system is so cool! We played it at their house and I must say I am extremely impressed. The sensors are so accurate and have facial recognition. The games are quite interactive and involve a lot of movement...definitely a great source of exercise. My only regret while making the rugelach was questioning why I picked a somewhat time consuming (although delicious) dessert, as it took away from my playing time with the kids. Still, everyone loved the rugelach and I had fun making them.

Hanukkah Rugelach
Note: The recipe makes enough dough for 64 little rugelach. I suggest trying a different filling for each batch of 16.
  • 2 cups flour
  • 1/4 tsp salt
  • 1 block (8 oz.) cream cheese, room temperature
  • 1 cup unsalted butter, softened
  1. Sift together the flour and salt and set aside.
  2. Using a mixer, cream the butter and cream cheese together for about 2 minutes.
  3. With the mixer on low, slowly add in the dry ingredients and mix until a dough comes together.
  4. Wrap the dough in plastic wrap and chill in the fridge for 15 minutes.
  5. Remove the dough from the fridge and roll it out until it is about 1" thick all over. Fold the dough into thirds, wrap it back up and chill it for at least another hour, though you can leave it in the fridge for up to 24 hours at this point.
Raspberry Chocolate Pecan Filling
Note: This is both fillings for enough for one batch of 16 rugelach.
  • 1/2 cup raspberry jam (I used seedless)
  • 1/4 cup chocolate chips (I used mini chocolate chips)
  • 3/4 cup pecans, toasted 
Combine the pecans and chocolate chips in a food processor and pulse repeatedly until the pieces stick together. Empty into a separate bowl and stir in the jam.

Cinnamon Sugar Pecan Filling
  • 1/2 cup pecans, toasted
  • 1 tbsp sugar
  • 1/2 tsp cinnamon
Chop the pecans finely using a food processor and then mix together with sugar and cinnamon.

To assemble rugelach:

1.  Divide the dough in quarters. Put three quarters back into the fridge while rolling out the fourth quarter into about a 10" circle.

2.  Spread the filling over the dough and then cover with wax or parchment paper. Use a rolling pin to go over it and get the filling spread in an even layer.

3.  Cut the circle into 16 wedges and roll up each wedge, starting at the wide end.

4.  Place rolled up rugelach onto a baking sheet and brush with the egg wash.

5.  If you want you can sprinkle a little bit of sugar on top, or just leave them plain.

6.  Bake at 375 degrees Fahrenheit for about 22-25 minutes, or until golden brown.

7.  Cool for 5-10 minutes before plating and serving.

Note: There are lots of different fillings that can be made. Some ideas include:
  • Walnuts
  • Hazelnuts
  • Different fruit jams
  • Nutella
  • Cinnamon Sugar (without the nuts)

Thursday, December 2, 2010

Moussaka


I first tried making this recipe quite a while ago, back in September. I had found the recipe online and it was titled "Speedy Moussaka". Honestly, I didn't seem very speedy to me; it had many ingredients and it required frying and then additional baking. However after reading through other moussaka recipes, and now making it for the third time, I have come to realize that this recipe actually stays true to its name. It may not be speedy in terms of an average dinner, but it's definitely speedy for a moussaka.

The first time I made the dish, I took the time to draw out a picture for myself of how to properly layer it. Of course, in the heat of things, I misinterpreted my picture and ended up with the layers in the wrong order. To cover my mistake, I made a second batch of everything and then added it on top. It ended up being a double-layered moussaka. I suppose this is where the "speedy" comes in...I was able to make a second portion quite quickly once I had gotten my bearings the first time.

Everyone liked the moussaka and no one paid any attention to the order of the layers. My mom, a moussaka lover, was surprised to learn that it was cinnamon that gave the dish its particular taste. The next time my mom and I made the dish together, we followed the recipe with the proper layering. Oddly enough, the family agreed that they liked the first version better and that the second was not filling enough.

We have now made this moussaka three times, and have made the recipe to our liking. We doubled everything in the recipe, except for the meat which was tripled. The end result is delicious! The one thing we have yet to figure out is how to make the texture as silky as it should be, but I promise I'll post the details once I figure them out.

Moussaka
  • 3 medium eggplants
  • 3 lbs ground beef, lamb, or turkey
  • 1 large onion, chopped
  • 4-5 garlic cloves, minced
  • 2 tsp dried oregano
  • 1 cup fresh flat-leaf parsley, chopped
  • 2 cups red wine
  • 1/2 cup tomato paste
  • 1 1/2 tsp cinnamon
  • 1 15 oz (500 g) container ricotta cheese
  • 12 oz (350 g) feta cheese
  • 1/2 cup Greek style yogurt (plain yogurt works fine)
  • Salt and pepper to taste
  • Olive oil
  1. Cut the eggplants crosswise into 1 cm thick slices. Mix about 3 tbsp olive oil with 1/4 tsp salt and brush the mixture onto both sides of the eggplant slices. 
  2. Arrange the eggplants in a single layer onto a baking dish and bake at 375 degrees Fahrenheit for about 12-15 minutes, or until tender. You want to make sure the eggplant are soft when you take them out of the oven, that way they will absorb the flavor of the meat once you arrange the layers.
  3. Meanwhile, heat a large skillet over medium-high heat until hot. Crumble the meat into the skillet and cook, stirring frequently, until it is no longer pink. 
  4. Transfer the meat to a bowl using a slotted spatula, draining as much fat as possible back into the skillet. Remove and discard all but 1 tbsp of fat from the skillet.
  5. Heat the skillet on medium heat and add the chopped onions. Cook until golden and translucent, about 5 minutes. Add the garlic and cook for one more minute.
  6. Add the cooked meat, red wine, tomato paste, cinnamon, and oregano to the skillet and mix well. Season with salt and pepper. Cook the mixture for about 5-7 minutes, until almost all of the wine has evaporated.
  7. In a separate bowl, mix the feta cheese together with the ricotta and parsley. Set aside about 1 cup and add the yogurt to it.
  8. In a large baking dish, arrange the layers as following (From bottom to top):
  • Eggplant
  • Meat
  • Ricotta mixture (without yogurt)
  • Eggplant
  • Meat
  • Ricotta mixture (without yogurt)
  • Eggplant
  • Ricotta mixture (with yogurt)
   
   9.  Bake for 35 minutes at 350 degrees Fahrenheit.

      Thursday, September 2, 2010

      Strawberry Banana Cheesecake


      As per all of our family birthday celebrations, no party is now complete without one of my desserts. Usually I go with some sort of cheesecake, and this time was no exception. Although my brother is a big chocoholic, I really wanted to make a cheesecake that reflected the summertime, and therefore went along the fruit path. I came up with this recipe on the fly, and was quite surprised with the consistency and taste. I particularly enjoyed the comment made by my cousin: "It's like a strawberry banana milkshake in solid form!"

      The truth of the matter was that he was right...it had both a distinct strawberry and banana flavor and the little chunks of banana were reminiscent of a milkshake. As for the consistency, my mother likened the cake more to a mousse rather than a cheesecake. However, it seemed that everyone actually enjoyed the soft, creamy texture of the cake instead of the usual density that a cheesecake brings to mind. After seeing everyone's reactions, I think I might try my hand at some mousse cakes and see how they turn out. After all, a girl can experiment with one type of cake for so long before wanting to spread her wings a little.

      The cake itself should not have been difficult to make, except for the fact that my mixer broke halfway through the process. My family has been faithfully served by the same hand-held Black and Decker mixer for the past 16 years. Unfortunately, as I was making my brother's birthday cake the mixer decided that it had run its course and, with one last whirl, gave up and died on me. Luckily it had remained alive long enough to do the grunt work...I used it long enough to beat together the cream cheese and sugar, as well as two out of the three eggs for each of the batters. Still, I got quite a workout by hand mixing the rest of the ingredients, starting with the last eggs and then of course the fruit and sour cream.

      In the end, it turned out to be a delicious cake and now I'm looking for a new hand-held mixer which will hopefully serve me just as well as the previous one did for so long. My dreams of course would be for a Kitchen Aid Stand Mixer, but the price tag on it will keep me dreaming a little longer...so I'm settling for a good hand-held mixer instead. Any suggestions would be appreciated, preferably one that has a slow speed setting which is actually slow. Until I get a new mixer, I guess I'll try making other things to pass the time.

      Strawberry Banana Cheesecake
      Note: I used an 11" springform pan to make this recipe, therefore doubling the proportions of a normal cheesecake and making two complete batters. I still had a little extra left over of each batter and made it into mini cheesecakes in metal tart forms. I honestly don't know the proportions for a regular 9" cheesecake, so I will post the recipe I used. If you're anxious about the leftover batter, either make mini cheesecakes like I did or split the batters in half, make two 8" or 9" cakes and then freeze one. Cheesecakes can sit in the freezer, tightly wrapped for a good three months.

      For the crust:
      • 2 cups graham cracker crumbs
      • 1/3 cup sugar
      • 1 tsp cinnamon
      • 1/2 cup (8 tbsp) unsalted butter, melted
      • 3/4-1 cup caramel
      • 1/2 cup walnuts, chopped
      • 1/2 cup pecans, chopped
      • 1/2 cup almonds, chopped
      Combine the sugar, cinnamon, graham cracker crumbs, and melted butter. Transfer the mixture to a 11" springform pan and press down gently along the bottom and sides. Bake for 8 minutes at 350 Fahrenheit. 

      Allow the crust to cool a little before you pour the caramel on top. Make sure to spread all along the bottom, and then sprinkle the mixture of walnuts and pecans over top.

      For the banana filling:
      • 1 lb (2 blocks) cream cheese, room temperature
      • 3/4 cup sugar
      • 3 large eggs
      • 4 bananas, mashed
      • 1 tsp vanilla
      • 1 tsp lemon juice
      Mash the bananas and add the teaspoon of lemon juice to the puree. You can process the bananas in a food processor, but I personally liked having the banana chunks run throughout the cake...it made the banana flavor stand out.

      Beat together the cream cheese and sugar until smooth. Beat in the eggs, one at a time, and then vanilla until well combined. Gently fold in the banana mixture until the batter is fully mixed and no streaks are present.

      Pour the banana batter into the springform pan halfway up the sides. You will probably have some extra batter leftover, but don't be tempted to use it all otherwise you won't have room for the strawberry layer. Place the pan in the freezer for about 10 minutes, allowing the banana layer to firm up a little before pouring the strawberry layer on top.

      For the strawberry filling:
      • 1 lb (2 blocks) cream cheese, room temperature
      • 3/4 cup sugar
      • 3 large eggs
      • 1 cup sour cream
      • 1 tsp vanilla
      • 2 cups strawberries + 2 tbsp sugar + 1 tbsp lemon juice
      To make the puree: There are proper methods to making strawberry puree using fresh or frozen strawberries, but they involve prepping hours ahead of time, and I often don't plan on making the cake until I actually find the time to do it. Therefore, my simple puree method involved roughly cutting up two cups of strawberries, sprinkling two tablespoons of sugar, and heating it up in a small saucepan until the strawberries became soft. I then dumped it all in a blender and pureed the mixture with a tablespoon of lemon juice, leaving it in there to cool while I worked on the rest of the batter.

      As with the banana batter, beat together the cream cheese and sugar, then add the eggs in one at a time and then the sour cream and vanilla. Lastly fold in the strawberry puree until the batter is fully combined. Pour the strawberry layer over the banana layer (you will have extra batter) until the batter is about 2 cm from the top.

      Bake the cheesecake in a water bath, or with a pan of hot water on the lowest rack, for 50 minutes at 325 Fahrenheit. Without opening the oven door, turn off the oven and let the cake sit there for another 1-1/2 hours before removing. Cool to room temperature and then refrigerate at least 4 hours, though preferably overnight, before serving.

      Note: If you choose to make mini cheesecakes with the leftover batter, bake them in muffin sized tart shells at the same temperature for 15 minutes. Afterward, turn off the oven and let them sit there for another 20 minutes before partially opening the oven door. Allow the cheesecakes to cool completely in the oven with the door ajar and then transfer to the refrigerator for at least 4 hours.