Wednesday, July 31, 2013

Grilled Prawns and Vegetables


I may be a lot of things, but a grill master I am not. I don't know why but somehow I have always found grilling food to be a challenge. Every summer I make a few (quite lame) attempts at grilling and usually end up burning the food. After each failure I usually succumb back into my safe world of stove-top and oven cooking.

However this summer I have decided that I want to conquer my grill inadequacies once and for all. Part of this desire stemmed from the fact that I am constantly seeing great grill recipes online and on Food Network and I so badly want to try them out. Also, I recently came back from visiting some family friends who showed me how easy and delicious grilling can truly be.

I decided that I needed to start small and work my way up. Therefore on day one, I settled on grilling some corn on the cob and zucchini slices that I quickly marinated. Result: success! Moving on to day two, I grilled some wine-marinated prawns and chipotle-lime chicken. Result: another success!

Both days I was so proud of myself and could not stop bragging to all of my family members. Part of my success came from some helpful tips I picked up, which I will definitely share.
  • Tip one: Make sure your grill is clean! An easy way to do this is to spray some PAM on the grates, turn it onto the highest heat, and close the lid. The oil will burn up in the heat and the grill will be ready to use once the grill is no longer smoking. Also make sure to scrape the grates well for any bits that may have gotten stuck to it.
  • Tip two: Brush the grates with an onion. This helps to keep the food from sticking to the grill, especially anything that may have been marinated. Simply cut an onion in half, stick a fork in it, and rub it vigorously up and down all over the surface of the grill. Don't toss the onion because you can keep using it in between each batch of food if you have multiple items to grill.
  • Tip three: Don't overflip! I was definitely guilty of this before. The way to achieve good food and those beautiful grill marks is to allow the food to cook through and develop flavor. Put the food on the grill, close the lid, and give it some time (depending on what you're cooking), before you flip it. With each additional flip or handling of the food you are only making it tougher. Generally, unless you are rotating something like corn, each food item only has two sides so really you only need to flip it once.
  • Tip four: Let it rest. This step isn't as necessary for something like vegetables or even smaller proteins like prawns. However if you're making something bigger like steak this is a must. Allowing the meat to rest gives it time to finish developing flavor. If you cut into it right away the juices will run out and be left on the plate or cutting board rather than incorporating into the meat.
I realize that I still have more things to learn when it comes to grilling and most likely I may still make some grilling mistakes. Still, I'm hopeful that these past two nights were just a preview of many more grilling successes.

Grilled Prawns and Vegetables
Note: My mother marinated the prawns and did very rough measurements. I too did not measure out the ingredients for the zucchini marinade. Therefore the quantities are not precise and can be adjusted.

For the prawns:
  • 36 raw jumbo prawns, in shell and deveined
  • 1 cup white wine
  • ½ cup olive oil
  • 2-3 cloves garlic, finely chopped
  • 1 tsp dried parsley flakes (can be substituted with basil, thyme, or oregano)
  • 1 tsp salt
  • ½ tsp pepper
  • 1 tbsp honey
  1. Combine all of the ingredients for the marinade and pour onto the prawns. Cover and refrigerate for 3-4 hours.
  2. Once ready to grill, put 3 or 4 shrimp onto each skewer. If using bamboo or wooden skewers make sure to soak them in water first so they don't burn.
  3. Turn the grill onto medium heat. Place the skewers evenly across the grates and close the lid. Cook for 2-3 minutes on each side. The prawns should be pink once they're done.
For the zucchini and corn:
Note: The corn did not require a marinade; it was stripped from the husk and wrapped in aluminum foil.
  • 3 large zucchini, sliced diagonally
  • 2-3 tbsp Frank's Red Hot Chile n' Lime sauce
  • 1-2 tbsp garlic plus seasoning
  • ¼ cup olive oil
  • Sprinkle salt and pepper
  1. Combine all of the ingredients for the marinade and toss the zucchini slices in it to evenly coat.
  2. Turn the grill onto medium-low heat. Spread the zucchini slices evenly across the grates and close the lid. Cook for 2-3 minutes on each side or until the zucchini are fork tender.
  3. For the corn: Place the corn on the grill turned onto medium-high heat. Quarter-rotate the corn every five minutes until all sides are finished.

Sunday, July 28, 2013

Cinnamon Rolls


Recently one of my best friends moved into a new place just two blocks away from the beach! After dealing with an ant-infested apartment for the past year I would say she truly deserves an upgrade. Last night I had the pleasure of seeing her new place and catching up with her over dinner. Afterward we walked over to the beach and watched the annual Celebration of Lights fireworks that take place every summer in Vancouver.

As a mini housewarming I decided to bake cinnamon rolls for my friend as they are one of her favorite desserts. I was actually surprised that I had yet to post any recipes of cinnamon rolls in the three years since I first started this blog. That's not to say I haven't baked any in that time, but somehow I was never completely satisfied with the recipe or the pictures.

Luckily this time was different. The rolls turned out flaky and soft with the perfect proportion of cinnamon filling. The original recipe called for an icing glaze but I personally love cream cheese frosting so I made that instead.

My friend's eyes lit up when she opened the door and saw the treat I had brought along. The expression on her face was worth the time I spent making the rolls, although truthfully it wasn't difficult at all. I had some extras left over and brought them to my cousin's house the next day, which she was equally grateful for.

Cinnamon Rolls
Note: This recipe makes 8-12 large or 12-16 small rolls, depending on how you cut them.

For the dough:
  • 6 ½ tbsp sugar
  • 1 tsp salt
  • 5 ½ tbsp unsalted butter
  • 1 large egg, slightly beaten
  • 1 tsp lemon extract or 1 tsp grated lemon zest
  • 3 ½ cups flour
  • 2 tsp instant (rapid rise) yeast
  • 1 1/8 to 1 ¼ cups whole milk or buttermilk, at room temperature
For the filling:
  • 6 ½ tbsp sugar
  • 1 ½ tsp ground cinnamon
  1. Beat the sugar, salt, and butter together on medium-high speed.
  2. Beat in the egg and lemon zest/extract until smooth.
  3. Add the flour, yeast and milk. Mix on low speed until the dough forms a ball. Switch to a dough hook and increase the speed to medium, mixing for approximately 10 minutes, or until the dough is silky and supple, tacky but not sticky. (You may have to add a little flour or water while kneading to achieve this texture.) Alternatively, hand-knead the dough until it is smooth.
  4. Lightly oil a large bowl and transfer the dough to the bowl, rolling it around to coat it with oil. Cover the bowl with plastic wrap and set aside in a warm place for approximately two hours, or until it has doubled in size.
  5. Once the dough is ready, roll it out into a rectangle about 2/3" thick and 14" x 12 for large rolls, 18" x 9" for smaller rolls. Make sure not to roll it out too thin otherwise the rolls will be chewy and tough.
  6. Combine the sugar and cinnamon for the filling and spread generously across the surface of the dough. Starting from one long edge, carefully roll the dough into a log.
  7. With the seam side down, cut the dough into 8 to 12 pieces about 1 ¾ inches thick for larger rolls or 12 to 16 pieces about 1 ¼ inches thick for smaller rolls.
  8. Set aside onto a baking sheet lined with parchment paper, placing the pieces about ½" apart so they aren’t touching but are close to one another.
  9. Cover loosely and allow them to proof at room temperature for 75-90 minutes, or until the pieces have grown into one another and have nearly doubled in size. (You may also retard the shaped buns in refrigerator for up to 2 days, pulling the pan out of the refrigerator 3-4 hours before baking to allow the dough to proof.)
  10. Bake at 350 degrees Fahrenheit for 20-30 minutes or until the rolls are golden brown. Cool for 10 minutes in the pan before glazing or frosting.
Note: The original recipe can be found on my favorite food blog Annie's Eats which also has the recipe for the icing glaze. I used half the amount from my standard cream cheese frosting recipe which can be found here.

Sunday, July 14, 2013

Chipotle Lime Grilled Chicken


Last week I was feeling inspired by our gorgeous Vancouver weather to prepare chicken outside on the grill. Up until that point my experience with the grill was limited and consisted of about three sporadic attempts made over the last two years. However after watching so many shows on TV promising me that grilling is actually quite easy, and seeing a family friend grill with no problems I decided to give it a go.

Well let me just say that grilling may come easily to all of those people but it surely doesn't for me. I think the problem was that I didn't know how to properly position the chicken pieces on the grill and while some turned out fine, others stuck to the grates and in the process of flipping the pieces I managed to rip them to shreds. There was also the problem that some became overcooked and dry while others were moist and juicy.

My saving grace became the chimichurri sauce I prepared to spoon on top. It was quite strong tasting, composed of cilantro, parsley, red chili flakes, and garlic, and managed to mask some of the drier pieces. The marinade itself also tasted good, at least on the juicy pieces that weren't overcooked, and had a pleasant balance between the smokey chipotle and fresh lime juice. In the future, I think I may just pan-fry or bake the chicken rather than grill it...or find someone who knows how to use the grill better than me.

Chipotle Lime Grilled Chicken
Note: Due to my lack of grilling experience, I adapted the recipe for chicken skewers as those seemed to turn out better than directly grilling the chicken.
  • 2 large boneless, skinless chicken breasts or 15 thighs, cut into pieces
  • 1 cup sour cream or yogurt
  • 2 limes, juiced and zested
  • 2 tbsp Frank's Red Hot Chile 'n Lime sauce
  • 1 tbsp Chipotle sauce
  • 2 tsp salt
For the chimichurri sauce:
Note: This sauce is very versatile and can be served alongside steak, chicken, or fish.
  • ½ bunch cilantro
  • ½ bunch Italian flat-leaf parsley
  • 5-6 cloves garlic
  • ¼-½ tsp red chili flakes
  • ¼ cup red wine vinegar
  • ¼ cup olive oil
  • Salt and pepper to taste 
  1. Combine the yogurt/sour cream, lime juice and zest, hot sauce, chipotle sauce, and salt and mix well to create the marinade.
  2. Add the chicken pieces. Cover and refrigerate for at least 2-3 hours, though preferably overnight to allow the chicken to absorb more flavor.
  3. Once ready to grill, skewer the chicken pieces onto slightly damp bamboo skewers. Place chicken on pre-heated grill over medium-high heat. Make sure to leave some space between the skewers so as not to overcrowd the chicken. Grill for about 15-20 minutes, making sure to rotate the skewers so that all sides are consistently cooked. The chicken will be done once no longer pink inside or the internal temperature has reached 165 degrees Fahrenheit.
  4. Meanwhile, combine all of the ingredients for the chimichurri sauce in a food processor and blend until smooth. Adjust to taste with salt and pepper.

Sunday, July 7, 2013

Mini Cheesecakes


Last week was a big event in my family...my dad's 50th birthday. We were preparing for this for the past year and my brother jokingly nicknamed it "Party of the century". We had upwards of seventy five people in attendance, including many out-of-town guests, and the evening was filled with memorable speeches and entertaining performances.

Although we had ordered a large cake for the event I still wanted to do something special and months ago came up with the idea of making miniature cheesecakes after buying special pans from amazon.com (click here). These pans are unique and designed specially to bake mini cheesecakes as each well has a removable disc at the bottom.

When I first ordered the pans my mom was a little skeptical as to how well the cheesecakes would actually come out and whether it would be as easy as promised. We decided to test the pans by baking a batch for one of our many family get-togethers. Happily we discovered that the cheesecakes came out perfectly and were beautifully smooth all around.

Unfortunately I didn't think to write down the recipe that I used at the time because I had simply altered the quantities from my lemon cheesecake. Apparently that was a mistake because my memory did not serve me well and when I tried making the cheesecakes again for my graduation they ended up all cracked and lopsided.

When it came time for me to make the cheesecakes for a third time for "Party of the century" I was a little nervous that they wouldn't turn out because I still wasn't 100% sure of what I had done the first time. However after doing some research online and talking it over with my mom we settled on the recipe and luckily they turned out great...which was a relief because I had to make three batches in order to have enough for the party.

To make the cheesecakes even cuter, and to add an air of sophistication, I made a fruit gelee then
topped it with some blueberries. The idea for the gelee came from when I had made the second, unsuccessful cracked/lopsided batch and was looking for a way to cover it up. At the time I had used berries, which tasted delicious, but the gelee was dark colored and stained the sides of the cheesecake. For the party I decided to use mango instead, due to its light color, and I had no problems.

In addition to the mini cheesecakes, I also baked almond florentines that were topped with little meringues. Both desserts were a hit and I received many compliments. Most importantly, the party was a huge success and lived up to its moniker.

Mini Cheesecakes
Note: The cheesecakes can be prepared in a muffin pan using liners for easy removal. The gelee can also be used but be prepared for it to stick to the liner a little bit, though it can still be peeled away before serving. The recipe makes 24 mini cheesecakes.

For the crust:
  • 1 cup graham cracker crumbs
  • ¼ cup unsalted butter, melted
  • 1/6 cup sugar
Combine all of the ingredients and distribute evenly amongst the wells of the muffin/cheesecake pan. Lightly pat down the bottoms and bake for five minutes at 350 degrees Fahrenheit. Set aside to cool.

For the cheesecake:
  • 24 oz (750 grams) cream cheese, room temperature
  • 3 large eggs
  • ¾ cup sugar
  • 1 cup sour cream
  • 1 tsp vanilla
  • 1 lemon, zested
  1. Beat the cream cheese on medium-high speed for about a minute, until smooth. 
  2. Beat in the sugar and then the eggs, one at a time, scraping the bowl as necessary.
  3. Beat in the vanilla, sour cream, and lemon zest.
  4. Divide the cheesecake batter evenly amongst the wells of the pan, filling them about ¾ full. (You may have some batter left over but it's best not to overfill the wells otherwise the cakes will puff up too much in the oven).
  5. Bake the cheesecakes at 300 degrees Fahrenheit for 20 minutes. Turn off the oven and leave the pans inside with the door closed for 10 minutes and then an additional 10 minutes with the oven door slightly ajar. Remove and let cool to room temperature before refrigerating for at least four hours.
The recipe for the gelee can be found here. I used exactly the same proportions as in the original recipe and it worked out perfectly to cover all 24 of the mini cheesecakes.

Sunday, June 30, 2013

Jalapeno Pepper Poppers


I made these little peppers on a spur last week when I saw pictures one night browsing my favorite food website tastespotting.com. In truth I didn't actually use jalapeno peppers to make them because my mom couldn't find any at the grocery store so she bought mini hot peppers instead.

I made sure to use gloves when handling the peppers so that no residue would be left behind on my skin, something I learned from past experience. I wasn't sure exactly how spicy the peppers would turn out but once they were baked they were actually just barely spicy. In fact, coupled with the cheesy filling I would say they weren't spicy at all, but then again I like things extra spicy so my palette is stronger than most.

Looking back I'm glad I made the peppers because it was fast and a fun appetizer, however I was disappointed that they flattened out once they were baked. I think that in the future I will leave the peppers whole and stuff the filling inside then apply an egg wash and crumb coating to the outside. Also I'll use real jalapenos and see if they turn out spicier.

On a separate note, one of my friends just made me aware that Google reader is officially dead and people can no longer subscribe to follow your blog through it. However, she pointed out that there is a great service called Bloglovin which has the same function. I checked it out and I realized that it's kind of like Pinterest but just for blogs. Although I have a Pinterest (but never really use it) I think I will try out this Bloglovin and see if there are more food blogs out there that catch my eye, besides my favorite Annie's Eats. I have put my blog up there as well so it can be followed by clicking here. I hope my readers will continue to enjoy my blog and maybe this way more can follow too.

Jalapeno Pepper Poppers
Note: I didn't exactly measure quantities that I used so the recipe below is approximate. Also I have updated it to include whole peppers rather than halves and a different method of finishing them. In addition, I would recommend wearing gloves while handling the peppers.
  • 5-6 jalapeno peppers
  • 2-3 cloves garlic, minced
  • 2 heaping spoonfuls cream cheese
  • 1 heaping spoonful sour cream
  • ¼-½ cup shredded cheese
  • ¼-½ tsp ground cumin
  • ¼-½ tsp paprika
  • 1 egg, lightly beaten
  • 1 cup panko bread crumbs
  • ¼ cup grated Parmesan cheese
  • Salt and pepper 
  1. Wash the peppers and remove the stems and seeds, keeping the bodies intact. Set aside.
  2. Combine the cream cheese, sour cream, shredded cheese, garlic, cumin, and paprika. Taste and adjust the seasonings to your own preference. Add salt and pepper.
  3. Fill each pepper with the filling mixture, leaving a little bit of room at the top as the cheese will melt and expand in the oven.
  4. Combine the panko bread crumbs and Parmesan cheese in a shallow bowl. Put the beaten egg in another shallow bowl alongside the crumbs.
  5. One at a time, dip each pepper first into the egg and then into the panko crumbs, making sure to evenly coat the entire pepper. Place the pepper onto a greased or parchment-lined baking pan and repeat with the remainder.
  6. Bake for 20 minutes at 350 degrees Fahrenheit or until the cheese filling starts to bubble and the crumbs become golden. If the cheese starts to bubble before the twenty minutes, switch to the broiler and broil for 2-3 minutes just to make the crumbs golden.

Monday, June 24, 2013

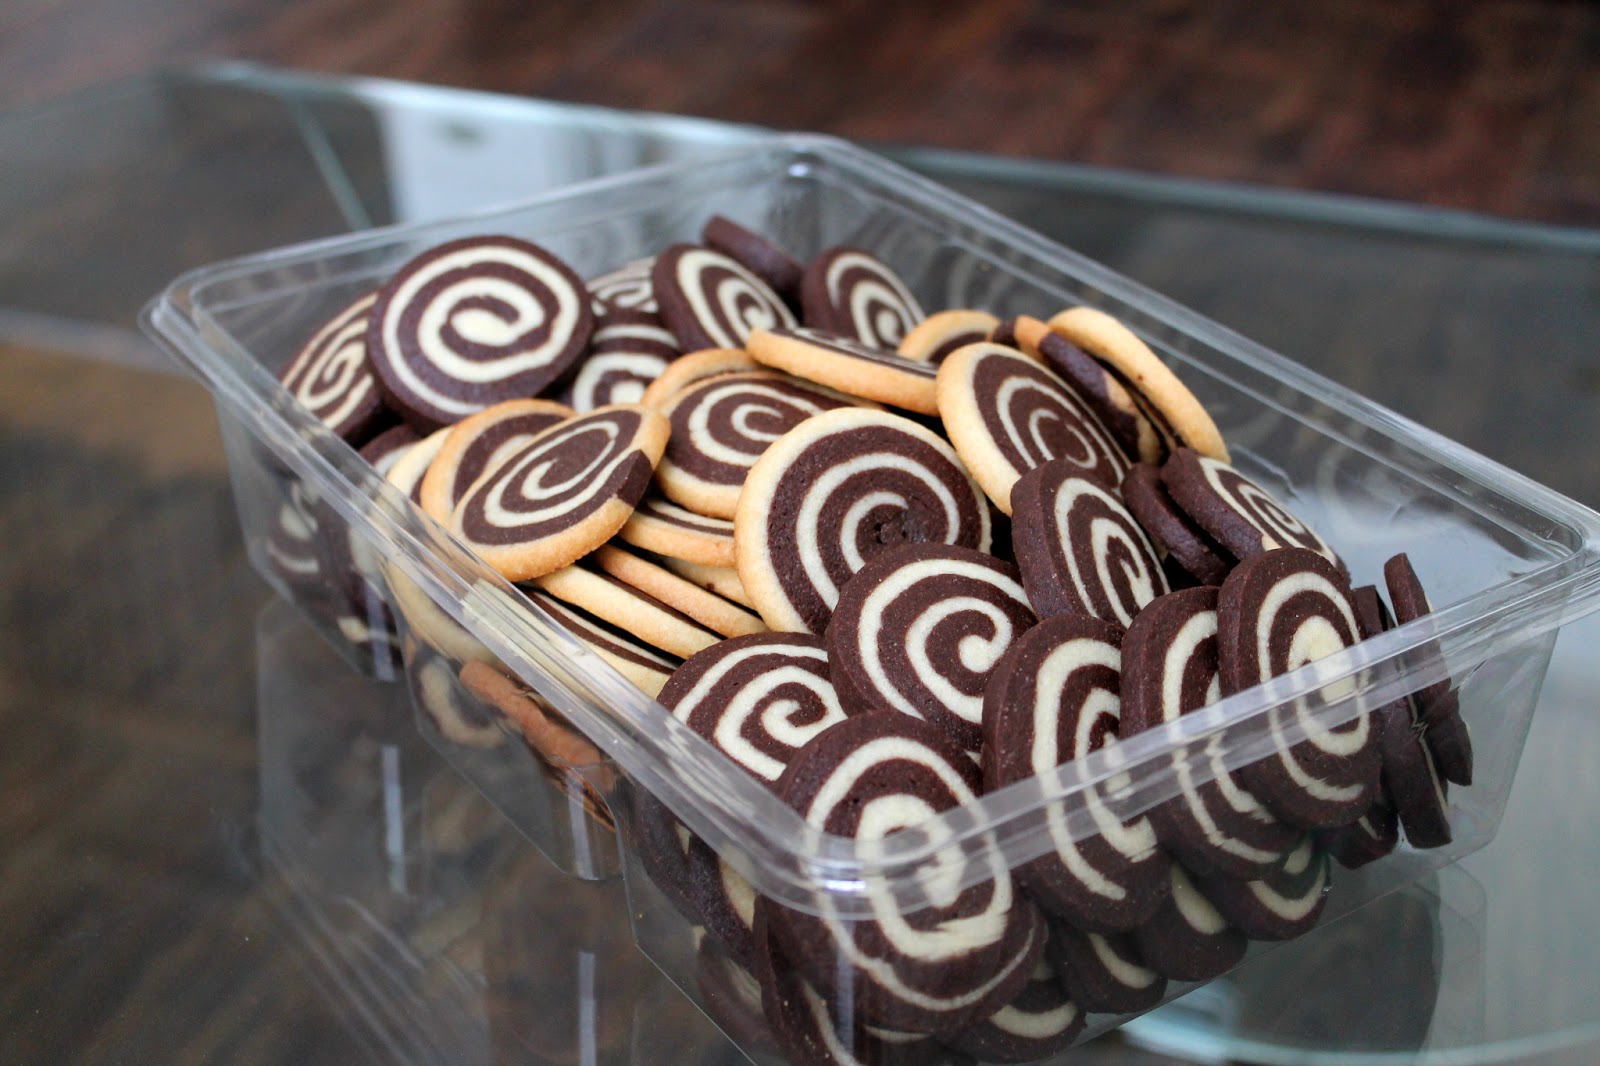
Chocolate Pinwheel Cookies


For the past four years there has been established a much loved tradition in our Russian community of celebrating Father's Day with a giant picnic. Due to scheduling conflicts with the main organizer, this year's picnic was actually postponed and we all celebrated Father's Day one week later. The picnic has a lovely way of bringing together many of the smaller groups into one large gathering and everyone looks forward to it every year.

The picnic is held in a rather potluck style, with each family bringing what they can. There is usually a vast array of salads, meats, fruits, and dessert. Basically it's one big food fest with occasional drinking, singing along to guitar songs, soccer games, card playing, and general merriment.

When I came across this recipe last week I thought it would be fun to bring to the picnic since these cookies look very visually appealing. Granted rolling the dough out was a little time consuming since it had to be done six times (three for each flavor) but once that was out of the way the rest was a breeze.

I split the task into two days, making the dough and shaping it into logs the night before the picnic and then slicing and baking the cookies the next morning. I have never made a "slice-and-bake" cookie dough before but having done it now I can see why it is so appealing; the preparation of the dough can be done well in advance and then frozen into logs. Then, once you're ready, you simply slice the log into cookies and bake. Best of all, you don't have to bake the whole log at once...you can decide to make as many or as few as you want at the given moment.

Although the cookies featured a chocolate and vanilla dough the taste of the chocolate was quite strong, therefore the cookies simply tasted like chocolate cookies. However the pinwheel design was quite intriguing and earned many "oohs" and "aahs" from those at the picnic. They were definitely a hit and enjoyed by young and old alike.

Chocolate Pinwheel Cookies
Makes approximately 100 palm-sized cookies.
  • 1¼ cups butter, slightly softened
  • 1¼ cups sugar
  • 1 egg
  • 1 tsp vanilla extract
  • 3 cups flour
  • ½ tsp salt
  • ¼ tsp baking soda
  • 2 tbsp strong coffee, cooled
  • 4 tbsp unsweetened cocoa powder
  • 4 oz (112 g) bittersweet chocolate, melted and still warm
  1. In a large bowl cream the butter for 2 minutes until smooth.
  2. Mix in the sugar and beat for an additional 2 minutes.
  3. Add the egg and vanilla and beat until well combined.
  4. Sift in the flour, salt, and baking soda and mix until just combined.
  5. Remove 2 cups of the dough and set aside.
  6. Add the cooled coffee and cocoa powder to the remaining dough.
  7. Mix in the melted chocolate until well combined.
  8. Divide each dough into three equal pieces, so as to have 3 chocolate and 3 vanilla.
  9. Shape each piece into a 5×5 square on wax or parchment paper, top with another piece of wax or parchment, and the roll each square into a 7×7 square. (The dimensions don't have to be 100% accurate, just make sure to roll the dough out to be thin and approximately the same size). Refrigerate for 15 minutes.
  10. Take one vanilla square and one chocolate square and remove one piece of waxed paper from each. Align the two layers together evenly, one on top of the other, and gently press to seal both layers together.
  11. Take off top layer of wax paper and slowly start to curl edge of the dough up and over using the bottom waxed paper for help, not rolling it into the cookies.
  12. Roll the dough into a tight spiral roll, pinwheel, avoiding spaces in-between.
  13. Once formed, gently but firmly roll back and forth to compact the roll and make it about 9 inches long, 1½" thick. Cover in plastic wrap, twisting ends to seal it closed. Repeat with remaining layers.
  14. Refrigerate for 3 hours before using or freeze for up to two months.
  15. Once ready to bake slice the cookie log into ¼" thick cookie slices and lay out onto a parchment-lined cookie sheet. The cookies won't spread too much so don't worry about spacing them too far apart.
  16. Bake for 12-14 minutes at 350 degrees Fahrenheit and transfer warm cookies to wire rack to cool.

Sunday, June 23, 2013

Lahmacun


I originally intended on trying this recipe two months ago but several things got in the way and I didn't have a chance to get around to it until last week. This recipe is for a Turkish flatbread called Lahmacun, which is kind of similar to a thin crust pizza except for the fact that it features a lot of meat and no cheese. The idea is to create a vegetable/spice mixture that is added to ground meat and spread in a thin layer over some dough.

The recipe I found was quite simple and claimed that the flatbreads could be baked in a matter of minutes on the grill or a flat-top. When my mom and I tried to bake the first one on the flat-top it created a big mess and we couldn't figure out how to make the top bake through, so for the rest we switched to the oven.

It was definitely time consuming not because it was difficult, but rather because we didn't have enough room in the oven to bake more than two at a time, therefore extending the baking into an hour long process. However I think the finished product was worth it in the end. The lahmacun had a pleasant meaty/tomato flavor and we topped it with some hot sauce and tzatziki for an extra spice and creaminess. I think in the future I might add some red chili flakes and possibly chili powder to the spice mix just to give it some extra heat.

The lahmacun was also convenient to have on hand the next day and simply reheat in the oven, especially when my brother came home super hungry (his usual state) looking for something to eat. Of course being the meat and cheese lover that he is, he added slices of sausage and sprinkled cheese on top. By that point it turned into a thin crust meat lover's pizza, which I guess suited him just fine.

Lahmacun

For the dough:
  • 5 cups flour
  • 1½ cup of milk
  • ¼ cup vegetable oil
  • 3 tsp salt
  • 1 tsp sugar
  • 1 package insant yeast (10 grams)
  1. Combine all the ingredients for the dough in a bowl or stand-mixer. 
  2. Kneed or mix the dough for about five minutes until it comes together. (My dough was a little dry at first and I had to add a little extra water).
  3. Cover the dough loosely with a towel and set aside for at least two hours in a warm place for it to rise.
For the meat: 
  • 1 lb ground beef
  • 1 red bell pepper
  • 2 large tomatoes
  • 1 large onion
  • 1 tbsp tomato paste
  • 2 tsp paprika
  • 1½ tsp cumin
  • 1½ tsp ground black pepper
  • 2 tsp salt
  • ¼-½ bunch Italian flat-leaf parsley
  • ¼ cup olive oil
  1. Combine the bell pepper, tomatoes, onion, and parsley in a food processor and mix until completely well mixed.
  2. Add the vegetable mixture, along with the spices, tomato paste, and olive oil, to the ground beef. Use your hands to mix thoroughly.
To assemble:
  1. Depending on how many you want and the size, tear a large chunk (about the size of a tennis ball) from the dough. 
  2. Keep the remaining dough covered while rolling out the torn chunk as thin as possible (about two millimeters thick).
  3. Top the rolled dough with a thin layer of the meat mixture, spreading it evenly over the entire surface.
  4. Bake the lahmacun for 5-10 minutes (depending on the size and thinness of the dough) at 425 degrees Fahrenheit. Repeat with the remaining dough and meat.
Note: Based on my experience of tennis ball-sized chunks, we made six lahmacuns which turned out to be approximately the same size as a large serving plate. Obviously the number and size will vary depending on how big the torn off dough is. Also, we realized they tasted best when they were hot out of the oven, so don't be afraid to dig in to the first one while making the rest.