Sunday, June 30, 2013

Jalapeno Pepper Poppers


I made these little peppers on a spur last week when I saw pictures one night browsing my favorite food website tastespotting.com. In truth I didn't actually use jalapeno peppers to make them because my mom couldn't find any at the grocery store so she bought mini hot peppers instead.

I made sure to use gloves when handling the peppers so that no residue would be left behind on my skin, something I learned from past experience. I wasn't sure exactly how spicy the peppers would turn out but once they were baked they were actually just barely spicy. In fact, coupled with the cheesy filling I would say they weren't spicy at all, but then again I like things extra spicy so my palette is stronger than most.

Looking back I'm glad I made the peppers because it was fast and a fun appetizer, however I was disappointed that they flattened out once they were baked. I think that in the future I will leave the peppers whole and stuff the filling inside then apply an egg wash and crumb coating to the outside. Also I'll use real jalapenos and see if they turn out spicier.

On a separate note, one of my friends just made me aware that Google reader is officially dead and people can no longer subscribe to follow your blog through it. However, she pointed out that there is a great service called Bloglovin which has the same function. I checked it out and I realized that it's kind of like Pinterest but just for blogs. Although I have a Pinterest (but never really use it) I think I will try out this Bloglovin and see if there are more food blogs out there that catch my eye, besides my favorite Annie's Eats. I have put my blog up there as well so it can be followed by clicking here. I hope my readers will continue to enjoy my blog and maybe this way more can follow too.

Jalapeno Pepper Poppers
Note: I didn't exactly measure quantities that I used so the recipe below is approximate. Also I have updated it to include whole peppers rather than halves and a different method of finishing them. In addition, I would recommend wearing gloves while handling the peppers.
  • 5-6 jalapeno peppers
  • 2-3 cloves garlic, minced
  • 2 heaping spoonfuls cream cheese
  • 1 heaping spoonful sour cream
  • ¼-½ cup shredded cheese
  • ¼-½ tsp ground cumin
  • ¼-½ tsp paprika
  • 1 egg, lightly beaten
  • 1 cup panko bread crumbs
  • ¼ cup grated Parmesan cheese
  • Salt and pepper 
  1. Wash the peppers and remove the stems and seeds, keeping the bodies intact. Set aside.
  2. Combine the cream cheese, sour cream, shredded cheese, garlic, cumin, and paprika. Taste and adjust the seasonings to your own preference. Add salt and pepper.
  3. Fill each pepper with the filling mixture, leaving a little bit of room at the top as the cheese will melt and expand in the oven.
  4. Combine the panko bread crumbs and Parmesan cheese in a shallow bowl. Put the beaten egg in another shallow bowl alongside the crumbs.
  5. One at a time, dip each pepper first into the egg and then into the panko crumbs, making sure to evenly coat the entire pepper. Place the pepper onto a greased or parchment-lined baking pan and repeat with the remainder.
  6. Bake for 20 minutes at 350 degrees Fahrenheit or until the cheese filling starts to bubble and the crumbs become golden. If the cheese starts to bubble before the twenty minutes, switch to the broiler and broil for 2-3 minutes just to make the crumbs golden.

Monday, June 24, 2013

Chocolate Pinwheel Cookies


For the past four years there has been established a much loved tradition in our Russian community of celebrating Father's Day with a giant picnic. Due to scheduling conflicts with the main organizer, this year's picnic was actually postponed and we all celebrated Father's Day one week later. The picnic has a lovely way of bringing together many of the smaller groups into one large gathering and everyone looks forward to it every year.

The picnic is held in a rather potluck style, with each family bringing what they can. There is usually a vast array of salads, meats, fruits, and dessert. Basically it's one big food fest with occasional drinking, singing along to guitar songs, soccer games, card playing, and general merriment.

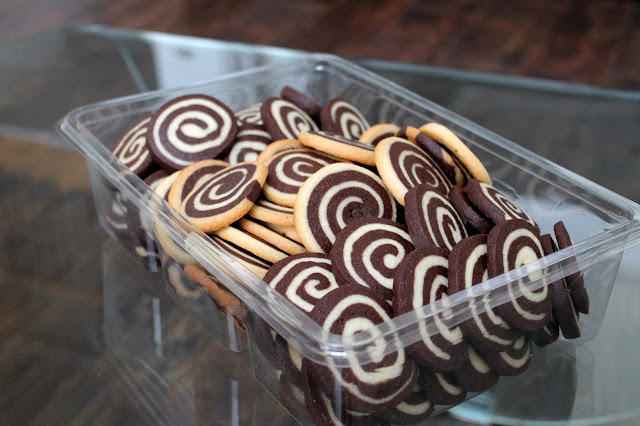
When I came across this recipe last week I thought it would be fun to bring to the picnic since these cookies look very visually appealing. Granted rolling the dough out was a little time consuming since it had to be done six times (three for each flavor) but once that was out of the way the rest was a breeze.

I split the task into two days, making the dough and shaping it into logs the night before the picnic and then slicing and baking the cookies the next morning. I have never made a "slice-and-bake" cookie dough before but having done it now I can see why it is so appealing; the preparation of the dough can be done well in advance and then frozen into logs. Then, once you're ready, you simply slice the log into cookies and bake. Best of all, you don't have to bake the whole log at once...you can decide to make as many or as few as you want at the given moment.

Although the cookies featured a chocolate and vanilla dough the taste of the chocolate was quite strong, therefore the cookies simply tasted like chocolate cookies. However the pinwheel design was quite intriguing and earned many "oohs" and "aahs" from those at the picnic. They were definitely a hit and enjoyed by young and old alike.

Chocolate Pinwheel Cookies
Makes approximately 100 palm-sized cookies.
  • 1¼ cups butter, slightly softened
  • 1¼ cups sugar
  • 1 egg
  • 1 tsp vanilla extract
  • 3 cups flour
  • ½ tsp salt
  • ¼ tsp baking soda
  • 2 tbsp strong coffee, cooled
  • 4 tbsp unsweetened cocoa powder
  • 4 oz (112 g) bittersweet chocolate, melted and still warm
  1. In a large bowl cream the butter for 2 minutes until smooth.
  2. Mix in the sugar and beat for an additional 2 minutes.
  3. Add the egg and vanilla and beat until well combined.
  4. Sift in the flour, salt, and baking soda and mix until just combined.
  5. Remove 2 cups of the dough and set aside.
  6. Add the cooled coffee and cocoa powder to the remaining dough.
  7. Mix in the melted chocolate until well combined.
  8. Divide each dough into three equal pieces, so as to have 3 chocolate and 3 vanilla.
  9. Shape each piece into a 5×5 square on wax or parchment paper, top with another piece of wax or parchment, and the roll each square into a 7×7 square. (The dimensions don't have to be 100% accurate, just make sure to roll the dough out to be thin and approximately the same size). Refrigerate for 15 minutes.
  10. Take one vanilla square and one chocolate square and remove one piece of waxed paper from each. Align the two layers together evenly, one on top of the other, and gently press to seal both layers together.
  11. Take off top layer of wax paper and slowly start to curl edge of the dough up and over using the bottom waxed paper for help, not rolling it into the cookies.
  12. Roll the dough into a tight spiral roll, pinwheel, avoiding spaces in-between.
  13. Once formed, gently but firmly roll back and forth to compact the roll and make it about 9 inches long, 1½" thick. Cover in plastic wrap, twisting ends to seal it closed. Repeat with remaining layers.
  14. Refrigerate for 3 hours before using or freeze for up to two months.
  15. Once ready to bake slice the cookie log into ¼" thick cookie slices and lay out onto a parchment-lined cookie sheet. The cookies won't spread too much so don't worry about spacing them too far apart.
  16. Bake for 12-14 minutes at 350 degrees Fahrenheit and transfer warm cookies to wire rack to cool.

Sunday, June 23, 2013

Lahmacun


I originally intended on trying this recipe two months ago but several things got in the way and I didn't have a chance to get around to it until last week. This recipe is for a Turkish flatbread called Lahmacun, which is kind of similar to a thin crust pizza except for the fact that it features a lot of meat and no cheese. The idea is to create a vegetable/spice mixture that is added to ground meat and spread in a thin layer over some dough.

The recipe I found was quite simple and claimed that the flatbreads could be baked in a matter of minutes on the grill or a flat-top. When my mom and I tried to bake the first one on the flat-top it created a big mess and we couldn't figure out how to make the top bake through, so for the rest we switched to the oven.

It was definitely time consuming not because it was difficult, but rather because we didn't have enough room in the oven to bake more than two at a time, therefore extending the baking into an hour long process. However I think the finished product was worth it in the end. The lahmacun had a pleasant meaty/tomato flavor and we topped it with some hot sauce and tzatziki for an extra spice and creaminess. I think in the future I might add some red chili flakes and possibly chili powder to the spice mix just to give it some extra heat.

The lahmacun was also convenient to have on hand the next day and simply reheat in the oven, especially when my brother came home super hungry (his usual state) looking for something to eat. Of course being the meat and cheese lover that he is, he added slices of sausage and sprinkled cheese on top. By that point it turned into a thin crust meat lover's pizza, which I guess suited him just fine.

Lahmacun

For the dough:
  • 5 cups flour
  • 1½ cup of milk
  • ¼ cup vegetable oil
  • 3 tsp salt
  • 1 tsp sugar
  • 1 package insant yeast (10 grams)
  1. Combine all the ingredients for the dough in a bowl or stand-mixer. 
  2. Kneed or mix the dough for about five minutes until it comes together. (My dough was a little dry at first and I had to add a little extra water).
  3. Cover the dough loosely with a towel and set aside for at least two hours in a warm place for it to rise.
For the meat: 
  • 1 lb ground beef
  • 1 red bell pepper
  • 2 large tomatoes
  • 1 large onion
  • 1 tbsp tomato paste
  • 2 tsp paprika
  • 1½ tsp cumin
  • 1½ tsp ground black pepper
  • 2 tsp salt
  • ¼-½ bunch Italian flat-leaf parsley
  • ¼ cup olive oil
  1. Combine the bell pepper, tomatoes, onion, and parsley in a food processor and mix until completely well mixed.
  2. Add the vegetable mixture, along with the spices, tomato paste, and olive oil, to the ground beef. Use your hands to mix thoroughly.
To assemble:
  1. Depending on how many you want and the size, tear a large chunk (about the size of a tennis ball) from the dough. 
  2. Keep the remaining dough covered while rolling out the torn chunk as thin as possible (about two millimeters thick).
  3. Top the rolled dough with a thin layer of the meat mixture, spreading it evenly over the entire surface.
  4. Bake the lahmacun for 5-10 minutes (depending on the size and thinness of the dough) at 425 degrees Fahrenheit. Repeat with the remaining dough and meat.
Note: Based on my experience of tennis ball-sized chunks, we made six lahmacuns which turned out to be approximately the same size as a large serving plate. Obviously the number and size will vary depending on how big the torn off dough is. Also, we realized they tasted best when they were hot out of the oven, so don't be afraid to dig in to the first one while making the rest.

Friday, June 21, 2013

Watermelon Feta and Olive Salad


I can't believe it has been a month since I last posted any recipes! Truly this past month has been fairly crazy and the next few weeks aren't going to be any easier with many birthdays coming up. Despite the numerous celebrations, most of the parties are being catered and therefore do not require my cooking/baking efforts. As a result I won't have my usual slew of occasions to try new cake recipes but I'm sure I will make other things to satisfy my recipe cravings.

This salad came together more out of curiosity than anything else as I have often watched shows on Food Network featuring the combination of watermelon and feta cheese. Also my brother recently mentioned that he read somewhere that sprinkling a little bit of salt on watermelon actually makes it sweeter. I thought that a nice summertime salad combining sweet watermelon and salty feta cheese would be just right for lunch. Since I like olives I decided to throw some in as well and dressed the salad with some fresh squeezed lime juice, a little salt, and olive oil. Overall it was simple and fresh and surprisingly not too sweet.

Watermelon Feta and Olive Salad
  • 2 limes, juiced
  • ¼ red onion, thinly sliced
  • ¼ large watermelon, cut into chunks
  • ½ can pitted black olives, sliced
  • ¼ bunch fresh Italian flat leaf parsley
  • 150 grams feta cheese
  • Olive oil
  • Salt
  1. Combine the lime juice and sliced red onion in a small bowl and set aside for 5-10 minutes to allow the juice to soak through the onion.
  2. Roughly cut the watermelon into chunks and combine with the sliced olives and crumbled feta cheese.
  3. Tear off the parsley leaves from the stalks and add to the salad along with the sliced onion and lime juice.
  4. Add a drizzle of olive oil and sprinkle with a little salt (not too much as the olives and feta cheese are already salty). Gently mix so that all of the ingredients are incorporated.

Monday, June 17, 2013

Happy Third Birthday Blog

Has it been three years already? Wow...I can't believe it. Looking back over my blog I realized that I'm actually one day late in celebrating the anniversary of my first post but then again there has been a lot of commotion in my life recently and I'm surprised I even remembered.

Just last month I graduated from university and finished my nursing program. I also took my licensing exam a couple of weeks ago and will be starting work as a registered nurse next month. I'm still struggling to understand how to fit into the "real world" now that I am no longer a student...though my mom likes to remind me that my studies are not over yet. However for the time being I am learning how to adjust to this new chapter in my life and awaiting the adventures and opportunities I have yet to discover.

It goes without saying that I have continued to love and discover new foods over the past year. Last year I wrote about how food could be used as a connection between people: to bridge gaps between new acquaintances or recreate distant memories. I still very much believe that is true and my food experiences have only served to strengthen my convictions.

Whereas my blog used to be a novelty form of entertainment, used as a form of escaping from everyday stress, now it is a well-engrained part of me. I don't use the blog or cooking as an escape so much as an outlet for my creativity. I used to have a goal of posting at least four recipes a month and, unfortunately, for the first time in three years I missed my goal last month. But you know what...I survived and so did my blog.

I think that this year taught me that setting goals is good, but knowing and understanding that things don't always go according to plan is important. The key is to learn how to adapt and accept new things and ideas. In a way cooking is a great way to do so because it teaches you to think on your feet and allows you to come up with new and exciting combinations using all sorts of ingredients. I may not be the most adventurous person in the world...but when it comes to the kitchen I am definitely more fearless than I used to be and I love it!