Thursday, July 26, 2012

Cheesecake Filled Strawberries


Over the weekend I had the pleasure of attending a baby shower for my aunt's cousin who is about to have a baby girl. Ever since I found out she was pregnant with a girl I immediately knew I wanted to prepare some sort of pink dessert for the baby shower. After making macarons for my friend's birthday back in April I thought it would be cute to make them again for the shower, only this time use food coloring and have them be pink.

Unfortunately my macaron shells did not turn out correctly and I didn't have enough time to make another batch. Although they tasted fine they were not visually appealing and I felt wrong bringing them to the event. Instead I brought strawberries which were filled with a cheesecake-like filling. I think the macaron slip-up ended up being a blessing in disguise because the strawberry dessert took very little effort to create and was a big hit with the crowd.

I didn't quite know how much filling would go into each strawberry and afterward I was left with quite a bit so my mom and I decided to pipe it onto little mini-meringues that she had baked as well. The meringues with the filling were also well received and withstood the warmer temperature, unlike the typical whipped cream my mom usually uses.

Overall the baby shower was a success and everyone enjoyed both the food and the games. The next day I got a call from the mom-to-be thanking me for bringing the strawberries and leading some of the games. It was definitely fun and now I can't wait until the new baby is born and we all get to meet her!

Cheesecake Stuffed Strawberries
Note: I had a lot of filling left over, even with four pounds of strawberries. Therefore, the recipe below reflects half of the amount I had initially made.
  • 4 lbs fresh strawberries
  • 16 oz (2 cups) cream cheese, room temperature
  • 6 tbsp powdered sugar
  • Optional: A few drops red food coloring (to make pink)
  1. Wash all of the strawberries and pat dry. Carefully cut the tops off and hull out the insides, making sure to leave about 1/4" on all sides.
  2. Beat the powdered sugar with the softened cream cheese. If you don't want the filling to be too sweet, start with four tablespoons of powdered sugar and add more if necessary.
  3. If you want to add color to the filling start with 2-3 drops and continue to beat the cream cheese until no streaks remain. Add more if desired.
  4. Transfer the filling to a piping bag or plastic ziploc bag with the tip cut off. Carefully pipe the filling into each strawberry until the filling is even with the top. Lay out on a platter and refrigerate until ready to serve.

Sunday, July 22, 2012

Guest Post: Puffy Omelet


I am doing something totally new...I am featuring a guest post on my blog. This idea has actually come up a few times in conversation since I first started the blog two years ago. However due to one reason or another it never came to fruition until now. My brother surprised the family this morning by making his famous "puffy omelet" for breakfast. I won't go into detail describing it since his post does so quite well, however I will say that it was a great feeling to wake up and have such a lovely breakfast awaiting me downstairs. I am extremely proud of my brother for both the omelet and his post that he wrote to accompany it. I can honestly say I did not have to change the content whatsoever and only minor editing (in the form of name removal) had to be done. So without further ado...I give the stage over to my brother.


Hi. You may have heard of me in previous posts referenced as “my brother”, reviewing food (almost always something along the lines of “nom nom nom”). I am one of my sister’s most avid fans; I help her decide on which food pictures to use, and I like to refer to myself as the Chief Taste Tester here at the Food for Thought blog. Whenever she makes something, I’m always the one to ask, “Is it food bloggable?” And sometimes, I make requests that end up here on the blog, like the potato skins (which turned out very well to no one’s surprise). My sister’s passion for cooking has arguably benefited me more than her, which is just fine for me! And seeing her rule over our kitchen, along with all the cooking shows we watch, sometimes I want to get in on the action and take a turn as the “Masterchef”! 

I take a foods class at my high school during the year, and I like to keep some of my favorite recipes from the class. Last year, we made a beautiful puffy omelet and I loved it. That same weekend, I made the omelet for my family for breakfast, and I don’t know what it was about the omelet, but it became an instant classic. I made the puffy omelet every so often, and it built up its reputation in our family. Sometimes, relatives would visit just to try this “famous” breakfast dish. I had always talked about making a guest post on the Food for Thought blog, but never got around to doing it. This weekend, I surprised my family once again with the puffy omelet for breakfast, and it turned out really well, so I couldn’t pass up the chance to finally make an appearance on the blog!

The omelet itself is pretty simple. You separate 4-6 eggs, beat both the whites and yolks until foamy, combine them, cook the bottom in a pan, and then finish the omelet in the oven. The filling can be whatever you like, but the traditional “Denver filling” includes sautéed onions, bell peppers and some deli meat. I hope to make more guest posts in the future and I hope you enjoy this puffy omelet recipe.

Puffy Omelet
Note: Suggested fillings included sauteed onions and bell peppers along with sausage or deli meat.
  • 4-6 large eggs
  • 50 mL water
  • Pinch of cream of tarter (can substitute with a bit of lemon juice)
  • Salt and Pepper to taste
  • 1/2 shredded cheese 
  1. Separate the yolks and whites of the eggs into two bowls. Add the water to the yolks, and season them to taste. 
  2. For the whites, add a pinch of cream of tartar, or a few drops of lemon juice. (This is to help stabilize the egg whites, and believe me it does make a difference in the finished product.
  3. Beat the whites to the stiff peak stage. Separately, beat the yolks for 1-2 minutes until they are foamy. Then, gently fold the yolks into the whites. 
  4. Spread the egg mixture into a large (oven safe) pan, and on a medium-low heat, cook until the bottom of the omelet is set. This should take around 3-4 minutes. 
  5. Once the bottom has cooked, put the pan into an oven at 350 degrees Fahrenheit. Bake for about 4-5 minutes until the top is spongy and springs back when touched. 
  6. After the omelet is cooked, take it out, and turn off the oven. Make a crease just a bit off center through the whole omelet. Place the filling onto the smaller half of the omelet.
  7. Using a large spatula, lift the larger half of the omelet, and fold it over the smaller half. (This takes a bit of practice so as not to tear the omelet.) 
  8. Pour the shredded cheese on top of the omelet, and put the omelet back into the turned off oven just to melt the cheese. 
  9. After the cheese is melted, take the omelet out, and voila! Your very own puffy omelet! Enjoy! 

Wednesday, July 18, 2012

Spicy Mac and Cheese


For the past month my friends and I have been trying to organize a game night involving dinner, board games, and some good company. Finally this week we were able to find a date that worked for the majority and had our long awaited night of fun. My contribution to the game night was a baked macaroni and cheese dish, per the request of one of my friends. I had always wanted to try making homemade mac and cheese, not just the boxed kind, and this provided a great opportunity.

Once I realized what I would be making I asked the group if they wanted it prepared classically or with some sort of a twist. Two friends replied that they would like it spicy so I went with the spicy theme and bought jalapeno pepper jack and Monterey jack cheese. I had been intending to also use cheddar cheese but once I got to the store I found that the jalapeno cheese only came in one size and it was quite large so in the interest of saving money I used more of that cheese and took out the cheddar.

Needless to say my cheese substitution definitely had an effect...the mac and cheese turned out quite spicy. The two friends who had asked for the spiciness loved it, as did I and one more friend, but two of my friends found it too spicy. The friend who had originally requested the dish said that she liked the overall creaminess and texture but had a hard time eating it because of the spice. It also didn't help matters that we were eating dinner on a hot day and the air conditioning in my friend's apartment was not too strong.

At the end of the day the dish was still well received by the majority and my friends were all thankful that I had made it. I brought the leftovers home and continued to enjoy them along with my family who also tend to like spicy foods. Though I probably won't be making it again soon since I don't eat mac and cheese often I'm glad to have at least tried it.

Spicy Mac and Cheese
Note: The spice level can be reduced by leaving out the cayenne pepper and using milder cheeses.
  • 4 cups pasta shapes
  • 1/3 cup onion, finely chopped (one small one should suffice)
  • 1/3 cup bell pepper, finely chopped (one large one should suffice)
  • 6 1/2 tbsp butter
  • 4 tbsp flour
  • 2 1/2 cups milk
  • 1/4 tsp cayenne pepper
  • 1/4 tsp onion powder
  • 1/4 tsp garlic powder
  • 1/2 tsp salt
  • 1/3 tsp ground black pepper
  • 8 oz (224 g) jalapeno pepper jack cheese, shredded
  • 8 oz (224 g) Monterey jack cheese, shredded
  • 1/2 cup Panko bread crumbs
  1. Bring a large pot of salted water to boil and cook the pasta according to the package instructions until al dente. Drain and set aside.
  2. Meanwhile, melt a half tablespoon of butter in a small skillet over medium-high heat. Saute the onion and bell pepper until soft and fragrant, about 5-7 minutes. Remove from the heat and set aside.
  3. Melt four tablespoons of butter in a medium saucepan over medium-high heat. Once completely melted whisk in the flour and continue to cook for about two minutes or until it becomes golden and lightly foamy.
  4. Whisk in the milk until well blended and continue to cook for another five minutes or until it starts to bubble and thicken.
  5. Reduce the heat to medium and whisk in the spices. Add the cheese and whisk until it is completely melted and incorporated. 
  6. Return the drained pasta to the pot and stir in the cooked onion and pepper as well as the cheese sauce.
  7. Pour the pasta into a greased two quart casserole dish. Melt the remaining two tablespoons of butter and toss with the bread crumbs. Sprinkle the mixture over top of the pasta and bake at 375 degrees Fahrenheit for 20-25 minutes, or until the bread crumbs turn golden brown. Let the dish stand on the counter for 5-10 minutes to cool before serving.

Tuesday, July 17, 2012

Gluten Free Almond Cookies


After much talk and anticipation I finally went over to Victoria on Vancouver Island this past weekend to see where one of my good friends grew up. It was a great weekend spent at her parent's condo and touring the city. Even though I had been to Victoria before the last time was for a school field trip ten years ago so I really didn't remember too much. My friend took me out on her boat on Saturday and then showed me downtown Victoria on Sunday. I even tried water skiing...though I was not very successful.

As soon as I found out we were going to be staying with my friend's parents I immediately knew that I wanted to bake something and bring it over as a sign of my appreciation for their hospitality. My friend's father has celiac disease, meaning he cannot eat foods containing gluten. Unfortunately that also means that he cannot eat anything that contains wheat, such as pasta, bread, and cookies. There are of course special flours that can be used, such as rice or amaranth flour, but since I don't own any and didn't want to specially purchase it I decided to stick with ingredients already in my pantry. Nut flours are relatively easy to make and use and therefore I focused on recipes calling for nut flours using almonds or walnuts.

I actually found several recipes for gluten-free almond cookies, some even with chocolate or peanut butter, but I decided to pick this one because I needed cookies that could withstand a hot day in my car prior to the trip over to the island. I'm glad to say these cookies did not disappoint; they held up to the heat and transported well and retained a nice softness and moisture. My friend's family thoroughly enjoyed the cookies and her dad ate several during the weekend. In fact her mother even asked me for the recipe which made me feel quite happy. I promised her that I would write a post about the cookies and past it on. Overall I had a great weekend and I'm so glad to have been welcomed in such a friendly manner. Hopefully I will visit again and maybe next time I'll be able to get up on the water skis!

Gluten Free Almond Cookies
Makes about 25 small cookies.
  • 2 cups ground almonds
  • 3/4 cup powdered sugar
  • 1 egg white
  • 1/4 tsp almond extract
  • Whole almonds (for decorating)
  1. Combine the ground almonds and powdered sugar and set aside.
  2. In a medium-sized bowl whip the egg white and almond extract until frothy and starts to form soft peaks. Do not beat into stiff peaks.
  3. Gradually beat the egg mixture into the nut/sugar mix until a stiff paste forms.
  4. Roll into balls about 2" in size and place about an inch apart on baking sheet lined with parchment paper. Flatten the cookies slightly and press a whole almond into the center of each cookie.
  5. Bake for 11-13 minutes at 350 degrees Fahrenheit or until the bottoms become golden. They will still look pale but do not over bake otherwise they will not stay soft. Remove from the oven and allow the cookies to cool on the baking pan and become firm before transferring to a plate.

Friday, July 6, 2012

Triple Berry Cheesecake Ice Cream


This ice cream is bad...it's bad because it tastes sooooo good. A little part of me actually wishes that I hadn't made this ice cream because now that I know how easy and delicious it was I have a feeling it will be making a repeat appearance, something my hips definitely won't agree with. But honestly I couldn't help myself...I constantly see recipes for ice cream on tastespotting.com and am always tempted by them but can never try them out because they all require an ice cream maker. Then one day I stumbled upon a recipe for a no-churn blueberry cheesecake ice cream. Like with many others, I saved the recipe on my computer to eventually try out.

Well the perfect opportunity presented itself last week after a trip to the States including a visit to Costco. Unlike the heavy cream here, capping out at 33% milk fat, the cream my mom bought in Bellingham was a whopping 40%. Pouring the cream was not like pouring any regular liquid; I literally was scooping the cream out of the measuring cup. Knowing how fatty this cream was I figured it would make an extra creamy ice cream.

My assumptions were totally true and the ice cream ended up very rich and indulgent. The cream cheese mixed in also helped to create an amazing flavor. The ice cream truly melted in my mouth and I found myself licking the bowl way too soon. I think that for the sake of my own sanity I should probably wait a little before I make another batch, as well as increase my gym outings.

Triple Berry Cheesecake Ice Cream
  • 1  1/2 cups berries (raspberries, blueberries, blackberries, etc), fresh or frozen
  • 1/4 cup sugar
  • 1 tsp corn starch
  • 6 oz (3/4 cup) cream cheese, room temperature
  • 1/2 cup brown sugar
  • 2 cups heavy cream, cold
  • 1 tsp vanilla
  1. In a small saucepan combine the berries and sugar and cook over medium heat until berries start to break down and release their juices. 
  2. Add the cornstarch and continue to cook for 1-2 minutes so that the mixture may thicken. Remove from the heat and put the berries in the freezer so that the mixture may cool down.
  3. Meanwhile beat the cream cheese with the brown sugar until smooth. Add 1/2 cup of the cream and whip until the cream cheese mixture is evenly incorporated.
  4. Add the remaining cream and vanilla and whip until stiff peaks form.
  5. Spread half of the whipped cream into a seal-able container. Top with half of the berry mixture. Spread the remaining whipped cream and top with the rest of the berry mixture. Use a knife to swirl the ice cream and seal the container. Freeze for at least six hours, though preferably longer, before serving.

Wednesday, July 4, 2012

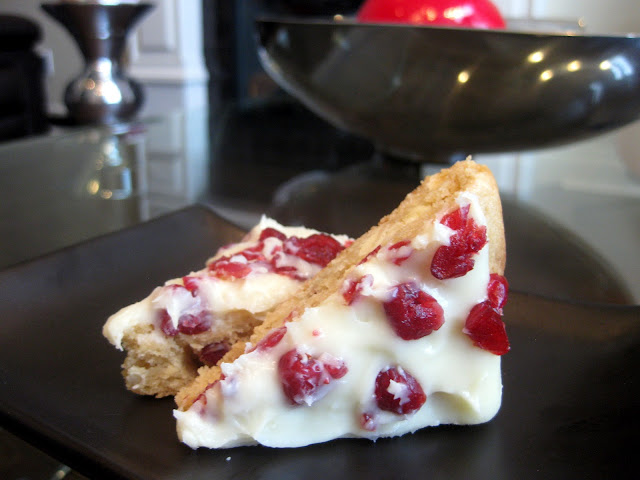
Cranberry Bliss Bar


Now I know that it's summertime right now, or at least it should be according to the calendar, but I couldn't resist making this holiday treat. Every year during the holiday season Starbucks brings out some specialty drinks and goodies including the "oh-so-famous" cranberry bliss bar. I have to admit that I have never actually tried the Starbucks version however one of my friends, a fellow baker, has made it a couple of times and every time it's like heaven. The combination of the delicate blondie laced with cranberries and white chocolate then smothered with a cream cheese and white chocolate frosting is absolutely to die for.

After eating my friend's version countless times I asked her for the recipe and she graciously emailed it to me. Granted she actually provided me with the recipe over a month ago but the occasion to bake it had not come up until last night. I had a meeting to go to early this morning and I thought it would be a fun treat to bring along and for everyone to start their day off right. Technically that also meant a huge sugar high in the morning but indulgences are always fun once in a while.

The only annoying part about making the little treats was the last step which involved drizzling melted white chocolate over the bars once they had been frosted. Honestly it was more work than it was worth considering that white chocolate was already in the base of the blondie and mixed into the frosting. Obviously it would have made the bars more aesthetically pleasing but I couldn't make my drizzle turn out right and gave up on it quickly, choosing to spread the remaining white chocolate with a knife instead.

When I brought the treats to the meeting everyone was pleasantly surprised and thanked me for baking them. I distributed the extras amongst my friends afterward and they all loved it too; one friend even said it was like it was made by angels. I also made sure to save a piece for my friend who provided me with the inspiration and the recipe in the first place. Now that I have finally made the bars and have the recipe I'll be sure to whip it out again come holiday time.

Cranberry Bliss Bar
Note: I excluded the part about drizzling the white chocolate over the finished bars but that can be added as a final step if desired using part of the melted chocolate.

For the blondie layer:
  • 3/4 cup (6 tbsp) unsalted butter, melted
  • 1 1/2 cups brown sugar, packed
  • 2 large eggs
  • 3/4 tsp vanilla 
  • 2 1/4 cups flour
  • 1 1/2 tsp baking powder
  • 1/4 tsp salt
  • 1/8 tsp cinnamon
  • 1/2 cup dried cranberries
  • 1 cup white chocolate, chopped (white chocolate chips works too)
For the frosting:
  • 1 8 oz package cream cheese, room temperature
  • 1 cup powdered sugar
  • 100 g white chocolate, melted
  • 1/2 cup dried cranberries, chopped
  1. In a large bowl sift together the flour, baking powder, salt, and cinnamon and set aside.
  2. Cream the butter and sugar until uniform.
  3. Beat in the eggs and vanilla.
  4. Slowly mix in the dry ingredients until evenly incorporated. Stir in the cranberries and white chocolate pieces.
  5. Spread the batter into a well greased 9" x 13" pan and bake at 350 degrees Fahrenheit for 18-21 minutes, or until a toothpick inserted into the center comes out clean.
  6. While waiting to cool, beat the cream cheese and powdered sugar until well blended. 
  7. Gradually add the melted white chocolate and continue to beat until incorporated.
  8. Once the blondie base has cooled completely spread the frosting over top. Sprinkle with the chopped dried cranberries. Cut into squares or triangles and store in the refrigerator until ready to serve.